Pages

6/30/11

Cinnamon Swirl Bread

The second baked item I entered at the county fair was Cinnamon Swirl Bread. The original inspiration came from allrecipes.com, but as I pretty much always do, I tinkered with the recipe a little bit. Most notably, I baked it as three mini loaves instead of one standard loaf. I also increased the cinnamon and sugar slightly. I make my version of the recipe all the time and everyone who has tried it loves it.

Here are the loaves on the cooling rack. Unfortunately, it was 100 degrees the day I baked for the fair and with the oven running all day, the AC couldn't keep up and our kitchen was HOT. The batter seemed OK, but once I baked it, the bread turned out differently than usual (and not in a good way). The tops raised a bit higher (and then fell) and the topping was more crackly. 


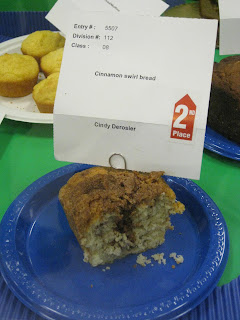
Despite those issues, it was still delicious. The judges must have liked it- another second place!


Cinnamon Swirl Bread


                                                     1 1/3 c. sugar                                         ½ tsp salt
                                                     2 1/2  tsp cinnamon                              1 egg
                                                     2 c. flour                                                  1 c. milk
                                                     1 T. baking powder                                1/3 c. oil

Grease and flour 3 mini loaf pans. Mix 1/3 c. sugar with cinnamon and set aside. In a large bowl, combine flour, baking powder, salt, and remaining 1 c. sugar. In a separate bowl, combine egg, milk and oil. Add to flour mixture and stir just until moistened. Pour half of the batter into pans. Sprinkle half the cinnamon sugar mixture on top. Repeat with remaining batter and cinnamon sugar. Draw a skewer through batter to marble. Bake at 350 degrees for approximately 50 minutes or until an inserted toothpick comes out clean. Cool in pan 10 minutes, then remove and cool on a wire rack. Wrap and store overnight before slicing.

6/29/11

Watermelon Cookies

A few months ago, I came across Amanda's Cookin' and her version of Watermelon Cookies.  I thought there were adorable and decided to use them as inspiration to make my own version.  The first thing that struck me is that her recipe used food color to achieve the red and green of the watermelon, but she didn't add any flavor.  I wanted to see if I could make a fruity version of the cookie to enter in the county fair.

I vaguely remembered reading a culinary mystery a few years ago where the heroine added Kool-Aid powder to her sugar cookies.  A quick google search revealed that it was in JoAnne Fluke's Apple Turnover MurderI decided to use one of my favorite sugar cookie recipes and experiment with adding Kool-Aid powder.

One problem- I hate artificial watermelon flavor.  I want nothing to do with watermelon Jelly Bellies, watermelon Jolly Ranchers, or the watermelon version of any other candy that I like.  So I bought some Cherry Kool-Aid powder.  I also bought Lemon-Lime, hoping it would be the right green for the 'rind' of the cookies.   

The first version of the cookies were absolutely adorable.


Our friends Karl and Gayle came over for lunch and I served my watermelon cookies.  I've known Karl for almost 20 years and Gayle for just a little less, so they are totally accustomed to acting as guinea pigs for my culinary experiments.  Most importantly, they know that honest feedback is important and that negative comments won't hurt my feelings at all.  Karl jumped right in with the comment that the green glaze was so sour it was almost inedible.  Steve and Trevor agreed, while Gayle and I kinda liked the extremely sour taste.  Maybe it was a male/female thing?  I brought some cookies to my parents and sister.  Nope- not a male/female thing, as they all thought they were unbearably sour.  Hmm.... time to tinker.

I made a second version of the cookies for Trevor's Zoo Party.  Watermelon cookies didn't fit the theme, but it was the best way to have 20 people give me feedback all at once.  I made the lemon-lime glaze much less sour and tinkered with the cherry a bit.  Everyone agreed they were adorable and that the glaze was good, but this time there were mixed reviews about the cherry cookie.  About half the people liked it, while the other half felt like it was a major disconnect to have something that looks like a watermelon taste so blatantly like cherry.

A quick search revealed that Kool-Aid doesn't make a watermelon version.  They used to make an "invisible" one (meaning no added color), but it's no longer made and wouldn't yield the color I wanted anyway.  I decided to try their Tropical Punch, thinking the blend of flavors might read 'watermelon' better than the cherry.  Here are the cookies just out of the oven:


I really liked the Tropical Punch flavor!  Here they are moments after I glazed them:


You have to submit 7 cookies to the fair, so I chose the best ones to turn in:


And here they are at the fair- second place!


Watermelon Cookies

Cookies:
        ½ tsp Tropical Punch Kool-Aid powder               ¼ tsp salt
        ¾ c sugar                                                        ½ tsp baking soda
        ½ c softened butter                                         1½ cups flour
        1 egg                                                               mini chocolate chips

White glaze:
         ½ c. powdered sugar                                       1 T milk

Green glaze:
        ½ c. powdered sugar                                        I T milk
        ¼ tsp lemon-line Kool-Aid powder

Thoroughly combine Tropical Punch Kool-Aid, sugar, and butter. Add egg and mix well. Add salt and baking soda. Add the flour in ½ c. increments, mixing after each addition. Roll out dough between sheets of plastic wrap to a thickness of approximately ¼ inch. Refrigerate dough for at least one hour.

Remove dough from plastic wrap. Use a biscuit cutter to cut circles from the dough, then use a knife to cut each circle in half. Transfer to an ungreased cookie sheet. Arrange mini chocolate chips on each semicircle so that they resemble watermelon seeds. Bake at 325 for 10-12 minutes. Let cool on baking sheets for 2 minutes, then remove to a wire rack.

While cookies are cooling, make white glaze by mixing powdered sugar with milk. Carefully drizzle glaze over the curved edge of the cookie, going in about ¼ inch from the edge. Let cookies sit on wire rack for 15 minutes or until the glaze sets.

Make the green glaze by combining powdered sugar, milk, and lemon-lime Kool-Aid powder. Carefully drizzle glaze over the curved edge of the cookie, covering about half of the white glaze. Let cookies sit on wire rack for 15 minutes or until the glaze sets.

Makes about 30 cookies.

6/28/11

My first experience with the Pinewood Derby

As I've mentioned before, I love county fairs and enter things every year.  However, since becoming a judge, I am ineligible to enter any of the categories that I judge, which means that I can't enter the very things I'm best at doing.  It's reasonable, of course, but it means I have to work harder to find categories to enter.

Every year I scour the entry guidebook to see if there is something interesting.  I don't let a silly thing like having no clue how to do make something stop me!  That's how I came to get one of these:


It's an official Cub Scout Pinewood Derby kit.  I've never been a Cub Scout, or made a Pinewood Derby car, or even seen a Pinewood Derby.  I've admired my nephew's cars at the fair over the past few years, but that's the total extent of my knowledge of Pinewood Derby cars.

I noticed that there was a new category at the fair- a men's and women's version of the Pinewood Derby.  A quick email confirmed that entrants did not need to be Cub Scout leaders... this was open to anyone.  I immediately signed myself and Steve up.

My dad is an extremely talented woodworker and has a huge shop full of fancy tools, most of which I know how to operate at a very rudimentary level.  Unfortunately, I did not have time to go to my parents' house before the car needed to be turned in, so I was limited to the few tools we have here.  I opted for the simplest design possible- a basic wedge, which required one straight cut.

I had great fun painting it.  Here's how it turned out:


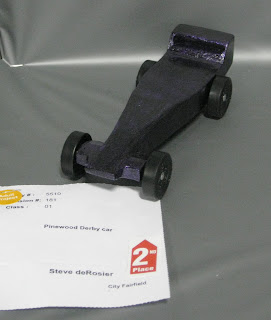
Steve went for a much more impressive design, using only the very basic tools we have here.  I can't believe he managed such complicated cuts without the proper tools!  Here's his car:


The cars are weighed, placed in the correct weight class (5 oz. or 6 oz.) and then judged on aerodynamic design, creativity, and decoration.  All this takes place well before the race.  We found the cars on display.  Steve got second place in the men's division!


 And I got second place in the women's division!


But wait... when I was uploading these pictures to the blog, I noticed a little something in the top left corner.  


There's a small, red JF.  Being a judge, I know what that means!  Judge's Favorite!  Each judge gets to select one or two favorites that really appealed to him/her for some reason, regardless of how they placed.  Usually, a Judge's Favorite goes to the first place winner, but not always.  Exciting!

The Pinewood Derby started with the mens' and boys' divisions.  Steve's car did very well in its early heats, coming in first or second every time.  Here's a blurry photo of his car zipping by in second place.


Unfortunately, as they got into the later heats, his car did worse and worse and was eventually eliminated.  But it was an excellent showing- the top third of a large field.

As you might imagine, the women's field was not very large... maybe 12 or so cars.  Here's the start of my first race.


I won!  It was so exciting!  I went on to win the next two races too.  Here's a blurry picture of my car zipping by during its third race.


Things soon went downhill (ha!) significantly.  My car was no longer zipping along.  It wobbled, was slower than before, and even jumped the track before being eliminated.  It's pretty clear that it was damaged, either in a race itself or when it was caught at the end of one of the races.  Oh well!  

I loved competing in the Pinewood Derby and definitely plan to do it again next year.  I love that I didn't let a little thing like having no clue what I was doing stop me. 

6/27/11

Circle Punches

I don't own a lot of punches.  They are bulky and hard to store, so I am extremely selective about the few that I have.  If a punch isn't a multi-tasker, there's no way I'm keeping it.  A friend once gave me a cow punch.  It was cute, but I can't imagine any situation in which I'd need a cow punch, let alone enough different ways to justify keeping it.

I have three circle punches.  One is 2.5", one is 1.5", and the last one is 1/2".  I use them often.  And just as often, I wish I had a 3", a 2" and a 1".  I'd definitely be willing to devote the storage space to those, especially since I'm no longer hanging onto things like the little (never)-used cow punch.

Technically, I have a few more circle punches.  My Crop-a-Dile punches 1/8" and 3/16".  My desktop 3-hole punch is 5/16" and my single hole-punch is 1/4".

Yesterday I shared two of the three cards I made from the scraps from my latest layout.  Today I'll show you the third. 


I used my 1/2" circle punch once and my 1/4" hole punch numerous times.  How many can you count? 


Answer: I used the 1/4" inch hole punch 26 times!  Now that is a versatile punch!

I love how easy it is to get such different looks from a single tool.  I'm sure I didn't even scratch the surface of how a single hole punch can be used on a card.

6/24/11

Using up Scraps

My all-time favorite paper crafting tip: When you finish a layout and there are scraps left, use them to make a quick card.  It makes perfect sense.  The supplies are already out and you know they work well together.

When I finished my 2011 layout, there were enough leftover scraps for three cards.  I cut the largest pieces into backgrounds, then filled in with the smaller scraps.

Here's the first card.  Super simple and extremely fast (except for Stickles and Glimmer Mist drying time!).


Here's the second one I made:


I'll share the third card on Monday!

6/23/11

Photographing 3-D Projects

As I mentioned yesterday, I am attempting to become a better photographer.  Slowly but surely I am making progress.  Something that has made a huge difference:


This is my light tent by CowboyStudio.  I love it.  I got it as a Christmas present (thanks Jonna!) and have used it almost daily ever since.  It folds up for easy storage, but since I use it so often I don't put it away.  It's huge and sometimes in the way, but it is so convenient to be able to throw something in the light tent and take a picture of it.  Shadows are almost non-existent, glare is significantly reduced, and the soft light looks great. 

When I first started taking pictures of the projects I make, I would just put them on the carpet, wait for the afternoon light, stand above them, and snap.  I cringe a bit when I see these photos- they certainly don't enhance my projects.  Here's one of the better ones:

Altered clips, before and after. 

It wasn't long before I realized that beige carpet is not the best background for my artwork.  I graduated to using a piece of white posterboard.  I would prop the posterboard up against a wall so it curved, wait for acceptable light, then set the object on it and snap away.  Much better.

Thank-you gifts for MOMS Club volunteers.

When I couldn't get decent light indoors, I'd head outdoors.  Sometimes I took my posterboard with me, while other times I just put my project in the grass.

The bag from my DIY Scavenger Hunt.

Both indoors and out, I really struggled with glare and shadows.  If I didn't take the picture during the right time, it looked terrible.  Unfortunately, it isn't always convenient to take pictures during one short time period each day.  Enter the light tent.  Now I can take pictures of my projects from dawn until dusk.

The photo tent comes with four backgrounds.  95% of the time I use the basic white:


A thank you card and gift bag for Trevor's preschool teacher.

The remaining 5% of the time I use black:


The other two backgrounds are blue and red, but I haven't used them at all. 

I still scan all my flat projects, but the light tent has revolutionized the way I photograph anything dimensional.  It's so easy and the results speak for themselves. 

6/22/11

"You keep a tripod in your purse?!"

I have a medium-sized purse and I carry a variety of normal Mom-things in it.  Plus one slightly unusual item: 


It's a GorillaPod by Joby.  Perhaps you've seen it?  It's a small, flexible tripod that can stand on or wrap around just about anything.  I LOVE it.

I've had my GorillaPod since 2009....  Valentine's Day, to be exact.  We were on a family cruise and I was very surprised to see that Steve had brought along a gift for me since we had limited packing space.  I was even more surprised when I opened it.  A tripod isn't exactly your typical Valentine's gift, but Steve isn't your typical husband.  He is so supportive of my scrapbooking and has been wonderful about helping me improve my photography.  (Before I met Steve, my skill level was Abysmal and I am proud to be approaching Mediocre now.  One day I aspire to be Adequate.)  Steve knew I'd love the GorillaPod and he was 100% correct.  I use it all the time.  It was the perfect gift.

Here's the first photo I took with my brand-new GorillaPod:

Valentine's Day 2009, on our balcony aboard the Golden Princess

It's not the best photo ever, but we're all in the photo and we didn't have to find someone else to take the photo.  Nor did I have to find a level surface at the perfect height to balance the camera.  The GorillaPod works on any surface, even things like a lampshade, handrail, or chair back. 

Each year, Steve and I celebrate our anniversary in a different local hotel.  For the past three years, we've used the GorillaPod to take a photo of us together on our bed. 

Cindy and Steve, 7th Anniversary, Inn at Benicia Bay

I almost always have my GorillaPod with me.  It came to CHA with me in January.  A minute or so after Amanda and I met Julie for the first time, she suggested a group photo and looked around for someone to take it.  "No need!" I assured her.  I pulled out my GorillaPod and took a quick photo.  Julie asked with a laugh if I was always that prepared.  Answer: Yes!

Amanda, Cindy and Julie, representing Flamingo Scraps, CHA-Winter 2011

Every year my MOMS Club has a year-end banquet.  Usually we ask a waiter to take a group picture, but this year we did not have the best service and there was no waiter to be found at the end of the evening.  I stacked a few take-out boxes, then pulled the GorillaPod out of my purse.  "You keep a tripod in your purse?!" a friend asked.  Of course I do!  

 
MOMS Club of Fairfield W- Vacaville, 2011 Banquet

Steve, Trevor and I spent this past Father's Day Weekend in Bear Valley.  The place was deserted- the ski resort is closed, but there is still 4-6' feet of snow on the ground, so summer sports haven't really started yet.  Fortunately, I didn't need to find someone to take our picture.  I put the GorillaPod onto a crooked stump and got this shot.

June 18, 2011, Bear Valley

We went to Lake Alpine the next day and took another family photo.  This time, all I could find was a tree.  I twisted the GorillaPod to balance on a branch, set the timer, and ran like crazy (through the snow) to take this picture.  I like that you can see the tree in the foreground, though it's almost blocking Trevor.  And I'm standing on a snowdrift that you can't see (I'm actually quite a bit shorter than Steve).  Oh well- still a cool picture!

Father's Day 2011, Lake Alpine

 The GorillaPod has made a big difference in my scrapbooking, as it allows me to get photos I wouldn't otherwise have.  Mine is perfect for my Canon point-and-shoot, but Joby makes them for all sizes of cameras.  They also come in different colors.

Anyone else have a GorillaPod?  Do you love it as much as I do? 

6/21/11

My Secret Life as a Judge at the County Fair

I am a HUGE fan of county fairs. I started entering my arts & crafts and baked goods in our local fair when I was six years old (the minimum age for that county) and have been entering pretty much every year since. In addition to baked goods and arts & crafts, I've entered a bunch of other things over the years. 

Lemon Bread, Reserve Best of Show 2009, Solano County Fair

When I was a teenager, I worked at our county fair in the Exhibits Department. My job was to check in entries, act as a clerk when they were judged, display the items, then patrol during the fair to make sure everyone kept their grubby paws off the entries. I loved everything about the job except the endless patrolling. Honestly, what makes people think that it is OK for them to reach beyond barriers and fondle (or steal) something beautiful that belongs to someone else? And the people who would sneak a bite of cake off a display plate?! I always laughed when we found that someone had eaten one of the goodies, knowing that they'd been judged three weeks earlier and had been sitting out uncovered for all that time.

When I was 19, I worked at the California State Fair. My many responsibilities included assisting with judging, displaying items, and acting as an MC at various contests and competitions. Few who were there will forget me trying to MC a pig showmanship contest (the first I'd ever seen, and the first time I'd tried to pronounce the various breeds of pigs). Not my strongest showing.

Fast forward a decade or so. Because of my long history with the fair, I was asked to become a judge. How exciting- and what a responsibility! I felt confident in what I was doing, having clerked for judges so many times.   


This year, I judged a brand-new division at a county fair (that shall not be named). That new division- Paper Crafts! For years, Paper Crafts have been lumped in with other arts & crafts. Obviously, it can be hard to judge a category that includes a scrapbook layout, a painted gourd, and a beaded scarf- an apples to oranges situation if there ever was one. I helped develop the judging criteria:


With the popularity of scrapbooking and cardmaking, it's great that Paper Crafts has its own division. I had a lot of fun looking through all the entries, though the actual judging is quite agonizing. There are always so many wonderful things that are entered, making it tough to pick the winners. There are also many not-so-wonderful things entered. I strive to provide constructive comments on the judging form that will help them improve their craft.

Did any of you enter your layouts and cards in your local county fair? I'd love to hear about it!

6/20/11

Scrapping Stamper - June Sketch

Here is the June sketch from the Scrapping Stamper:

What a fun sketch!  Shannon mentioned that she designed this sketch with the summer sun or July fireworks in mind.  I had no summer pictures to scrap, nor did I have three photos in those approximate sizes that would work together.  I ended up using the one photo- the group picture I took on New Year's Eve. 

I'm not sure how I feel about this layout.  It doesn't feel like me.  This is the first time I've ever painted directly on cardstock.  I love how quick and easy it was to make a journaling space, but I'm not sure I can deal with how messy it seems.  I'm rethinking whether I should have painted behind the photo too (again- not my usual crisp and clean look).  I'm glad I tried a new-to-me technique and I'm glad that the sketch pushed me out of my comfort zone.

You can see what the rest of the Design Team did with the sketch here.  

6/17/11

Cake Mix Cookies

I occasionally bake cakes from scratch, but more often that not, I use cake mixes. They're easy, they're cheap, they're quick, and they taste good. A few weeks ago, I noticed a recipe on the side of the Pillsbury Funfetti box for Cake Mix Cookies. (Affiliate link here and below.) It seemed amazingly simple, so I gave it a try.


Cake Mix Cookies


                                                           1 pkg. cake mix                                      2 eggs
                                                           1/3 c. vegetable oil

Heat oven to 375. Combine cake mix, oil and eggs in large bowl. Stir with spoon until thoroughly moistened. Shape dough into 1-inch balls. Place 2 inches apart on ungreased cookie sheets. Flatten to 1/4 inch thickness with bottom of glass dipped in flour. Bake 6-8 minutes or until edges are light golden brown. Cool 1 minute; remove from cookie sheets. Makes about 3 dozen.


Yum! They had a different texture than traditional cookies, yet I wouldn't really call them cake-like either. Definitely tasty though.

I decided to try a chocolate cake mix (Duncan Hines Devil's Food this time) and experiment with mix-ins. Trevor and I mixed up the cookie dough, then divided it in thirds.


We left the first third plain and skipped the step about flattening the dough. After baking them, we sprinkled them with powdered sugar. Very tasty- they reminded me of fudgy brownies.


 We added a ton of chocolate chips to the next third. They were gooey and delicious.


We added Guittard Green Mint Chips to the final third. So delicious! I can't believe such a good cookie was so simple to make.


I still love baking cookies from scratch, but for speed and convenience you can't beat cake mix cookies! We'll try some other flavors the next time we need something quick and easy for a potluck.

6/16/11

Id Reaction

The most common search term that brings strangers to my blog is scrapbook pages. Not surprising. The second most common: id reaction. Apparently, there are people across the globe looking for more information about why they are covered in spots. Their search leads them here. 

Years ago, Steve (Husband Extraordinaire) set up cindyderosier.com as a website for my classroom. Once I stopped teaching, I kept the website in place, but put a few of my scrapbook layouts on a gallery there to use for Design Team applications. Steve eventually took both the website and gallery down, and now this blog is at cindyderosier.com. But if you use Bing to search for information about id reactions, you will see this:


I made that layout in 2008 to document Trevor's experience with an id reaction. I had it in my gallery briefly for one Design Team application. Now, it sends people to this blog, where up until now, there was no mention of id reactions at all.

So, if you are here because you are covered in spots and want more information, welcome! I'd originally intended for "My Creative Life" to cover my adventures in art, crafts, cooking, and other creative ventures, but I suppose any post where I include a scrapbook layout counts. Besides, I really do feel bad that there are people who come here for information about an id reaction and don't get it. So I'll share what I know.

In June 2008, just after he'd turned two, Trevor woke up one morning covered in small red spots. They were slightly raised, but didn't itch or hurt. By the next day, they looked like this:


Amazingly, they didn't bother him at all. He never itched them or complained about them in the slightest. The doctor diagnosed the spots as an id reaction, which is essentially an allergic reaction to a virus or fungus. So basically, Trevor caught a virus which had no symptoms. However, he was allergic to the virus itself, which showed in the form of a skin reaction. Id reactions are not contagious, do no harm, and go away on their own. However, they can look pretty horrifying! My nephew was in the hospital at the time and because of a very strict "No Rashes" policy, I wasn't able to bring Trevor to visit his beloved cousin. It didn't matter that the id reaction wasn't contagious. We had swim lessons during this time period too- I made sure that the others in the lesson and his teacher understood that his id reaction was not contagious!

Fast-forward three years. I started this blog and immediately visitors showed up in search of information about id reactions. I made a mental note to write this blog post. And then.... one morning Trevor woke up covered in spots. Yes, according to the doctor, it's probably another id reaction! This time the spots only lasted about 4 days and were far less severe. They were isolated on his trunk, not affecting his arms, legs or face like last time. I made a mental note to write the blog post sooner rather than later.

Fast-forward 10 days later. I woke up covered in spots. Not as bad as Trevor's when he was two, but worse than his the previous week. The spots were the worst on my trunk, gradually lessening on my arms and legs, with none on my feet, hands, or face. They didn't itch or hurt. The next day they had spread down my arms and legs and were covering my hands and feet. The doctor said that it was almost certainly the same virus (again, absolutely no other symptoms) and the same allergic reaction that Trevor had. While the symptomless virus is obviously contagious, the allergic reaction isn't. It's sheer coincidence that we both were allergic to it. Anyone else who gets the virus will never know they had it. Weird!

6/15/11

June Flamingo Four

Each month, Flamingo Scraps presents the "Flamingo Four"- a challenge where four designers use four identical sets of products to create something.  It's always fascinating to see how incredibly different the end results are!

I first participated back in September when I was on the Flamingo Scraps Guest Design Team.  Back then, they featured five designers and five products.  I really struggled to use products that were outside my comfort zone.  You can see what each of us made here:  September Flamingo Five

I was really anxious for my Flamingo Four package to show up.  Would I like all four items?  Would they be as challenging as last time?  Would I have an idea right away?  I opened the package and found this:


I really liked the black glittery ribbon and the Prima embellishments.  The patterned papers were OK, but more vintage and busy than I prefer.  I took a deep breath and turned the papers over, hoping as hard as I could that they were two-sided.  

YES!  Not only were they two-sided, but I absolutely LOVED the reverse of the papers.  Now these are totally me!


I had so many ideas!  I decided to alter an unfinished wooden box that I had laying around, then create a coordinating card.  I started by painting the box black (actually "Licorice").  I painted right over the gold hinges.  Then I added a coat of Folk Art's Black Extreme Glitter.  Here's what the box looked like when I was done painting:


I cut the two Prima papers to fit in the center area and attached the ribbon across the top.  I used about a dozen coats of Mod Podge to seal it.  Finally, I used one of the Prima embellishments on top.  I whipped up a coordinating card.


Here's a closer look at the box:


I'm really happy with how it turned out!  I still have quite a bit of the paper, ribbon and embellishments left, so I'll definitely whip up a bunch more cards- stay tuned for those!