3/30/12

Egg Cream

Have you ever had an Egg Cream?  I've asked a bunch of people that question recently and not one of them had.  Most had never heard of it.  According to Wikipedia:
An egg cream is a beverage consisting of chocolate syrup, milk, and soda water, probably dating from the late 19th century, and is especially associated with Brooklyn, home of its alleged inventor, candy store owner Louis Auster. Modern versions of the drink contain neither eggs nor cream, although earlier versions did include eggs in the ingredients. 
The egg cream is almost exclusively a fountain drink. Although there have been several attempts to bottle it, none has been wholly successful, as its fresh taste and characteristic head require mixing of the ingredients just before drinking.

I don't know when I first heard about this classic drink, but I do know that it was at least 15 years ago.  When I find interesting things in magazines or newspapers, I tear them out and file them in folders labeled Stuff to Do, Places to Go, and Cooking Ideas.  If I hear about a neat idea, I write it on a post-it note and throw it in the appropriate folder.  Every once in a while, I go through my folders to see what's there.  A lot of the ideas for my list of 40 Things came from these files.  Including "Try an Egg Cream."  
By happy coincidence, Food Network Magazine (which I LOVE, by the way) published a recipe for an Egg Cream in their March issue.  You can find the recipe here: Chocolate Egg Cream Shooter.  Basically, you make chocolate syrup (sugar, cocoa powder, vanilla and salt), freeze it in a glass, then add half-and-half and seltzer.  Here's my Egg Cream:


It was so good!

As it turns out (again, according to Wikipedia), March 15 was National Egg Cream day.  If I'd known that earlier, I would have celebrated on the proper day instead of 6 days late.  Oh well- there's always next year!

Goal #11 accomplished!  (Yes, I do realize I posted Goal #12 before Goal #11.)

3/29/12

Scrapping with Pink

I don't scrap with pink very often.  Almost never, in fact.  I do make some pink cards or gift bags once in a while, but even that is rare.

Last May I became a godmother to two girls.  It took me a long time to scrap the pictures because I wasn't sure what direction I wanted to go with the layout.  With hundreds of photos of the day, there were so many choices to make.  Should I focus on their baptism, or on my becoming a godmother? Should I scrap their mom's baptism too, or just that of my godchildren?  Should I journal about Trevor so desperately wanting to be a part of the baptismal ceremony, or should I keep the focus on me and the girls?  Candid photos or posed?  A separate layout about each girl, or one that includes them both?

I decided to make a one page layout about how honored I was to become a godmother.  I'd mix candids with posed photos.  I'd include one picture of Trevor, but wouldn't mention him in the journaling.

Once I made the decision of what direction my layout would go, I struggled to decide what colors to use.  The girls were both in white dresses; I wore turquoise.  After going through just about every piece of patterned paper I own, I settled on a beautiful pink polka dot by Melissa Frances.  It is young and feminine and joyful, perfect for my layout about the two little girls who became my godchildren on May 22, 2011.


I used gold accents, and kept them small and delicate.  What fun to work with a completely different color palette once in awhile!

3/28/12

Our Own "Chopped" Challenge

We watch a lot of Food Network in our house. Chopped is one of our favorite shows. For those who haven't seen it, four chefs receive a basket of four mystery ingredients. They compete to see who can create the best dish using all four ingredients in a very short amount of time. There are three rounds- appetizer, entree and dessert. After each round, one chef is chopped. At the end, one of the two remaining is declared the winner and gets $10,000.

There was no question in my mind that "Cook from a mystery basket" would be on my list of 40 Things. We decided I'd be competing solo and that I'd be doing the entree round. I would have 60 minutes (or longer if needed, since whatever I made would be our dinner and we wouldn't eat anything that was dangerously undercooked). Steve and Trevor would work together to select the mystery ingredients.

When the competition was set to begin, I donned Trevor's toddler-size toque from the dress-up corner and posed with the basket of secret ingredients. I was dying to know what was inside!

 
Finally, the ingredients were revealed! I needed to make an entree using boneless pork loin, radishes, 2 unripe plums, and Pepperidge Farm Lemon Cookies. AAAAAACK!

  
OK, I didn't actually scream. I actually stood there doing nothing for a very long time. Finally, I went to the pantry and started pulling out random things- Corn Nuts, dried cherries, croutons, trail mix... anything that might tie these ingredients together. With no plan, I decided to buy time by breaking down the required ingredients. I experimented with grating radishes and plums, then crushing cookies. I zested and juiced a lemon (in hopes that it would emphasize the lemon of the cookies). I sliced the pork into strips.  


As I was prepping, I started developing a plan. I decided that I would coat pork slices in a crust of crushed lemon cookies and Corn Nuts, then cook them on a griddle. The pork would sit on a bed of greens and sliced radishes. I'd make a salad with the unripe plums, oranges, and grated radish. I'd tie everything together with a sauce of grated plums, dried cherries, lemon juice and, um, whatever else I could find. 
 
As I worked, I kept thinking about what would go into my sauce. I decided to make it Asian-inspired. In addition to the plums, cherries, radish, and lemons, I added soy sauce, sesame oil, and grated ginger. It actually tasted good!

I dug through the trail mix and pulled out all the peanuts and cashews I could find. I toasted them lightly, then chopped them and added them on top of the pork.

Finally, time was up. "Hands up and utensils down!" as Padma says on Top Chef. I don't think Ted says the same thing every time.

 
I presented my dish to the judges. "You have in front of you slices of pork loin, crusted in lemon cookies and Corn Nuts, served on a bed of greens and shaved radishes. I've added toasted peanuts and cashews for crunch. The sauce is made from grated plums, radishes, dried cherries, lemons, soy sauce, ginger, and sesame oil. On your right you'll find a salad of unripe plums, oranges, and radishes. Enjoy."

 
The judges were introduced... Steve, Trevor and Jonna. I breathed a sigh of relief that there wasn't a pork specialist or Asian cuisine expert on the panel. It was a tense moment as the judges dug in. I waited to hear what they thought. What a relief to see them smiling and to hear that they all liked it. I anxiously awaited the results. The judges were unanimous- I was declared Chopped Champion! And all three judges cleaned their plates!  


Goal #12 achieved!  

3/27/12

Making Cheese

If you know me, you know that I *love* cheese.  It is my second favorite food.  (Bread is #1).  I have way too many favorite cheeses to list, but it's safe to say that over the course of my life I have eaten more cottage cheese than any other type of cheese.  So I knew that one of my 40 Things would be to make homemade cottage cheese.

I read through some online recipes and settled on this one by David Lebovitz.  The first step was measuring out one quart of whole milk.

 
As instructed, I brought the milk to 85 degrees, added the rennet, then let it sit at room temperature for four hours.

 
Here's the big reveal.

 
I made long slices in the mixture, then heated it gently until the curds separated from the whey.  Then I strained out the cottage cheese. 

 
Almost done!


I tasted it at this stage (yum!) and then chilled it for the recommended 1 hour.  I tasted it again (yum!) then added the cream and tried it again (yum!).  Goal #9 accomplished!

One of the other items on my 40 Things list was to make ricotta cheese.  In my research, I learned that ricotta is made using the leftover whey from making other cheese.  How convenient, as I had a bunch of leftover whey from making cottage cheese.  So I ended up making two different cheeses in one day.  I used this ricotta recipe by Jill McKeever.

It literally took five minutes.  I slowly heated the leftover whey to 200 degrees.

 
I poured it through a coffee filter and about two tablespoons of ricotta remained.  


I tasted it at this stage (yum!), then squeezed the remaining liquid out and tasted it again (yum!). I refrigerated it for an hour, then tasted the last tiny bit (yum!).  Goal #10 achieved! 
Out of curiosity, I measured the remaining whey.  


I started with 4 cups (1 qt) of milk and ended up with approximately 1 cup of cottage cheese, 2 tablespoons of ricotta cheese, and 2.5 cups of whey.  I used most of the remaining whey to make bread (replacing the water with whey).  Not a bad use of a quart of milk! 

3/26/12

Green Color Challenge

The Fiskateers' March color challenge was an easy one- create something green.  I decided to tell the story of how we chose Trevor's name.

 
Journaling: 
During one of our early dates in fall 2002, Steve told me about the deRosier family tradition of giving sons their father's first name as a middle name. Even though we weren't talking about marriage yet, I agreed that if we had a son someday, his middle name would be Steven. Fast forward to January 2006, when we learned the child we were expecting was a boy. We'd already settled on a girl name (Carissa Nicole), but had no idea what to name our son. Many of the names we liked were too common for my taste. (I think growing up as a Jones makes a person extremely sensitive to this sort of thing.) We wanted a name that was familiar and easy to spell, plus it had to sound good with Steven. After pouring through books and websites, we had a list of names we liked: Gregory, Erik, Nathaniel, and Dominic. But none of them seemed just right. One day as I was driving home from work, the name Trevor popped into my mind. It seemed perfect. Steve agreed. We kept the name secret until the big day. On June 7, 2006 we introduced the world to Trevor Steven deRosier. Nearly six years later, I still think it's the perfect name.
........

Here is the sketch I used.  I actually made it the same day I made my first sketch, but it's taken me this long to create a layout from it!  


I have a few more completed sketches that I'll be revealing soon.  Stay tuned! 

3/23/12

Spirelli

Welcome to the Fiskateers Spring Blog Hop!  If you're hopping along, you should have arrived from Scrap n Patch.  To start from the beginning, go to She's the Crafty Neighbor.


As my regular readers know, I turned 40 last week.  To celebrate, I am trying 40 Things during my 40th Year.  Number 8 on my list was to try spirelli.  Spirelli is a form of string art.  I first learned about spirelli around 15 years ago.  A former coworker always taught her 6th grade students to make beautiful projects with string.  Teacher etiquette says that you do not learn about a fabulous craft from a coworker and teach it to your students who are one year younger than her students, so I filed her instructions away in my "Craft Ideas" folder.  All these years later, I still had never tried it.  Until now!  

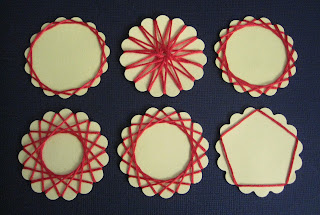
Not only did I try spirelli, but I taught it to Trevor.  I wasn't sure if a 5 year old would be able to do it, but he had no problem.  Here are 6 of Trevor's designs.  He's extremely proud of them.


Materials needed: cardstock, a scalloped circle punch (we used Fiskars' Seal of Approval Squeeze Punch), some sort of string (thread, yarn, embroidery floss, etc), tape, and scissors.


Step 1: Punch scalloped circles from cardstock. 

Step 2: Tape one end of the string to the back of the circle, then start winding.  Skipping different numbers of spaces results in completely different designs.  There's no right or wrong.  When you reach your starting space, cut the string and tape the end in place.

 
Step 3: Use your completed spirelli to decorate cards, gift bags, place cards or anything else your heart desires!  Trevor chose to skip this step.  I created four items to showcase my spirelli.   

  • A card:

  • A gift bag:
 
  • A gift box:

 
  • A place card:


 I love the way different accents on each spirelli design create a totally different feel!  Spirelli is such a quick and easy craft and it adds such a nice touch to many papercraft projects.  I'll be using it often in the future.  I'm so glad I finally tried it after all these years!

To continue along on the Fiskateer Spring Blog hop, go to Ink Blots by TRD.

3/22/12

Personalized Lunchsack Gift Bag

I don't think I've ever bought a gift bag.  I keep all the gift bags we receive and reuse them, plus I make a lot of gift bags.  I especially love the homemade ones, since they can so easily be personalized.  

Trevor made a gift bag for his friend Jordan's 6th birthday.  We started with a plain white lunchsack, alphabet stickers, and chalks.  I helped Trevor arrange the letters in Jordan's name on a piece of clear plastic sticker backing, with the top half of the letters hanging off the top edge.  Then we pressed them onto the bag, removed the sticker backing, and finished pressing the letters down.  (I hope you all know that trick already- it is so helpful for making sure your letters are straight and evenly spaced!)  

 
Next, Trevor used the sponge daubers to apply chalk directly over the letters.  I love these things and highly recommend them, but if you don't have them cotton balls work just fine.

 
For the record, I don't normally have Trevor do messy crafts on the carpet of his bedroom floor.  We keep his birthday card making supplies (paper, stickers, and crayons) in his bedroom, so he'd been working on Jordan's card when I started setting up the gift bag supplies.  It wasn't until he finished the gift bag that I realized the mess potential.  Fortunately, Trevor is the world's neatest 5 year old and nothing got on the carpet.

Here's the bag after he finished all the chalking.  

 
The next step is carefully removing the letter stickers.

 
Finally, outline the letters with a black pen.

 
We put the gift in the bag, stapled it shut, then added curly ribbon and a bow.  Here's the finished gift!


Happy birthday Jordan!

3/21/12

Homemade Tortillas

I have a long history with bread.  I started baking bread when I was very young.  As a teenager, I successfully sold enough homemade bread to pay for a trip to Washington DC in 1988.  I won a trip to Chicago as the California 4-H State Winner in breadbaking in 1989.  That same year, I earned my 4-H Emerald Star (sort of similar to an Eagle Scout rank) by creating a 10-year breadbaking curriculum.  I've entered countless breadbaking competitions and judged a few as well.

Over the years, I've made just about every kind of bread there is.  But somehow I have never made one of the most basic breads of all, the tortilla.  For Christmas, I asked for this Imusa tortilla press, which my sister bought for me.  (Thanks again!)  I've held off trying it, since I knew that making homemade tortillas was going to be one of my 40 Things.

It was with great excitement that I assembled my tortilla press and measured out the masa harina.

 
I added boiling water and mixed.

 
The next step was to knead the dough for 10 minutes.  It hurt quite a bit, as dough made with boiling water is quite warm.  Steve walked in as I was finishing kneading and I asked him to take this picture.  My hands were still red, though not nearly as dramatic of a red as they'd been a few minutes earlier.  

 
I divided the kneaded dough into equal balls.  Then I prepped the tortilla press.   The instructions that came with it said to measure and cut circles out of a plastic grocery sack to line the press.  That sounded like too much work, plus it didn't sound very sanitary.  Instead, I popped a ball of dough into a bread bag that I'd emptied that morning.  
 
It worked like a charm!  No pain-in-the-neck circle cutting for me!

 
Here is my first-ever homemade tortilla!

 
I fried my raw tortillas, then served them up with all the fixings.  Tasty!  But they were definitely lacking salt.  Next time I'll be adding a little bit of salt to my dough.  It is official: "Make tortillas" is now accomplishment #6 on my list of 40 Things!  

Accomplishment #7 on my 40 Things list doesn't deserve its own blog post, so I'm adding it to this one.  For the first time in my life, I tried a Shamrock Shake.


I don't eat a lot of fast food- maybe an average of once a month and that's including Subway. If I do have a burger, it's usually In-N-Out, not McDonalds.  Still, it's hard to believe that I'd never tried a Shamrock Shake.  I love milkshakes and I love mint, so I made a point to get one before they go away for the year.  


Verdict: delicious! 

3/20/12

Trevor's Easter Bunny Project

"Mommy, THIS is the project we will be doing tomorrow," said Trevor at bedtime, handing me a sketch. "We need blue, green, brown, grey and colorful paper, plus scissors, and I will tell you what to do. You may have some of your own ideas, but on some parts you need to do what I say."  


The sketch shows that we'd be using "papr" to cut out an Easter bunny, tree, and eggs, which would hide under a table, in the tree, and in some sort of can. The most recent Trevor-directed projects (our Angry Birds poster and this Snowman craft) were a great success, so I was looking forward to this.

The next day, after school, lunch, homework and chores, it was finally time for the project. Trevor put on his bunny ears and got to work. I waited for my instructions. He explained that we needed to make grass from the green paper by cutting out triangles. Then we were supposed to make a brown tree trunk and green leaves.

 
Next, we cut out a gray bunny. He was very particular about the way the bunny looked. He inspected my cut-out, then had me redo the arms to his satisfaction. Trevor's original plan was to cut out baskets, but he was tired at this point. He ended up drawing his baskets and other details. Finally, we cut eggs and hid them all around the drawing. He was very happy with how his turned out.

 
Here's a closer look at Trevor's artwork.


And here is mine.  It was a lot of fun to make.

 
For you parents out there: Do your kids ever teach you how to do craft projects, the way Trevor teaches me? I don't remember sitting my parents down when I was a kid and carefully explaining how to do a project I'd dreamed up. Maybe I did and just don't remember. Although I do remember making the neighborhood kids follow my instructions on how to make projects, now that I think about it!  

3/19/12

My Punch Organizers

Over the years, I have amassed quite a few punches.  Not so many that I forget what I have, but it's getting close.  I decided it was time to create an organizer.

I started by dividing all my punches into two piles: border punches in one pile and everything else in the other.  I got out a scrap of black cardstock and punched a sample from every border punch.  I used white cardstock to create a card for each punch, then attached each sample to one and wrote the name above it.  I used my Crop-a-dile to punch a hole in the corner of each card.  


I wanted to be able to quickly find each punch, so color-coding was the next step.  I got out my cardstock scraps and punched circles to match each border punch.  Here's what the back the cards look like:


I added a ring, then tied an orange ribbon to the ring, indicating that every punch on the ring is Fiskars brand.  If I happened to own any other brand of border punches (which I don't), I would have made a separate ring for each brand and added an appropriate ribbon.

 
I did the same thing for my miscellaneous punches.  I have two rings of those, one for my Fiskars punches (in the picture below), another for the rest (mostly Marvy Uchida).  

 
I love my new organizers!  It's great to have a visual reminder of what I own, plus I love having the names of the punches all in one place.