Pages

6/29/12

Vacation Planning Folder

When I opened my latest package from the wonderful ladies of Flamingo Scraps, I was thrilled to find the Heidi Swapp 'No Limits' collection and the Studio Calico 'Abroad' Wood Veneers - my #1 pick from the CHA Winter tradeshow! 


The timing of the package couldn't have been better.  My parents are taking us on a Hawaii cruise toward the end of this year, and quite a few family friends are coming too.  We all got together recently to share tips, coordinate our shore excursions, and plan details.  I desperately needed a place to store all of the paperwork and information for our trip.  The 'No Limits' file folder would be perfect.

I wanted to dress it up a bit to make it say 'Hawaii', but I wanted to be able to use the folder for other vacation planning once the Hawaii trip had passed.  I decided the solution was to use an old-school library pocket.  I used a bunch of stamps and ink to match the style of the folder.  Here's the Before and After:

 
Next, I made a card to fit in the pocket.  I started with a blank white background and added two scraps of orange paper.  To hide the seam, I used a strip of white and blue, accented with a sticker from my stash.  I used a pen to color the Hawaii wood veneer blue, attached it to the card, and added a title.  After I took this picture, I filled in details, like the dates and names of our traveling companions on the top section.  The bottom section can hold special memories after the trip.
 
Here's how my vacation planning folder looks now!

 
When the trip is over, I can easily remove the card and create a new card for whatever trip we plan next.  And I can save the Hawaii card for use on a layout or keep it as it is as a momento from the trip.


What do you think?!

6/28/12

Flag Magazine Mosaics

One of my favorite things about being a fifth grade teacher was teaching United States history. The year started with a study of Native Americans, moved on to Explorers, then Colonial America. We'd study the American Revolution, the Industrial Revolution, and the Civil War and Reconstruction. From there, we'd leap ahead and learn about the present-day United States. I used a variety of games, simulations, and projects to immerse the kids in their learning. They loved it and I did too.

I'm a huge fan of integrated curricula, so I was always on the lookout for ways to incorporate history into math, or science into art, or math into reading, etc. Our study of the 50 States usually fell right around the same time as the Measurement unit in math, which gave me the perfect excuse to mix history, math and art into this cool project.


All you need is a piece of white paper (watercolor weight is best, but cardstock or construction paper will work), a ruler, a pencil, some white glue, and an old magazine or catalog. Start by using the ruler to draw a horizontal line, 9" long, at the bottom of the paper. Next, add vertical lines, 6.5" long, at a right angle to the original line. Connect those two lines with a 9" horizontal line.   

Next, mark every half-inch along the vertical lines. Holding the ruler horizontally touching the top two dots, make a mark at the 4" spot. Draw a line from that spot across to the right, creating the top stripe. Repeat this step for the next 6 stripes. Draw a vertical line to make the edge of the blue field. Return the ruler to the horizontal position and continue drawing the stripes. Here are the measurements:


And here is what the pencil lines will look like. Notice that the flag isn't centered. This doesn't matter, as you'll be cutting it out.  
Go through the magazine looking for large area of red, white and blue. Working with one color at a time, tear small pieces and glue them to the appropriate area of the flag. The pieces should overlap and cover the area completely. It is OK if they go over the perimeter lines of the flag, as this area gets cut off.


Excluding the measurement part, it takes about an hour to complete this project. Here's Trevor finishing up the last stripe. (He's wearing a nametag because he'd just gotten home from VBS. We don't normally wear nametags around the house, being that there's just the three of us and we know each other pretty well.)


And here he is with the mosaic part completed.


When the whole thing is filled in, use a paper cutter to trim the excess paper. You can hang your art as is, or extend its life by sealing it in a laminator, using contact paper, or brushing on a coat of Mod Podge. Enjoy!

6/27/12

Bunny Rolls

This week was a special one in the deRosier household. Monday marked the 1-year anniversary of Trouble's adoption. It's hard to believe that we've been bunny owners for a year now. It's been awesome. I love that rabbit.

We didn't throw a big party for Adoption Day like we did for Trouble's birthday, but we did mark the occasion by making Bunny Rolls.    

 
Last winter when I was cleaning out my 20+ years of recipes torn from magazines, I came upon the instructions for making these bunny-shaped rolls. I believe it originally came from the now-defunct (and much missed) Gourmet Magazine.  

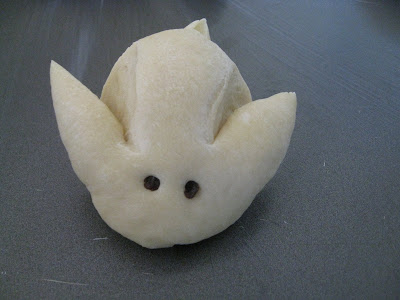
Begin by making your favorite yeast roll recipe, stopping just before the shaping step. (Here is one that I like: Classic Dinner Rolls.) Gather clean kitchen shears, a few raisins, and a toothpick. Use the shears to cut the raisins into tiny pieces; set aside.

Punch down the dough and divide into 12 equal pieces. Form each into an egg shape and place on a greased baking sheet.

 
Holding the kitchen shears vertically, make a small snip on the rounded end of the egg. This will be the rabbit's tail.


Holding the shears horizontally, make a long snip along each side of the roll. From above, the three snips will look like this.

 
Use the toothpick to poke two deep holes where the eyes will go. Push raisin bits into the holes. Make sure they are secure so they don't fall out as the bread rises.

 
Cover the bread loosely with plastic wrap and let rise in a warm place, approximately 30 minutes. Bake at 375 degrees for 15-20 minutes or until done.  

The guest of honor did not eat any of our bunny rolls, but he did get to enjoy a raisin treat. Raisins are one of his absolute favorite foods.


Happy Adoption Day, Trouble!

6/26/12

Tablesetting Contest

Most people know that you can enter crafts, baked goods, photography, and homegrown vegetables in the county fair, but the fair is so much more than that.  For example, did you know that there is an entire division for tablesettings?  The concept is simple- you dream up an occasion and a menu, then create a placesetting and centerpiece around your theme.  The results are beautiful, elaborate and so creative.  

This was the first year that Trevor was eligible to enter a tablesetting in the fair in the 5-8 year old category (based on age on Jan 1).  Step one was thinking up a theme.  I helped him by brainstorming what his dream occasion would be.  A themed birthday party?  A big campout?  A super fun Halloween meal with gross-out foods?  No.  Trevor wanted a huge outdoor party for bunnies and their owners, where all the food would be tasty and safe for both the bunnies and the people.  

In all my years of looking at fair tablesettings, I've seen tons of birthdays, weddings, graduations, campouts, and picnics, but I've never seen a tablesetting based on food that pets and their owners would both enjoy.  If that didn't earn full points for creativity, I don't know what would!  

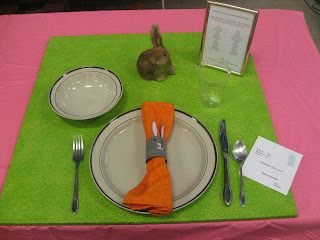
With the theme and menu in place, I took Trevor to the fabric store.  He was hoping to find a bunny print, but they don't stock a lot of bunny prints 10 months before Easter.  So instead, he chose a leaf-print green and carrot orange.

 
The plan was that the green would be the tablecloth and the orange would be the napkin.  I taught Trevor how to use the sewing machine so that he could finish the edges of the orange fabric.  

 
He put the finished napkin into the bunny napkin ring that he made back in April.  Adorable!

The next step was to write the menu.  Trevor's idea was to list all the foods in two separate columns.  The first would be foods that were healthy for the bunnies (kale, swiss chard, broccoli, etc) and the second would be foods that are treats for the bunny (peaches, bananas, strawberries, etc).  I helped him type it out.  The two columns were very unbalanced, so I showed him how we could balance the columns and use an asterisk to show which foods were treats.  He liked that idea.  Here's how the finished menu looked.


Finally, we got out the plate, bunny dish, cup, and silverware to go with our menu.  His centerpiece was the rabbit he picked at the San Francisco Flower Mart.  Trevor practiced and practiced until he knew exactly where each item should go to set the perfect table. 

On the big day, each child was assigned a location, then set-up time began. We were able to watch, but we couldn't coach or talk with our children as they worked.
 
I prepped Trevor ahead of time by saying that there would be lots of kids entering and that most of them would be older and more experienced than him.  They would all have lots of good ideas.  But Trevor was convinced he would be the winner.  How could anything be better than a party for bunnies and their owners?!
 
There were a handful of no-shows.  In the end, there were 11 entries.  As predicted, all were really cute and well-done.  Only one had a visible error (silverware in the wrong place).  


Here's Trevor watching the judge look at his entry.  She took a long time carefully reading his menu and checking his placesetting.
 
Then, one by one, the names were called for the children to get their participation ribbons. Seven names went by and Trevor's wasn't called. Could he possibly have placed?! Trevor's was the next name. Honorable mention. Not 1st, 2nd or 3rd, but a very fine showing for his first time and considering he was the youngest there.
 
 
He was disappointed not to have won the huge blue ribbon, but was very proud of his ribbon and how well he did.

 
After the contest, we were allowed to enter the area and look carefully at all the entries. Here is Trevor proudly reading his menu to his cousin Timothy.
 
 
I can't wait to see what he dreams up for next year!

6/25/12

Pinewood Derby 2012

We had so much fun making and racing Pinewood Derby cars last year that we decided to do it again.  (Click here to see last year's nifty watermelon car.) Here's what I came up with this time.


This year, we worked on our cars in my dad's awesome workshop.  He has every tool imaginable, which made the process so much easier than last year.  I cut my car into a gentle wedge.  Then I used the drill press to drill a bunch of holes on one end, then chisled out the excess wood to create a hole to hold my popcorn.  We did the painting and finishing at home. Here's how it looked after I painted the stripes.


I printed the words Pop Corn in red, then punched out a circle around it.  I adhered that to the car with Mod Podge.  I put a large puddle of glue at the top of the popcorn box, then dropped Mini Pops (made from sorghum, not corn) inside. When the glue was dry, I sprayed the Mini Pops with clear acrylic sealant.


This year Trevor was old enough to enter.  He decided to make an Angry Birds car.  Grandpa showed him how to drill holes, then they glued dowels into the holes.  Trevor painted the car blue.

He drew and cut out Angry Birds characters, then Mod Podged them to the car.  He decorated a cardstock awning as well. 
 
Here's what Trevor's finished car looked like.  

 
Steve finished his at the last second, so I didn't get a picture of his before he had to turn it in.  

Finally, the Big Day arrived!  Before they ever race, the cars are judged on creativity, workmanship, functionality, etc.  I got first place amongst the women!


It was great fun seeing the other cars and how creative some of them were.  I really liked this Ho-Ho.  Only after I checked the tag did I see it was made by my very talented nephew Timothy.


When it came time for the races, they divided all the cars into two groups.  The females raced first.  My car did not fare very well.  Here it is zipping by in third place, which was actually one of its better finishes.  The races are done double-elimination and I was out by my 4th race.  Oh well!  I was going for looks over speed anyway.  


Once the women's races were over, it was time for the males.  All of the males' cars competed against one another, which meant that my husband, six-year old Trevor, 11-year old Timothy, and my dad all had cars in the race.  Here's Trevor, excitedly watching to see how his car would place in its first race.  (Notice the blue lips from the shave ice he'd just finished....)


All four of the guys did better than I did, as none of them were eliminated as early in the competition as my car. Trevor and my dad were out fairly early, then Timothy. Steve's car did the best. His is the sleek orange car zipping by in 2nd place. That's my mom, Timothy, and Trevor looking on.


Eventually Steve was eliminated too.  But no matter!  We had so much fun designing, building, and racing our Pinewood Derby cars.  Can't wait til next year!

6/22/12

Paper Scrap Fish

One of my (many) quirks: I have no problem touching spiders, snakes don't bother me one bit, and I find rodents charming, but I don't even want to be in the same body of water with a fish.  The thought of touching one totally freaks me out and the idea of eating one is completely revolting.

Yet, I do think that many fish are quite beautiful.  Our bonus room is decorated with tropical fish art because my husband is a major fish aficionado (say that 10 times fast!).  But even before I met Steve, I did quite a bit of fish art with my students each year.  I dug out my old classroom samples, which were a bit faded.  So I made some new fish to share with you! 


Part of what I love about this project is that it uses scraps.  (We scrapbookers find immense pleasure in using up scraps.)  You need 6 strips of 1x12-inch paper.  They can all be the same, or you can use two different colors.  I'd recommend using two different colors the first time you try this. Once you're confident in the technique, then you can switch to a single color. You'll also need scissors, craft glue, and a googly eye.
 
Fold all six strips of paper in half.  Interlock 2 strips (one of each color) as shown.

 
Add the next strip of paper by weaving it under the upper half of the folded strip and around the lower half of the folded strip. 


Weave the third strip the same way as the first.  You should have the beginning of a checkerboard pattern.

 
Do the opposite for the next strip.  

 
Weave the final strip the same way as the first strip.  Push all the strips tightly together. Because they are interlocked, they will hold together.  Check front and back to be sure that there is a checkerboard pattern on both sides.

 
Cut off the middle strips flush to the edge of the checkerboard.

 
Glue down all the edges.

 
Make diagonal cuts on all four remaining strips.  They can be straight or gently curved. 

 
Add a googly eye and your fish is done!


More fish art coming soon...