11/30/12

November Flamingo Four

I've been designing and blogging for Flamingo Scraps for over two years now and it's been a blast!  Recently, I was promoted to become their "Flamingo Four" coordinator.  Each month, three other members of the Design Team and I each receive four products.  This month, we received the following items:

 
  1. Glimmer Mist (Clam Bake)
  2. assorted wood veneers  
  3. lacy trim
  4. an empty Maya Road tin

I thought about what I wanted to store in the tin and let my design go from there. Trevor needed a place to store the flattened pennies that he's recently started collecting; the tin was just the right size.  
The next step was figuring out how to cover up the brand name and slogan on the tin.  What would stick to the metal of the tin AND cover up the words without interfering with the closure of the tin?  Washi tape!  I layered torn bits of washi tape and it worked beautifully. 

 
Because Trevor's pennies are from our travels, I decided to back the opening with a map.  I found a 10-year old map of the western US that I haven't used in years and probably will never use again.  


I cut out the section of California where we live and attached it to the opening.  I chose the heart veneer and misted it with the Glimmer Mist.  Then I cut apart the trim and misted that.


When the mist was dry, I attached the trim and then added the heart.  


The tip of the heart points to where we live. 
 
Want to see what the other designers made?  Head over to Flamingo Scraps to check it out! It's amazing how different the four projects are, considering that we all used the same supplies!

11/29/12

Goal 32: World's Largest Maze

My parents took our family and my sister's family to Hawaii over Thanksgiving.  One of my top priorities for the trip?  To visit the Dole Pineapple Plantation to tackle the World's Largest Maze.


I've been to the Dole Plantation a few times before and have always wanted to do the maze, but I've never had enough time.  During this visit, with a full week on Oahu, we had plenty of time to dedicate a few hours to the maze.

 
Unfortunately, it started raining right when we got there.  We ordered Dole Whips and watched the indoor pineapple demonstrations, hoping the rain would end.  The rain didn't stop, but fortunately it was a warm rain. We put on hats and ponchos and set out to conquer the maze.


The maze stretches over 3 acres and has 2.5 miles of paths.  There are 8 stations throughout the maze that you need to find.  Each station has a stencil to mark your ticket with the secret object hidden there.  We were given this map to follow.  The stations are little red dots.   


Even with the map, it was a very challenging maze.  The rain didn't help, as there were some large puddles to navigate.

 
The rain also brought out some super-sized snails.  You would NOT want to step on one.

 
The maze itself is really cool.  It's made up of 14,000 individual Hawaiian plants.  Some were very tall. In those sections, the paths were very narrow.  The shorter the plant, the wider the path.  Here is the whole group (us plus my parents, sister, brother-in-law and nephew) in the center pineapple section.  Since it was late November, most of the plants weren't in bloom, but we did see an occasional flower here and there.  I bet it's spectacular in spring.
 
There is a time stamp at the beginning and end of the maze.  There are prizes for the fastest finishers (not us).  But we did pretty well, especially considering the weather: we found all 8 stations and finished the maze in 1 hour 3 minutes.  

 
Goal 32 accomplished!

11/28/12

DIY Sprinkles

Here's a quick tip for those of you who do a lot of holiday cookie baking or candy making. Perhaps you occasionally buy these?


They usually cost $3-4, which means that if you want a full set of the basic colors, you're spending at least $25.  And when you run out of orange/black during a Halloween baking session or green/red while the Christmas cookies are iced and ready, you're stuck running to the store.  Not if you make your own!  All you need is regular sugar, ziplock bags, a toothpick and food color.   
I've had these Wilton Icing Colors for years.  The package of 8 costs about $10 (or about $6 with a 40% off coupon).  There is enough color to last for many years.  Not only do they color frosting, but they are great for making your own colored sugars.

 
It's so easy.  Put some sugar in a ziplock bag.  Poke a toothpick into the color and rub a teeny bit of color onto the inside of the ziplock bag.  Close the bag and massage the sugar until the color is evenly distributed.  You can always add more color if it's too light or more sugar if it's too dark.

 
Here's what my orange sugar looked like halfway through the mixing step.  


Here's my finished orange sugar.


I will never buy colored sugar again when making my own is cheaper and so easy!

11/27/12

A Flower for Cheryl

Recently my friend and fellow Fiskateer Cheryl was diagnosed with breast cancer. The fabulous Sylvia (Fiskateer #5019) came up with a wonderful idea. She asked Cheryl's friends from around the world to show our support and love. Each of us made a pink flower, then mailed it to Sylvia. She attached stems, then assembled the flowers into this amazing bouquet.


Here's the flower I made. You can barely see it in the bouquet, just a bit to the right of center.

 
I was thrilled to hear that Cheryl absolutely loved her bouquet!

11/26/12

Cherry-Cranberry Biscotti

Remember the sparkly cherry card? I made it for Trevor's teacher. She is a wonderful person and a top-notch teacher. When I taught, I was blessed with many thoughtful students and parents who gave me gifts on Christmas, Valentine's Day, and Teacher Appreciation Day. And sometimes, I would receive a small gift on a random day, for no reason other than the fact that the family wanted to tell me how much they appreciated me. That meant a lot to me. When I had Trevor, I knew I wanted to be the kind of parent who supported his teachers any way I could, who reminded them all the time how much we appreciate what they do.

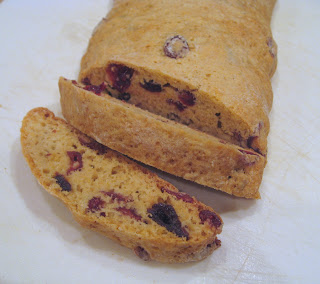
Trevor and I made a sweet treat to accompany the card: cherry-cranberry biscotti. We started with a recipe for a cranberry-pistachio recipe that I tore out of Gourmet Magazine a decade ago. It called for 1.5 cups of dried cranberries. We replaced half the cranberries with dried cherries, skipped the pistachios, and upped the vanilla slightly. Here is Trevor shaping the biscotti for the first baking:


Of course, we had to sample the cookies after the first baking. So delicious!


Here they are after the second baking.


Next, we dipped them into chocolate. Half got semi-sweet and half got white chocolate.

 
We had to wait for the chocolate to set up.

 
Then we bagged up our biscotti, filled out the card, and delivered them to Mrs. Forbes.  

 
Here's our version of the recipe if you'd like to try them yourself.  (You should.  They are delicious!)


Cherry-Cranberry Biscotti


                                                 3/4 c. dried cherries                            1/2 tsp. baking powder
                                                 3/4 c. dried cranberries                      1/2 tsp. salt
                                                 2 1/2 c. flour                                         3 eggs
                                                 1 c. sugar                                               1 1/2 tsp. vanilla
                                                 1/2 tsp. baking soda

Soak cherries and cranberries in a small bowl of boiling hot water for 10 minutes. Drain, then pat dry with paper towels. Mix together flour, sugar, baking soda, baking powder and salt. Add eggs and vanilla and beat with an electric mixer at medium speed until a dough forms. The dough will be very thick. Add cherries and cranberries and mix at low speed.

Turn out dough onto a well-floured mat and knead several times. Divide the dough in half, then form each into a 13-inch by 2-inch slightly-flattened log. Transfer to a baking sheet that has been buttered and floured (or, line it with a Silpat). Logs should be about 3 inches apart. Bake at 325°F for 25 minutes or until lightly golden. Cool on the baking sheet for 10 minutes, then transfer to a cutting board. Cut diagonally into 1/2-inch thick slices with a serrated knife. Arrange the slices on a baking sheet and bake for another 10 minutes. Flip each cookie over and bake for 10 more minutes until crisp and golden. Allow to cool, then dip flattened end into melted chocolate.  

11/23/12

The One Product I Couldn't Craft Without...

A frequent question in the scrapbook forums: What is the one product you couldn't craft without?  (A similar version asks: What is your one go-to product that you use on virtually every project?)  I don't even have to think about it.  It's this:


Yes, I use my Fiskars trimmer and Fiskars microtip scissors on almost every project.  I love Bazzill cardstock.  (I can't even begin to list patterned paper manufacturers I wouldn't want to craft without).  My Zig Millenium Markers appear on most projects.  I go through ridiculous amounts of Tombow tape runners.  But my #1 can't craft without item is ColorBox Chalk Ink in Chestnut Roan.  I use it on almost everything.  

There is something about the Chestnut Roan that works with absolutely everything.  I have a bunch of other colors, but I use them fairly infrequently.  I'd give up every other color of ink that I own before I'd give up Chestnut Roan.

What's your go-to product that you use on most of your projects? 

11/22/12

So Very Thankful

Happy Thanksgiving, everyone!

Today is the day that many of us count our blessings and think about all the things for which we are thankful.  My list is similar to a lot of people's: I'm thankful for my family, my friends, our health, and our home.  I'm thankful to live where I do and for the opportunities I've had. I'm thankful for my talents and abilities.  I'm thankful for God, through whom all things are possible.

But I don't want to focus on any of those today.  Instead, I want to give thanks for something that might not be on everyone else's list.  Today, I'm giving thanks for friends I've never met.

The first 30ish years of my life, I had exactly one friend I had never met - a penpal who was assigned to me as a school project.  Having a friend you'd never met was definitely unusual in the 70's, 80's and into the 90's.  Not so anymore.  Once I started participating in online message boards and following (and then writing) a blog, I have become friends with dozens of people who I have never met.  

It seems hard to believe that true and genuine friendships can develop between people who have never met and or even spoken on the phone.  But it does happen.  I am blessed with amazing friends all around the world.  If you have a minute on this Thanksgiving Day, go "meet" some of my friends and tell them Cindy says hi!

Izzy
Heather
Marianne
Pat
Diana
Yvonne
Tracy
Tanya

This definitely isn't a comprehensive list - there are so many wonderful people out there who I've never met who I consider friends.  I'm so glad to have all of you in my life!

11/21/12

The Cherries are Multiplying!

Yesterday I shared a card featuring an ice cream cone with a cherry on top.  I used Glossy Accents to give the cherry a fun, enamel look.  I thought it would be fun to see how cherries looked with some sparkle instead of shine.  Here's my latest card:  


Glitter never shows all that well in the picture, but in real life the cherries have a fabulous sparkle that glints and gleams from all directions.

 
I know exactly who will be getting this card, but first I need to bake up a cherry treat to accompany it.  Stay tuned!

11/20/12

Fun with the Cloud Punch

When I won the Fiskars Cloud Punch, I knew I'd be punching lots of fun clouds.  (A description of how I did the sky is here.)  


What I didn't expect is how well the cloud punch works as ice cream!


Here's my latest cloud/ice cream card.  The whole thing is made with scraps.  I added Glossy Accents to the cherry to make it shine.

 
I love when a punch does double duty!  

11/19/12

The Awesome Ed Embereley

This post contains affiliate links. 

I liked to draw when I was a kid. No surprise, right? Strangely, I don't think I ever took any drawing classes, but I do remember checking out lots of library books from the 741.2 section of the library about how to draw. (No, I didn't actually remember the exact Dewey Decimal Number of the "Drawing - Technique" section, but I did remember it was in the middle of the 700's.) I think I was around 6 or 7 when I first discovered Ed Emberely.  

Ed Emberely's books have been so popular for so long that I assume most of you know them. For those who don't, he has published 80+ books (I had to look that up too) that teach elementary age children how to draw by using very simple, illustrated step-by-step instructions.

Last year, Trevor's godmother gave him Ed Embereley's Complete Funprint Drawing Book and ink set and he was smitten. A year later, he still loves it.    


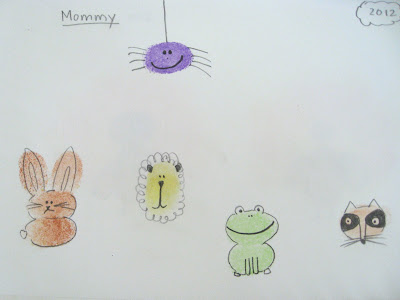
Here are some of the critters Trevor made this week.  


Here are some of mine.


After making some from the book, I started making up my own. Trevor immediately guessed, "Rainbow!" but I wasn't done. More fingerprints.

Once I added the brown thumb, pinkies, and index finger, he knew what I was making.

Turkey!


This gave him an idea. I watched as he did blues, greens and purples, then added the browns.  Peacock!


I should mention that the area around Trevor's school has a ton of peacocks. We regularly see them moseying down the sidewalk or on a neighbors' lawn (or roof) on our walk to school. I love that.

You know, I should check to see if my own goddaughters have any Ed Emberely books yet. They obviously make a really good gift for budding artists. Any other Ed Emberely fans out there?   

11/16/12

First Grade Homework

This week, Trevor came home with the classic Thanksgiving homework assignment called "I Am Not a Turkey."  His job was to disguise a turkey as something else so that the turkey can avoid becoming dinner.  I know some parents dread them, but I LOVE creative assignments like this.  In fact, I loved the assignment so much that I couldn't resist playing along while Trevor did his.  

I got out our markers, crayons, paper scraps, googly eyes, and a bunch of other stuff and we got right to work.  So much fun!  I knew right away how I'd disguise my turkey.  "I am not a turkey... I'm Mickey Mouse!"   

 
Trevor insisted that anyone would know that mine was a turkey and not Mickey Mouse.  He was far more thorough in disguising his own turkey as a space alien (right down to the nametag that says "Space Alien").  I love all the eyeballs.


What's your opinion about creative homework, either as a parent or when you were a kid? Love it, hate it, or somewhere in between?

11/15/12

Quick and Easy Handmade Notebook

I love notebooks. I always have at least one in my purse, my car, and and even my suitcase. In other words, I'm never without a notebook.  Ideas are constantly popping into my head and I have to be able to get my thoughts on paper before they disappear forever!  

Here's a fun notebook I made recently. 


It literally took five minutes.  Supplies: piece of chipboard, white copy paper, piece of patterned paper, Crop-a-dile, stick, rubber band, and letter stickers.  


Cut the papers to the same size (mine are 4x6).  Punch two holes at the top of all the papers.  
 
Line up the papers and thread the rubber band through one of the holes.  Insert the stick.

 
Insert the free end of the rubber band through the other hole, going from back to front. Catch the end of the rubber band with the stick. 

 
Here's what the back looks like.

 
I added letter stickers of my intials to the front.  (Yes, I know my last name starts with d and not J.)  Done!

Not only was this notebook quick and easy, but it costs me nothing.  The patterned paper was a scrap.  The white papers inside were the bottoms of things I printed that didn't cover the whole page.  I found the stick.  The rubber band came on our newspaper.  The chipboard came in the envelope from the USPS when I ordered stamps.  Trash to treasure!  

11/14/12

Black and Gold Thank You

I've been writing articles for Scrapjazz for awhile now, but I've only recently started checking out the contests and challenges in their forums.  When I saw the November card sketch challenge, I knew I wanted to play along.  

The sketch is very simple - just my style!  I recently uncovered a piece of shimmery gold cardstock that I'd embossed on a friend's Big Shot way back when.  I decided to use that as my background.  As to what color to pair with the gold, that was a no-brainer.  My high school colors were black & gold (go Matadors!) and I've always thought it was an elegant combination.

Here's my card: 


And here's the sketch:


As you can see, I followed the sketch very closely.  I think the embossed dots, the scalloped circle, and the extreme shimmer of the paper add interest.  Overall, I'm really happy with it. I might have to try this again with some other color combinations!