1/31/13

Mashed Potato Soup

The last time we had relatives over for dinner, I grossly overestimated the amount of mashed potatoes we'd need. It's always better to have too many than not enough, but after a week of eating leftover mashed potatoes with every meal, the three of us were more than ready for the container to be empty. I turned to Google to see what to do with leftover mashed potatoes. I was intrigued to see recipes for mashed potato soup.

I read through the various recipes, rejected each for various reasons, and decided to make up my own. I'm happy to report that it was fantastic! And I used up every last bit of the mashed potatoes.


Mashed Potato Soup


                                 4 slices bacon                                                      2 c. leftover mashed potatoes
                                 1/4 c. finely chopped onion                              1/2 c. shredded cheese
                                 1 can (14.5 oz) vegetable broth                       chives

Slice bacon into 1/2 inch pieces. Cook in a large pan over low heat to render fat. Remove bacon, leaving approximately 1 T of bacon grease in the pan.  

 
Add onions to hot grease. Cook over low heat, stirring frequently until onions are soft and golden brown. Pour in broth. Add mashed potatoes. It will look like this:  

 
After about 2 minutes of stirring, it will look like this:

 
Turn heat to high. Stir constantly until the soup reaches a boil, then remove from heat. The soup should be creamy and smooth, without any lumps.

 
Ladle into bowls, then garnish with cheese, bacon and chives.


I should mention that I made my mashed potatoes with butter, sour cream, and a little bit of cream. Obviously, these all helped make my soup so good. If you start with plain mashed potatoes, you'll want to stir in a little bit of one (or more) of these to the soup right after you take it off the heat.

Bon appetit!

1/30/13

Adorable Octopus Fail

Trevor has been reading the Nate the Great series by Marjorie Weinman Sharmat.  At the back of each book are all sorts of fun activities- crafts, cooking projects, and the like. Trevor was really excited by the "Octopus Pops" from Nate the Great and the Stolen Base.  Basically, you put gummy worms into Dixie cups, add juice and sticks, put them in the freezer until they set, then tear off the cup and enjoy an adorable frozen octopus pop.  It sounded fun and easy.

But it's not exactly popsicle weather right now.  I promised Trevor that we would make these when it warmed up a bit and suggested that in the meantime we try a version using Jello. He wasn't convinced.  He really wanted to follow the directions in the book and didn't trust that this would be an acceptable version of the adorable octopuses he was so eager to make. "What could go wrong?" I asked.  "They'll be great!" I promised.  He reluctantly agreed.  

The first problem happened when we opened our package of gummy worms.  Trevor was adamant that he wanted red or purple octopuses, so I'd chosen cherry jello.  When I bought the bag of gummy worms, there was no way to tell what the breakdown of red worms vs. other colors would be.  As it turned out, the package was at least 75% green.  There weren't 8 non-green worms in the entire package.  He dealt with this disappointment well, deciding that there'd be one octopus with alternating red and green legs and the others would have green legs.


Once he'd carefully arranged the 24 legs, he shoved the 2 extra red legs into his mouth.

With the legs arranged just so, we mixed up the Jello.  We let it cool a bit (not enough, as it turned out), then poured it in.  We only slopped a tiny bit on the table and into the muffin tin. 
 
I gently placed the octopuses in the refrigerator.  When we checked on them a few hours later, we found this disaster.

 
Some octopus legs had melted off entirely into the Jello.  Others melted or softened partially, then slumped out of the cup.  Clearly, adorable octopuses were not in our near future.  One looked semi-promising, so I turned it out onto a plate.  I snapped this picture....

 
... then as I moved to look for a better angle, the whole thing fell apart into this hideous mess.

 
Not exactly the cute octopus Trevor had requested!


Fortunately, it still tasted pretty good.  In fact, it was probably easier to eat knowing we weren't destroying an adorable octopus!

1/29/13

Goal #36: Globetrotters!

Anyone else grow up watching the Harlem Globetrotters on TV?  I loved their silly antics and amazing tricks.  Remember when the Globetrotters would show up on Scooby Doo? Those were my favorite episodes!  I also vaguely remember the Globetrotters on Gilligan's Island...

I've always thought it would be fun to see the Globetrotters in person.  When I made my list of 40 Things, one of the first things I added to the list was to see the Globetrotters live. After a bit of research, I learned that they've been coming to Sacramento and Oakland each January for years and would be doing the same this year.  Awesome!

I found some friends who were interested in going and we purchased tickets for Sacramento. I was pleasantly surprised that we were able to get good seats fairly inexpensively.  About 20 minutes before start time, the Globetrotters' mascot (Globie) came out for a pre-show.  Then the Globetrotters and their opponents (the Global Select) took the court to warm up.      


The game started with plenty of action and a lot of laughs.  There were a lot of tricks and antics that I remembered from back in the 70's and 80's, but there were others that I'd never seen before.  My favorite was when one of the Globetrotters pulled up onto the basket and KICKED his opponent's shot before it could go through the net.

 
At half-time, the Globetrotters' mascot Big G came out.  It was the funniest thing I've seen in a long time.  I was laughing so much I was crying.  Steve took video of the routine; he was laughing so hard that the video is shaking like crazy.  If you have nothing better to do, check YouTube for a video of Big G.   
 
Several interesting things to mention about the current Globetrotters roster.  First, there are women on the team now.  T-Time played in the game we watched.  You can easily make her out in the picture above.  She's 5'6".  


Second, the Globetrotters' Tiny holds the world record as the tallest professional basketball player.  He's 7'8".  You can easily make him out in the picture above.  For comparison, Jet is 6'3".  

 
And finally, all you Amazing Race fans will remember Flight Time.  It was especially fun watching him play after watching him do two seasons of the Amazing Race.


We had so much fun watching the Globetrotters!  Thanks to Ken, Sheena and Devin for joining us for Goal #36!

1/28/13

S+C

I had a lot of fun working on my January layout for The Scrapping Stamper.  This is only the second time EVER that I've used lace on a layout.  I love the soft look it gives here.  I've had that lace for about 15 years, which is when my grandma passed all her sewing stuff on to me. Who knows how long she had it before then!  


 Here is the sketch that inspired the layout:


Some of the elements are in my layout: a single 4x6 horizontal photo at the center right, a strong horizontal strip anchoring the picture, the title in the bottom right, and horizontal trim at the top and bottom.  I chose not to back the picture with the circle/star, and I moved my (non-tree) accents upward from the bottom left to the center left.  I skipped the journaling (gasp! so unlike me!) but slid a blank journaling card behind the accent strip.  

I really like how this turned out.  I love working with sketches, keeping what works for my particular layout and changing what doesn't.

1/26/13

Time for a Mythbusters Update....

As most of you know, my husband Steve and I were volunteers for a big, awesome Mythbusters experiment.  The filming took place last May.  We were told that the episode would probably air in early fall.  It was so hard waiting all summer!  Little did we know how long we'd actually be waiting.  Fall came and went and our episode did not air.  However, brief clips and still shots from our episode started appearing on their website and Facebook page.  Week after week, I'd check the schedule and see new episodes scheduled... but not ours.  

Then around Thanksgiving, Discovery stopped airing new episodes.  The website had a picture taken from our episode with a mention that new episodes will begin again in spring.      

And then, something very interesting happened.  


I got an email inviting me to apply as a volunteer for another experiment.  Steve and I both applied.  We were asked to submit pictures of ourselves and our cars.  Steve was accepted.  I was not.  Needless to say, this was pretty upsetting. 

Steve went to do his filming.  Halfway through the day, he sent me a message saying that my car had been rejected (as opposed to ME being rejected).  The production assistants wanted me to reapply using Steve's car instead.  I did and was accepted for a day of filming a week after Steve's.    

I had a blast doing my filming.  Like before, I can't talk about any of it for awhile.  Unlike before, I was allowed to take pictures.  I can't share them with anyone until after the episode airs, but I actually have pictures this time.  Yea!

While I was there, I learned some very interesting things.  Our original episode actually aired in Australia last fall.  Although Mythbusters is filmed in California, the production company (Beyond) is Australian.  Usually, the episodes air here and there at the same time, but our episode and two others aired in Australia after Thanksgiving.  So, we *could* find the episode online and watch it, but we're waiting until it airs here to watch it.  Beyond has no control over when Discovery airs the episodes, but they do know that new episodes resume in March. So I'm cautiously optimistic that the three that aired in Australia will be the first to air in the US when the season resumes.  I also learned that Discovery is planning to move Mythbusters back to Wednesday nights.    

As for when our second episode is going to air, your guess is as good as mine.  The production assistant said they've seen episodes air as soon as 6 weeks after they wrap up filming, but 3-4 months is more typical.  Our first episode is certainly on the long end, at 8 months and counting!

P.S.  Happy 37th birthday, Steve!  I love you.

1/25/13

January Flamingo Four

Ready for another Flamingo Four?  This month, three other designers and I each worked with these products:


       1. Graphic 45 patterned paper - "Well Groomed"
       2. Tim Holtz Giant Tag
       3. Pink Paislee Vintage Vogue buttons
       4. pearl trim

The first thing I did when I saw the supplies was to turn the patterned paper over and check out the B-side, as the A-side is totally not my style.  Fortunately, the B-side is!  I could definitely use the patterned paper and the tag on a scrapbook layout.

But what about the buttons and the trim?  The buttons are really chunky and I don't like putting bulky items like those on scrapbook pages.  So I started thinking about cards. Hmm... what to make?  

Inspiration struck.  I cut into the paper (always a little scary when you only have one piece and you HAVE to use it for an assignment), did some folding, added a button, and accented with Stickles.  Then I headed out into the garage, where I put on the shop glasses, grabbed a hammer, and started pounding on the pearl trim.


I removed about 1/4 of the beads on each end of the trim, headed back to the craftroom, and glued everything together.  When I was done, I had this:

 
The "purse" is fully lined... with the scraps left over from December's Flamingo Four!  

 
And when you pull out the tag... it's holding a gift card.

 
Curious about what the other designers made?  Head on over to Flamingo Scraps to see their projects.  As usual, my project is COMPLETELY different from what the other designers created! 

1/24/13

Goal 35: Library Roulette (Part 4)

Here are the last four books in my Library Roulette!

025: Library Operations
Google Top 100 Simplified Tips & Tricks
by Joe Kraynak


I wasn't sure what to expect from this book when I took it from the shelf.  It was published in 2005, so it would almost certainly have out-of-date material.  Not only that, I use Google pretty much daily and have for years; would there be any tips and tricks I didn't know?

The book is divided into ten topics with ten tips per topic.  I started with the first topic, "Maximize Google Search Options."  I was happy to discover that I only had to read through 3 tips before I learned something new!  I didn't know that you could use Google to search a specific website that doesn't have its own search bar.  I read through a few more tips and learned about using Boolean operators: in Google, you use +, - and OR.  I've tried using AND and NOT without success- now I know why.  I learned how to search for numerical ranges.  You can't use hyphens or the word 'to' - you have to put two periods between the numbers with no spaces separating them.  (For example, to search the nearly 41 years I've been alive, you'd type: 1972..2013).  Next, I learned how to search for pages that link to a specific webpage by typing the word link, a colon, and the web address.  Out of the first 10 tips, I learned something new from 4 of them.

As I moved on to the rest of the chapters, I didn't learn nearly as much.  In fact, there were only 4 tips in the remaining 90 that were helpful to me!  Some of the chapters were obsolete (does anyone use MapQuest now that the far-superior Google Maps exists?).  Some were about services that have changed significantly (Froogle is now Google Shopping).  Others were not relevant to me (like how to create a Google listing for a business).

Recommended: Yes, slightly.  I wouldn't recommend buying it, as much of the information is out-of-date, but it might be worth flipping through at the library to glean a few helpful tips.


750: Painting and Paintings
How to Paint Light
Barron's Pocket Art Guide


Reading this book was a lot like taking a graduate-level course without having any of the prerequisites.  Not that I've ever done that, since it makes no sense to struggle through an advanced class when you have no idea about any of the foundation material.  If there had been a Painting 101 book on the shelf, I would have chosen that.  Instead, I ended up with this thorough guide to painting light.  

Each section of the book is set up with several lessons and examples, which are followed by a "Let's Experiment" activity, an "Effects" tutorial, and finally "In the Style Of..." artist exploration.  The book is very well-written and easy to understand.  The examples are clear and beautiful.  A person with decent knowledge of painting techniques would get a lot out of this book.

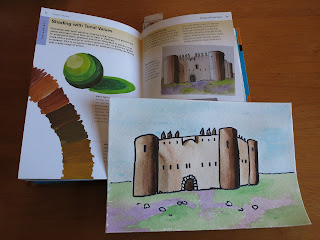
While I enjoyed the book, all of the "Let's Experiment" activities were more advanced than my skills.  I could have tried them, but I knew that my lack of foundation would have meant that I would spend FAR more time struggling to set up the starting point than actually applying the specific lighting technique to the painting.  I experimented with one activity- "Shading with Tonal Values."  It was an interesting challenge.  


Recommended: Not unless you are at least an intermediate-level painter. 


500: Natural Sciences and Mathematics 
How to Dunk a Donut: The Science of Everyday Life
by Len Fisher


"Scientists, like hangmen, are socially disadvantaged by their profession."  This is the opening sentence in a fascinating and funny look at the scientific principles at work in everyday live.  The book is divided into chapters including, among others: The Art and Science of Dunking; How to Add Up Your Supermarket Bill; How to Throw a Boomerang; Bath Foam, Beer Foam, and the Meaning of Life; and the Physics of Sex.  The book is informative and detailed, yet totally accessible to the non-scientist.  The author has a wonderful sense of humor and true dedication to the pursuit of answers.  I thoroughly enjoyed it.

Recommended: Yes.


003: Systems  
The Black Swan: The Impact of the Highly Improbable
by Nassim Nicholas Taleb


This is an incredibly difficult book to summarize.  From the inside cover: "A Black Swan is a highly improbably event with three principal characteristics: It is unpredictable; it carries a massive impact; and, after the fact, we concoct an explanation that makes it appear less random, and more predictable, than it was.  The astonishing success of Google was a black swan; so was 9/11."  The book is interesting, thought-provoking, and clever.  Taleb is a brilliant and fascinating person, as well as an excellent writer.  That said, did I actually enjoy the book?  Sometimes yes, but much of the time, no.  The book is not an easy read and does not lend itself well to the lifestyle of a busy mom picking it up for a few minutes here and there.  The book requires concentration and thought, as well as large chunks of uninterrupted time to absorb the material.  I am glad that I read it though.

Recommended: Not unless you have the time and interest to dedicate to reading it properly.


Goal #35 accomplished!  Even if I didn't totally enjoy every book, I absolutely loved this goal.  I already have plans for my next Library Roulette.... stay tuned!

1/23/13

Fiskateer Crop: October - December

Here are the last projects I made for the Fiskateers "Through the Year" crop.

The October challenge:
October makes me think of leaves. So, make a creation that includes at least 5 leaves (same or different). 
I mentioned that I will be making a creative gift for my sister's family after their new baby arrives in a few weeks.  For this challenge, I made a card that will go along with that gift.  I started by having Steve make a brown thumbprint (representing my brother-in-law).  I stamped my own thumbprint twice (representing my sister and my 12 year old nephew, who are almost exactly the same size).  Then Trevor stamped his thumb (representing his new baby cousin).


The November challenge:
So thankful!  Create 3 different thank you card designs. The 3 cards should be completely different from each other. 
For my first card, I used repositionable adhesive to adhere a tag to a piece of ivory cardstock, then misted with oranges and purples.  I removed the tag, then added a sticker sentiment.  I mounted the misted paper on purple cardstock, then added that to the card base.

Recognize this paper?  It's the paper I used for my Happy Holidays sign.  I stamped the background over and over with a single "thanks" stamp.  The design?  Self-scraplifted.

 
My last thank-you card is deceptively simple.  All I did was cut patterned paper to size, add the sentiment and mount it on black.  The paper already had the dots, ink, and other elements that you see.   
 
The December challenge:
The holidays are always full of delicious food. Follow this recipe to make a delicious scrapbook page layout.
3 buttons
3 different shapes
3 photos
1 yard of ribbon
1 border strip (cut, punched, ripped, etc., you decide!)
1 sticker
1 stamped image
Add in a sprinkle of creativity
Mix with a love for all crafts!
I have to admit, I freaked out a little bit when I read this.  My layouts are simple.  Really, really simple. I *might* have 3 pictures, 1 border strip, and 1 stamped image on a layout. Never more than that. I almost never use buttons (I don't like lumps), rarely put stickers on layouts (I use them on cards), and a YARD of ribbon? A YARD? A scrapbook page is 12 inches by 12 inches... where do you put a YARD of ribbon on a layout??

But, because I can't resist a challenge (especially a Fiskars challenge), I made a layout. I picked three pictures and added border strips and a title. I stamped a journaling box. Frankly, at that point, I was pretty happy with the layout and ordinarily would have called it done. But I struggled forward, adding buttons, random shapes, the required sticker, and the YARD of ribbon. And I actually really like the finished layout.


The 13th challenge:
Challenge #13—Because it’s 2013!
What’s old is new again! While you’ve been organizing (and re-messing) and sifting through all of crafty items this weekend, did you find something that you forgot you had? It’s time to use it! Create a project that includes that forgotten tool, stamp, die-cut shape, whatever! Make sure to tell us what it is you “found”!
I had an easy time with the 13th challenge. While I was struggling through the July flag challenge, I found a single sticker left on its sticker sheet. I thought I'd used all the stickers that coordinated with this fun line. I whipped up this quick birthday card, using that "found" sticker.

 
This was such a fun crop!  I can't believe how many projects I completed in such a short time. Thanks, Fiskars!

1/22/13

Fiskateer Crop: July - September

Here's the third batch of projects from the Fiskateer "Through the Year" crop.

The July challenge:
Create a project using a FLAG.  It can be a card, layout, tag, altered art, home décor—whatever suits your fancy. It can also be ANY type of FLAG – a state flag, country flag, garden flag, sports flag, holiday flag, birthday etc.
This challenge was really hard for me.  My mind immediately went to banners, but I decided against that.  (Are banners really flags?  I'm not sure.)  I got out a toothpick and set about making a flag.  Cut cardstock into a rectangle, attach a sticker or two, and glue it to the toothpick.  How hard could it be?  As it turns out, pretty hard (for me).  I couldn't get the proportions right.  And when I finally did get the proportions right, it didn't fit the sticker I wanted to use.  It was very frustrating.  With time running out, I submitted this card, even though I was not at all happy with it.


The August challenge:
After a summer of lots of parties and celebrations, we are often in need of sending out some cards of appreciation -- to say thank you, you're welcome, thinking of you etc.  Create a handmade card with a handmade, matching/coordinating envelope. It can be of any theme/size-- but they both MUST be made by hand and not premade.
I stumbled on this card sketch by Jessica Witty awhile ago and have been wanting to use it.  This was the perfect chance.  I'm down to almost nothing but scraps from Paper Loft's "Spring Fling" collection (probably about 5 years old), so it was a good choice for punching out circles.  When I made the matching envelope, I was careful to do my cuts and folds so that the decorative scroll border would follow the edge of the envelope.


The September challenge:
Back to school time: TAG you’re it!  Create one handmade tag.  It must include something orange and something green on it!
I think this is my favorite of all the things I made during this crop.  I love orange/green color combinations, I love polka dots, and I love simplicity.

 
Tomorrow: the October through December challenges, plus a 13th challenge.

1/21/13

Fiskateer Crop: April - June

On Friday, I shared my creations for the first three "Through the Year" Fiskateer challenges. Today I'm sharing the next three.


The April challenge:
APRIL SHOWERS! Think Baby, Bridal, Rain showers etc. Shower us with your use of at least 4 Fiskars tools on this project.
On the way to my sister's baby shower, my mom commented that she didn't have any girl baby shower cards.  Since I make all the cards my mom gives, this was a not-so-subtle request for more.  So I made a card for her to give at the next shower.  
I started with a shimmery pink patterned paper with dots on the front and "baby girl" printed on the back.  I used the trimmer (tool 1) to cut the background paper and to slice a thin strip of "baby girl" to use across the front.  I used a border punch (tool 2) to create the scalloped cardstock edge.  I layered the "baby girl" strip over the top and snipped it to size using microtip scissors (tool 3).  Finally, I used a heart punch (tool 4) and popped the heart up.     


The May challenge:
MAY FLOWERS! Since we know that April showers bring May flowers, use a Fiskars tool to make a flower and then use it on your project.
I've been wanting to try to make flowers from ribbon for awhile.  I decided to make an elegant silver and white flower to attach to a wine bag for the next time we gift a bottle of wine.  I used my Fiskars scissors, white satin ribbon, a Gluber, and a Prima embellishment.


The June challenge:
JUNE BRIDES!  Let's honor the June bride's white wedding dress by creating an all-white project. 
I started with a white card base and attached a piece of white cardstock that I'd run through a friend's embossing machine.  Since I already had the ribbon container out from the February and May challenges, I added a white grosgrain ribbon.  I dug through my alphabets looking for white and stumbled upon these 2008 beauties.  They were just the right size, but every letter features a winter symbol on it, so my choices of sentiment were limited to holiday themes.  It's not very "June" but I love how my card turned out and look forward to sending it next winter.


July, August and September tomorrow!

1/18/13

Fiskateer Crop: January - March

Twice a year, the Fiskateers who aren't able to attend the Craft and Hobby Association (CHA) tradeshow have a big online crop.  I love playing along with all the challenges.  This time, our theme was "Through the Year."  


The January challenge
January always seems to be a time for bridal shows, and wedding planning for all those newly engaged brides. Let’s start the challenges off with an easy one….create a wedding card for the bride and groom.
I started with some black dotted paper and silver frames that I won awhile ago.  I traced the frame on the back of the patterned paper, then cut it out to make a window.  I put the rub-on sentiment directly on the white cardstock base, then layered the patterned paper and frame over that.

This looks WAY better in person than it does in this photograph.  The frame isn't flat - it's popped up a little to provide dimension.  The whole project shimmers and shines.  The dots are little prisms that create a rainbow of colors as the card catches the light.


The February challenge:
February is the month for hearts and romance. Your challenge is to make a Valentine's card that does not have any hearts or the word love on it.
No hearts and no love... tricky!  I could have gone the easy route and made a kid valentine ("Owl always be your friend" or something similar), but wanted to try and make a Valentine for my husband without using hearts or love.  I pulled out pink cardstock and a red ribbon, as those colors scream Valentine.  Then I used a flower punch to create a tone-on-tone background for the card.  Finally, I went through my collection of stamps, rub-ons and stickers looking for an appropriate sentiment and found a "Forever Yours" rub-on.

I love you, Steve!  Pretend to be surprised when you see this again on February 14!  


The March challenge:
Have you check out the Design Team projects lately? Well now is the time to MARCH on over there and see what wonderful inspiration you find. You will find projects on sewing, cards, layouts, kids crafts, home décor and so much more. Create something that inspired you from the design projects.
I love seeing the amazing projects that the Fiskars Design Team creates.  My absolute favorite Fiskars designer is Lisa Storms.  Have you seen her work?  Amazing.  As I browsed through her stuff, I fell in love with her Easter Egg Hunt party.  She made the most adorable bunny-themed items, including a carrot garland that was so incredibly cute.  Trevor and I made this garland together, following Lisa's instructions.  We hung it over Trouble's enclosure.


Next week, I'll share my April through December projects, which includes one of the most challenging challenges I've ever done.

1/17/13

Cupcake Wars (Part 3)

Remember the lime and goat cheese cupcakes I made in December?  The ones I made after challenging my sister to make them immediately after our original family Cupcake Wars competition in September?  She'd declined at the time.  But when I posted my lime and goat cheese cupcakes on Facebook, Kari had the following response:
"Oh. Yuck. Seriously doubt I could've eaten a cupcake with chunks of goat cheese (which I really hate). I'll do my best to turn in my cupcake at Christmas. But, please be assured--I WILL be taking the easy way out with some cream cheese..."
Yea!  I love when friends and family play along with my silly competitions and experiments. True to her word, Kari brought these to our family Christmas celebration:  

 
First, a few things about Kari.  She doesn't really like lime (or any citrus).  She doesn't like a lot of types of cheese.  She doesn't do a lot of baking.  And, she was almost 8 months pregnant at Christmas.  (Only a few more weeks until I meet my first niece!)  Put all that together and I am super impressed that she made these lime and cheese cupcakes!  

But how did they taste?  Totally amazing!  She made the BEST lime curd I've ever had.  She added lime to a cream cheese frosting and it was delicious.  I LOVED these cupcakes.  Thanks for playing along, Kari!  

 
So why did I wait until mid-January to share cupcakes from Christmas?  As you recall, my mom had promised to make pineapple and grape jelly cupcakes.  I wanted to be able to share those in the same post.  She made a pineapple cake filled with grape jelly and topped with a grape jelly frosting.    


The pineapple cake was moist and tasty, but did not taste very strongly of pineapple.  The grape jelly filling was just odd.  The frosting was a bit too sweet, although the grape jelly taste did come through.  So, not nearly as successful as Kari's lime and cheese cupcakes, though I really appreciate the effort.

Mom brought along some unfrosted and unfilled pineapple cupcakes so that I could experiment with fillings and frostings.  After a few attempts, I didn't come up with anything that really worked.  Starting with commercial grape jelly really limits the options, since the texture, sweetness and amount of grape flavor are already established.  Maybe someday I'll try baking grape jelly into the cake just to see what happens.....