Pages

5/31/13

"Fireflies are Interesting Insects!"

As a year-end project, Trevor was assigned an at-home insect report. His first grade teacher has been very focused on report-writing. The children have written a report about once a month, researching, organizing facts, writing rough drafts, and editing. I was eager to see how well Trevor would be able to put those things together without his teacher's guidance.

The first step was selecting an insect. Trevor immediately chose the firefly. They don't live around here; I've never seen one and neither has he. Neither of us know much about them, so as far as I was concerned, this was an excellent topic. We went to the library and came home with two books - one a very simple children's book and one that was more advanced. I supervised as he read and then selected important facts - getting him to use his own words instead of copying from the book was, of course, a struggle. I typed his facts into the computer, then showed him how to move the sentences around to make a coherent report. When he liked the sentence order, he did a final edit for capitals and punctuation, ran a spell-check, and printed out the draft. Then he copied it by hand. That was the hardest part for him and he had to take several breaks.


Next was making a firefly to illustrate his report. We each made one. I can't resist doing an art project. This one is mine.


Firefly Craft


Materials: 


  • black construction paper 
  • clear vellum
  • yellow cardstock
  • watercolor paper
  • paint (brown, black, yellow, orange, and red)
  • yellow Stickles
  • a pencil
  • scissors
  • glue

We painted three sections on our watercolor paper - one for the body, one for the head, and one for the antennae and legs. Each started with a base coat of brown, then streaks of black, red, orange, and yellow over that.

 
Then we smeared Stickles on some yellow cardstock.  


When both papers were dry, we cut out our pieces: a long oval for the body, a round head, two small circles for eyes, 6 legs, 2 antennae, and sparkly yellow hindquarters.

 
We cut wing shapes from vellum, then curled them slightly around a pencil.   
 
We added a bit of glue, then tucked the wings under the body. The small amount of curl looked really cool. Here's Trevor's:

 
Here is the scanned version.  


Trevor is very proud of his report and project. And he's become a walking encyclopedia on the topic of fireflies. Fireflies are indeed interesting insects!

5/30/13

9 Wonderful Years

Happy anniversary to Steve, the most wonderful husband a woman ever had!

 
Cindy and Steve, 8th anniversary, 5/30/12

Here we are, nine years ago today, exchanging rings.  I love looking back on the layouts in the wedding album, even if I do occasionally cringe at how I was scrapping circa 2004....


This one is particularly special to me since Steve and I each wrote out what we said when we exchanged rings.  Writing by hand is difficult and often physically painful for Steve, so it is particularly special that he slowly and carefully printed out his words to preserve in the scrapbook.  It means so much to me.


Happy anniversary Steve!  Thank you for making the past 9 years the best years of my life.  I love you.

5/29/13

Freezer Biscuits

I'm always on the lookout for recipes with a make-ahead component.  I love to cook and bake from scratch and do so fairly often with Trevor.  But on those increasingly frequent days when he has soccer, book club, swim lessons or whatever else going on after school, there isn't enough time to do much cooking before dinner has to be on the table.

Which is why I was so excited to try making freezer biscuits.  You use a standard cream biscuit recipe, except after cutting the biscuits and putting them on pans, you pop them into the freezer instead of the oven.  After they're frozen solid, you transfer them to a ziplock bag and store them in the freezer.  


When you want some biscuits, say to accompany some Slow Cooker Minestrone, you simply toss your frozen biscuits onto a parchment-lined baking sheet and bake at 450° for 20 minutes.  They emerge from the oven just as fluffy and delicious as if you'd made them that day.


What a great timesaver! 

5/28/13

Slow Cooker Minestrone

Back in January, my friend Izzy posted a recipe for crockpot minestrone soup that sounded both delicious and easy - definitely a winning combination! You can see her picture and get her recipe here. Yum!

While my intent was to actually follow her recipe, I made quite a few changes (due to a combination of Steve's food sensitivities, my personal preference and in an effort to use what we had on hand). Fortunately, soups are very flexible and forgiving! Here's how mine looked.  


  And how did it taste? Delicious! All three deRosiers gave it two thumbs up.


Slow Cooker Minestrone

                            1/2 onion, chopped                                                2 16-oz cans vegetable broth
                            1 clove garlic, minced                                            1 28-oz. can crushed tomatoes
                            3 carrots, chopped                                                 1 tsp. dried basil
                            2 zucchinis, sliced                                                   1/2 tsp. celery salt
                            1 15-oz. can kidney beans, drained                      1/4 tsp. pepper
                            1 15-oz. can cannellini beans, drained                 2 c. cooked macaroni

Combine all ingredients in a slow cooker except the two types of beans and the macaroni. Cover and cook on low for 6-8 hours. Twenty minutes before you want to eat, add the beans. Ten minutes later, add the cooked macaroni. Ladle into bowls and garnish liberally with parmesan cheese.

Tomorrow I'll share the biscuits that I served alongside the minestrone.

5/27/13

Angry Birds Cupcakes

I have a lot of fun designing Trevor's birthday cake each year.  I've made a Very Hungry Caterpillar cake, a Cookie Monster cake, a Monsters Inc. cake, a maze cake, a giraffe cake (my most popular post until yesterday when The World's Greatest Classroom Birthday Treat overtook it), and a Lego cake.  I've been thinking about my plans for the Angry Bird cake for awhile.

Except Trevor suddenly decided he doesn't want an Angry Birds cake.  He wants cupcakes so that each child can decorate their own.  I don't think I've mentioned on the blog that Trevor has been taking a cake decorating class.  (We LOVE it.)  This class has taught him, among other things, that cake decorating is not something to be delegated to Mommy, but instead something that kids can do themselves.  He insists that it will be much more fun for his friends to decorate their own cupcakes than just eating a cake I made would be.  He's right, of course, but it does make me a little sad that I won't be making his cake.  On the other hand, not having to decorate a fancy, beyond-my-skill level cake is a bit of a relief too.

Yesterday we took a trip to the candy aisle together to see if we could find candies that would make a cute Angry Bird cupcake.  We settled on Candy Eyeballs, black licorice, and a package of Mike and Ike.    

 
We baked up some chocolate cupcakes and frosted them with red frosting (made by mixing cherry Kool-Aid with vanilla frosting).  We added eyeballs, then used kitchen shears to cut the licorice into thin strips to make eyebrows.  We put a Mike and Ike down for the top part of the beak, then cut a second one to form the bottom part of the beak.  

Here's our first draft.  It's definitely not quite right.

 
Would an orange beak be better?  No.  Worse.


What about just a single beak?  No.

 
Trevor and I were contemplating taking a trip to the specialty candy store to find better beak options.  Steve came home as we were mulling it over and suggested slitting a Mike and Ike vertically to make a beak.  Brilliant!  We used the kitchen sheers to do a quick snip 3/4 of the way through a yellow candy.  Cute!  We snipped a red candy into thirds and added the red bird's signature feathers.  So much better!   
  
I can't wait to see the versions Trevor's party guests make!

5/24/13

Small Adventures are Still Adventures

Recently, a friend referred to me as adventurous.  I had to laugh - I'm as risk-averse as a person could be.  I have no interest in sky diving, mountain climbing, or any of the activities normally considered adventurous.  I lack the thrill-seeker gene and get no adrenaline rush from things that excite others.  I am an extreme advanced planner and hate spontaneity.  "I'm a lot of things," I told her, "but adventurous is not one of them."   

"No," she insisted, "you are a very adventurous person.  Small adventures are still adventures."  I realized she was right.  I'm a risk-averse, non-thrill-seeking, advanced-planner who actively seeks and creates small adventures all the time.  

Case in point: there's a new-ish gourmet donut shop in town, so in April I suggested that for our May MOMS Club brunch, we order a bunch of different donuts and do a formal taste-test with scorecards and crown a winner.  Everyone liked the idea, so that's exactly what we did.  I made up a scorecard.  Each donut could earn up to 3 smily faces for appearance, 5 for flavor, and 2 for originality.  I printed enough scorecards for everyone, then headed over to Red Devil Donuts to select some of their most interesting and appealing donuts for our taste-test.


We started with The Ozzy, described as a red velvet donut with blackberry glaze and chocolate drizzle. It was very pretty and smelled great.  We awarded appearance and originality points, then moved on to tasting.  While it was yummy and fresh, there was no discernible blackberry taste.  The chocolate taste was very mild.


We moved on to The CHP, a cake donut topped with maple glaze and Applewood bacon.  We had quite a bit of discussion about this one.  We loved the fresh, soft, and sweet cake donut, the flavorful maple glaze, and the perfect balance of salty/sweet that the bacon provided.  We all agreed - this was a really good donut.


Our third donut was The Curse, described as a raised donut with peanut butter icing and chocolate covered pretzels.  We spent some time debating whether these are 'chocolate covered pretzels' or not (barely).  We liked the donut, but there was a bit too much of the very-sweet frosting and the chocolate/peanut balance wasn't quite right.  We felt the whole pretzels made it a bit difficult to eat and would have preferred them broken into pieces (and actually covered in chocolate).      


Next up was The 50/50 Bar.  According to the menu, it is a vanilla creme filled long john dipped in orange glaze.  Um... no.  It was not filled; the creme was globbed on top.  It was not dipped; the glaze was clearly drizzled.  This could have been a beautiful donut.  I gave it one happy face out of three for appearance and that was very generous.  Now that I'm looking at the photos, I'm wondering what I was thinking awarding it even one.  

I'm not sure why, but I hate pastry creme, so the big globs of it on the donut were extremely unappealing to me.  I loved the orange glaze though.  The others liked this donut more than I did, as everyone else thought the creme was tasty (though all wondered why it was on top instead of inside as advertised).     


Our fifth donut was The Cricket, a chocolate cake donut with mint green icing and mini chocolate chips.  I had the highest hopes for this one.  I love mint and I love chocolate and I especially love them together.  The green was so pretty, but where are the mini chocolate chips? I count exactly three standard-size chocolate chips.  We each took a bite.  What the heck?!  It's not peppermint, it's spearmint.  It was so weird (and not in a good way).  What a disappointment when I'd been expecting this to be my favorite.    


The final donut was The Ultimate Sin, described as a chocolate cake donut with chocolate icing, chocolate creme, and one truffle topped with a shake of cocoa powder.  Our first observation - this is a really ugly donut... and it's missing the cocoa powder.  It was very difficult to cut into small pieces because of the very dense truffle hidden in the center.  When we tasted it, we were disappointed once more.  I hated the creme (everyone else said it was fine), but the donut itself did not have a deep or rich chocolate flavor like we'd expected.  


We totaled up all the points.  Here's my scorecard.


Time to declare the overall winner!  Starting from the bottom, the loser was The Cricket with an average of 4.5 points out of 10.  In 5th place was The Ultimate Sin, with an average of 5.0 points.  Fourth place went to The Curse, with 6.0 points.  In 3rd place was The 50/50 Bar with 6.5 points.  There was a tie for 1st place between the Ozzy and the CHP, both of which averaged 7.5 points.

We had a blast with this!  It's always going to be fun to get together with friends and eat donuts, but turning it into a taste-test added so much to the experience.  We'll definitely be doing something like this again.  

Small adventures are still adventures.

5/23/13

My Creative Dad - Intarsia

I've mentioned several times that my dad is a very talented woodworker.  He's done a huge variety of wood-related projects over the years (furniture, cabinetry, picture frames, shelving, etc.), in addition to large-scale projects like home additions.  But his favorite hobby is intarsia.

Intarsia is a woodcraft in which the artist uses different sizes, shapes, and species of wood and fits them together to make a picture.  There is no staining or painting - all color comes from the choice of wood.  It is a very time-consuming and exacting art.  The results are stunning.

My dad has made hundreds over the past 15 years or so.  We have around a dozen or so on display in our house, plus another handful that are seasonal and come out for Christmas.  My parents have a couple dozen of his pieces on display in their house as well.  The last time I visited, I snapped pictures of a few of my favorites.  Remember, all the color is the natural color of the wood.

 
This USA piece is about 5 feet across.

 
I'm blown away by the colors and patterns in this fruit bowl.

 
Isn't the cornucopia amazing?

 
His designs come from a variety of sources.  He buys some patterns from Judy Gale Roberts and creates his own patterns from coloring books and photographs.  One of the coolest was the Trouble intarsia he made for Trevor for Christmas 2011.


I've made exactly one intarsia project in my life.  It was a very simple Winnie-the-Pooh that I made for a friend's baby shower gift back in 1993.  I know I have a picture of it somewhere, but I haven't found it yet.  After working on such a very easy project with so few pieces, my appreciation for my dad's amazing artwork rocketed.  He makes it look so easy, always a sign of talent and many years of practice.

Happy 65th birthday Dad!  I love you.

5/22/13

Blinky, Pinky, Inky, and....

At least once a month, a friend hands me something unusual and asks, "Can you use this in your crafting?"  It's never normal stuff, like fabric scraps, or glitter, or egg cartons.  No, it's weird stuff.  Like this:

 
It's a full box (12) of extra large rubber finger tips.  And by "extra large" they mean "far too big for human use."  Someone at a friend's work purchased this huge size and couldn't use them. Since she didn't know any giants, she passed them along to me.

They sat on the back corner of my desk for at least 8 months.  I knew there was a craft in there somewhere, but I just couldn't find it.  One day, I was tired of them sitting on the desk, so I opened the box and lined up 4 of them in plain sight where they would inspire me.    


Within minutes, I knew what to make.  I grabbed the paint and did a test run to see if acrylic paint would stick to the rubber.  Yes!  I grabbed my beloved microtip scissors and carefully cut little triangles out of the bottom of the four finger tips.  Then I painted them.  One red, one pink, one green, and one orange.  When they were dry, I added googly eyes.

I rooted around the craftroom to find some yellow cardstock and a clear lid to make a quick accessory.  Then I lined them all up to take this picture.  


Obviously, the Pac-Man needs work.  Eventually, I'll probably think of a cute way to make a Pac-man that will stand up.  I might need to resort to clay or something similar.  In the meantime, I'm really happy with my Blinky, Pinky, Inky, and .... do you remember the orange ghost's name? It's Clyde.  Just a little '80s trivia for you.  If you got it right, you're totally tubular.

5/21/13

Happy Birthday Suzanne!

Today I'm joining the rest of the Flamingo Scraps Design Team in wishing Suzanne a very happy birthday!  Each of us made a card using Flamingo Scraps supplies.


Do you recognize the supplies I used?  They're leftovers from the six months I've been the Flamingo Four Coordinator!  Here's a rundown:

  • November Flamingo Four:  I used the Clam Bake Glimmer Mist to give some color and shine to the paper that holds the sentiment.
  • December Flamingo Four:  A little grey paint transformed the Maya Road chipboard frame into a resting place for the initial.
  • January Flamingo Four: The only item still left from January was the sparkly Pink Paislee Vintage Vogue button.  It adds fun shine to the card.
  • February Flamingo Four: The base of the card is Heidi Swapp "Vintage Chic" patterned paper.  There's a subtle ledger print on the B-side, which provided nice, straight guidelines for writing my message on the inside.
  • March Flamingo Four: The yellow and striped papers are Pink Paislee's "Indigo Bleu."  I love the colors and subtle patterns.
  • April Flamingo Four:  The S is from Pink Paislee's 'Parisian Anthology' Corrugated Alphabet.  This was only the second letter I've used from the package, so expect to see these pop up plenty of times in the future!

I had so much fun challenging myself to use up the leftovers! It was tempting to skip a month (I'm looking at you, January button...) but in the end I think the card shows a perfect marriage of Flamingo Scraps products and my style.

5/20/13

Whole Orange Cake

I've mentioned our prolific orange tree many times.  This year, there are more oranges than ever before, which just didn't seem possible.  We eat oranges morning, noon and night. We've given dozens away.  The tree is still full.  It's May.  As far as problems go, it's a great problem.  

Last year, I discovered a recipe for Blender Quick Orange Bread that literally uses the whole orange, peel and all.  I was extremely wary about a bread made from orange peels and pith, but it was delicious and I've made it several times since.  Then I discovered another whole-orange recipe, Orange Cookies. Also delicious.

Now that I know that orange peels and pith do indeed make delicious baked goods, I was really excited to find a recipe for Whole Orange Cake in the March 2013 issue of Sunset Magazine.  I went outside and picked some good-sized oranges, washed them, cut them into chunks, and threw them in the blender.  Then I measured out 1.5 cups.  

 
The batter came together quickly and easily and smelled really good.

 
The house smelled amazing while it was baking.  The cake looked perfect when I removed it from the pan.  It was hard to wait to add the glaze.  

 
The verdict?  Absolutely fantastic!  Another great recipe to add to my file of what to do with a bumper crop of oranges.  


Anyone have any other great recipes using oranges?

5/17/13

"Mommy! Watch this!"

This is the last of the 14 layouts I made for National Scrapbook Day challenges.  (I made 11 of them on NSD and the remaining 3 the next morning before Grandma delivered Trevor to me.) Not knowing what the challenges were ahead of time, I didn't preplan any pages... with one exception.  When I printed these pictures, I thought the jumping picture desperately needed a speech bubble with Trevor yelling, "Mommy!  Watch this!"  So I found a die cut and had him write those words in his handwriting before he left for the weekend.

When the challenges were announced, one of the first I tackled was Scrapbook.com's "You Spin Me Right Round Baby" challenge, which required us to make a pinwheel and add it to a page.  I made a pinwheel, intending to pair it with the picture of Allison, but it wasn't working for me.  I thought the colors of the pinwheel worked with the colors of the corn bath, so I built this layout around it.

 
I would never have put a pinwheel on this page if not for the challenge, but I love how it turned out. The challenges really pushed me outside my comfort zone and stretched my creativity.  More than anything, that is what I love about National Scrapbook Day.  My calendar is already marked for May 3, 2014 and I'm counting down the days. 

5/16/13

Streamers and Colors

Here are two more of the layouts I made for National Scrapbook Day challenges.  The first was Scrapbook.com's "Party on a Page" challenge.  We had to use a party supply (like a goodie bag, straw, or cupcake wrapper) on a layout.  I used some of the streamers that were left over from the Cub Scout pinata I made.  I created the ruffle under the photo, then I experimented with using crepe paper in a punch.  Once I had 5 semi-acceptable hearts, I layered them with the best looking one on top and added them to the upper left corner of the page.


This next layout was for the Fiskateers Color Challenge.  We had to use at least three colors from Pantone's Spring 2013 Color Report.  I chose Grayed Jade, Tender Shoots, and Dusk Blue to make this layout.

I have one last layout to share from my extremely productive National Scrapbook Day.  I'll share it tomorrow!  

5/15/13

Washi and Triangles

Today I'm sharing two more of the layouts I made for National Scrapbook Day challenges.  Both use pictures from Halloween.

The first was for the "Ways to Washi" challenge at Scrapbook.com.  Part 1 of the challenge was to watch this 40 minute video demonstrating 12 ways to use washi tape, then the second part was to make a layout using at least three of the techniques.  I freaked out a little bit when I saw that the video was 40 minutes long as was worried that I'd be wasting precious scrapbook time. But my worries were for nothing, as the video was excellent and gave me lots of ideas.  I played along as Kels demonstrated and learned so many different ways to use my growing stash of washi tape.  As you can see, I journaled on washi, used a strip as a border, and framed the whole layout with washi.  

 
I made my "Angry Squash" layout for the triangles challenge at Scrapjazz.com.  I struggled a lot with the color scheme for this layout.  I wanted the layout to read 'Halloween' but it's hard when the only picture is red, green and blue.  After playing around with all sorts of colors, I settled on what you see.  The tiny red and blue stripes and the green word provided a connection to the photo.  


Here's the story behind the Angry Squash, with pictures of the Gourd Foreman Grill that won the competition.

I'll share more National Scrapbook Day layouts tomorrow!

5/14/13

Challenging Challenges

They're called "challenges" for a reason, but some of the National Scrapbook Day challenges were far more difficult for me than others.  Today I'm sharing two that really pushed me out of my comfort zone.  

I made this layout for a Scrapbook.com challenge to use a punched top layer of cardstock or patterned paper with another piece of cardstock or patterned paper as the base.  I'd never done anything like this before.  I found a large circle punch and cut a bunch of holes into a piece of white cardstock.  The punch only reached so far, so I had to be creative in where I placed my pictures so that it looked like the pattern was all over the paper.  I backed it with blue patterned paper, then chalked around the cardstock to add a little color and interest.  


I made this next layout for the Fiskateer Hexagon challenge.  I don't have a hexagon punch, don't have a die-cut machine set up (I finally put my Wishblade away after not using it for about a year), and couldn't find any hexagon paper.  I did, however, discover a hexagon foam stamp.  I carefully stamped gold-on-gold all over the background, which was a major nightmare with a foam stamp you can't see through.  I added the photos, title and journaling about our 'new' year's celebration, then tucked glittery hexagon cut-outs behind that.  

 
 More NSD projects tomorrow!

5/13/13

More 'Then and Now' Layouts

As you all know by now, my absolute favorite scrapbook pages are Then-and-Now layouts, or any that show growth or changes over time.  Today I'm sharing two that I made on National Scrapbook Day.

Back in November, Trevor and I did a major cleaning and donated a bunch of toys and clothes he'd outgrown.  One of the items in the giveaway pile was a Bob the Builder hat and tool belt that he'd LOVED when he was a toddler.  I found some pictures to show him... and the next thing I knew, I'd talked him into recreating one of those pictures.  I love this layout.  It's amazing to see and remember how much he has changed in 5 years.  I used my own Sketch #4 for this page.

 
This next layout isn't quite the same as my other Then-and-Now pages because the two photos aren't of the same people.  The first picture is my nephew Timothy holding my son Trevor on the day he was born in 2006.  I didn't take that picture; I'd had a c-section two hours earlier and was so focused on the itchy tubes up my nose that I barely registered that we had visitors.  I did take the second picture; that's Trevor meeting his new cousin Allison (Timothy's sister) the day she was born back in February. 

 
This was for a Scrapjazz.com sketch challenge.  I love how it turned out.  I don't think I could have come up with a design like this for these pictures without the sketch inspiration.  

5/10/13

Project 41: May

I'll share more of my National Scrapbook Day pictures on Monday. In the meantime, it's time for May's Project 41, my plan to try each flavor-of-the-month at Baskin Robbins with a different friend as a year-long celebration of my 41st birthday. Three months in, I'm SO incredibly glad to be doing this. It has turned into so much more than just eating ice cream. 
 
This month, I asked my friend Sara to join me. I met Sara a few years ago when we were both serving on the board at our preschool. Her kids are younger than mine (kindergarten and preschool), so she only has 3 hours a week when both kids are in school. We met at my neighborhood Baskin-Robbins during her one free time block.

We went up to the counter and scanned for the flavor-of-the-month. Not there. The employee told us that there was an error and they were sent last month's flavor and that they wouldn't have this month's for a day or so. He was extremely apologetic and offered us free ice cream then and we could come back the next day to get the flavor-of-the-month. But Sara wasn't free the following day. What to do?!

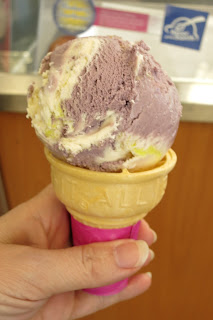
The employee graciously offered to call other Baskin-Robbins stores in the area to see if any had the correct flavor. The one in the next town over did. We hopped in the car and headed over. It was one of those tiny ice cream counters inside a gas station mini mart, a far cry from the store we'd just left - clean, large, with good indoor and outdoor seating, as well as an adjacent shaded courtyard. But they had the correct flavor, Blueberry Shortbread, described as "delicious shortbread and blueberry flavored ice cream with a tasty and textured lemon shortbread cookie swirl."


I presented the buy-one-get-one coupon Baskin-Robbins had sent me (which the gas station employees didn't recognize) and ordered two cones of the flavor-of-the-month. I tried to pay with my Baskin-Robbins gift card, but they said they couldn't accept it. (Grrr...) We brushed some lettuce off one of the small tables in the mini mart and sat down. Here we are. Take note of the beer and chips in the background.


Sara and I had a wonderful time despite the less-than-ideal lead up. The time flew by. We spent the majority talking about parenting philosophies, difficult decisions and thoughts regarding our children's education and schools.

So how was the ice cream? Well... when I'd first told Sara about Project 41, she'd made the comment that even if you don't like a flavor, it's ice cream, so it can't be that bad. And that's pretty much how we both felt about Blueberry Shortbread. It definitely wasn't BAD (I ate it all and enjoyed it), but I won't be ordering it again. I liked the shortbread part and the lemon swirl, but I didn't love the blueberry and didn't think all the flavors really went together.


Thanks to Sara for joining me! I'm so excited to see what future months of Project 41 will bring!