7/31/14

For Izzy

If I made a list of all my friends, people who I count on, who support me, who care what's going on in my life, who make a point to keep in touch... at least half of them would be people I have never actually met in person. Some may think it's impossible to really be friends with someone you've never met, but there's no question in my mind that my friends who I haven't met (yet) are just as valuable and real as the friends I see in person. One of my haven't-yet-met friends is Izzy.

Izzy and I met years ago on Scrapbook.com. She's incredibly creative and makes beautiful scrapbook layouts, cards, and other stuff. Unfortunately, she hasn't been creating anything for the past few months, as she's been battling a very aggressive and rare cancer. Today is her sixth and final chemo treatment.

When a local friend has a serious illness or injury, there are lots of helpful things you can do: babysit her kids during treatments, bring a casserole so she doesn't have to cook, run her errands when she's unable to drive. But when the friend lives 2500+ miles away, those things aren't possible. Other than be there emotionally, there usually isn't much you can do.

A few weeks ago, Izzy asked her Facebook friends for a small favor. She wanted to celebrate her last chemo treatment with homemade "Last Chemo!" party hats, crowns, etc. for herself and her oncology nurses. She would then donate the items to the center for other patients to wear during their last treatment. I thought this was a wonderful idea. 

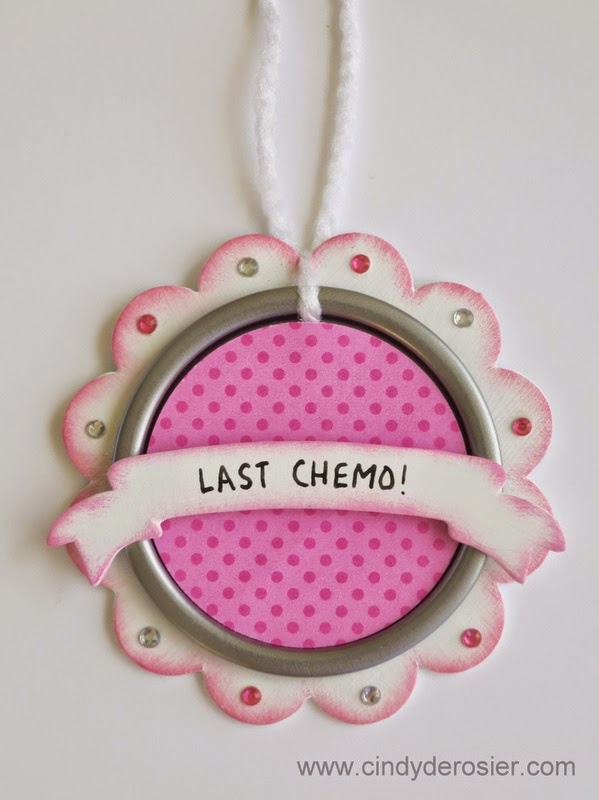
I decided to make a necklace. It needed to be durable, both for mailing and because it will be worn by multiple people. I gathered together the following items:


Yes, that is a juice lid. I saved the lids when we made Rhubarb Slush Punch, because they are really handy for crafts. I used the Crop-a-dile to punch the hole and it went through easily.

Here's the finished necklace:


I wrote a message on the back for Izzy and all future cancer patients who might wear it. I hope it brings them strength and helps them feel like the warriors they are.

7/30/14

A Card for Jordan

Have you ever heard of femoral derotation osteotomy surgery? I hadn't until last week, when I learned that my friend Heather's 10-year-old daughter, Jordan, would be undergoing this procedure. Jordan has cerebral palsy and this surgery should eventually allow her to walk correctly. During the surgery, the doctors will break both femurs, rotate them into the correct position, and insert rods and pins. The recovery process is long. 

Heather mentioned how much Jordan would love to receive handmade cards to open during her recovery. I wanted to send something uplifting, positive, and sparkly to put a smile on Jordan's face. I found a beautiful hot air balloon sticker, got out the Stickles, and painted them on to change the muted colors of the hot air balloon to bright and sparkly.  


I cut a sky blue card base, punched some clouds, and added the glittery hot air balloon.  


I know that Jordan and her family will appreciate any prayers and well-wishes for tomorrow's surgery and the long recovery process. If you would like to send Jordan a card or follow her recovery, you can find information on Heather's blog

7/29/14

Ellia at 5

There aren't too many people who I have known for their WHOLE life. I can think of exactly five: Trevor (of course); my younger sister, Kari, who I met in the hospital when she was a few hours old; Kari's kids, Timothy and Allison, each of whom I also met in the hospital when they were a few hours old; and my goddaughter Ellia, whose birth I witnessed five years ago.

Each year, I make a framed layout for Ellia's birthday, just like I do for her older sister, Kylinn. Ellia requested purple, so I dug out three purple papers, a purple pen, purple ink, and purple Stickles and got to work. The first step was changing yellow letter stickers to purple.


The layout came together quickly and easily. Here it is:


Here are the layouts I've made for her the past four years:


Happy 5th birthday, Ellia!

7/28/14

Kylinn at 8

Each year, I make a framed scrapbook page for my goddaughter Kylinn's birthday. This year, for the first time, she requested a specific color scheme: lavender and pink. Yikes. Totally not my colors at all. But, anything for the Birthday Girl!

Thank goodness for Tanya's box of goodies.  It was loaded with all sorts of pinks and lavenders, stuff I never buy. While there were lots of pinks and lavenders to choose from, there weren't any papers that combined the two colors. I selected a pink and white floral to use as the base for the layout. I matted the photo with a lavender, then used the scraps to punch small circles, which I added as centers to the floral background. I inked some light pink letters to make them darker, then added Stickles so that they'd sparkle. Here's the finished layout:  


Here are the previous seven years.  I love going back and reading the words I used to describe Kylinn each year.


Happy 8th birthday, Kylinn!

7/25/14

The Cursive Project: Narwhal

Trevor chose "narwhal" for Letter N of The Cursive Project. As I mentioned in that first post, Trevor drafted the whole A-Z list ahead of time, so I've had plenty of time to think up a craft for each letter. Some have been easy, while it's been a major struggle to think up a cute, original craft for others. I was stumped about how to make a narwhal, until the day Steve offered to do a grocery store run to pick up the only two things we needed: bread and milk.

I do 99% of the grocery shopping, and when I do, I always get a full cart's worth. Rather than do a quick run for two little items, I'm more likely to do without them until my next major grocery store trip. Steve doesn't mind running to the store; in fact, since he works from home, he often welcomes quick errands that give him a reason to leave the house. Anyway, my point is that Steve went to the grocery store to get two items. He has never, EVER, come home with just the items he planned to buy. He almost always comes home with treats that I never buy, things that aren't on sale, etc. We all know this, which is why Trevor is happy to accompany Steve to the grocery store and doesn't always choose to go with me: Daddy says yes to everything Trevor asks for, and Mommy does not. This time, in addition to bread and milk, they came home with Twinkies.

I can't remember the last time I had a Twinkie, as it's been years (probably the last time Steve brought some home from the store). I don't love them, and if I'm going to indulge in a treat, I'm not going to choose one that's only so-so. As Steve and Trevor were enjoying their after-lunch Twinkies, it struck me: a Twinkie would make an excellent narwhal! 

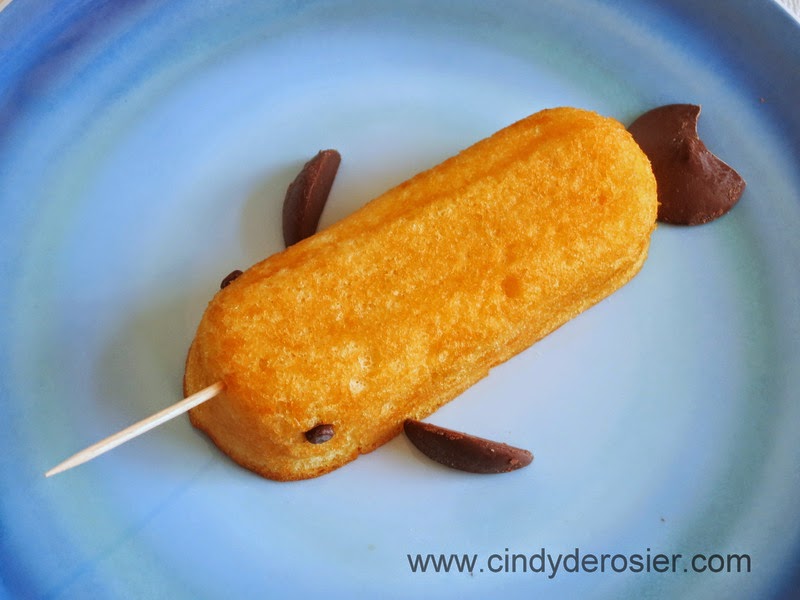
Time to create! We looked at photos of narwhals and talked about what we could use for each feature. After digging in the pantry, we came up with our supplies and got to work. Here is my Twinkie narwhal:


This is Trevor's. He preferred a toothpick for the horn instead of the twisty candle.


The eyes are mini chocolate chips and the fins are Melt 'n' Mold wafers that we carved down with a knife. 


We were both really happy with our narwhals except for the color. Narwhals are dark and speckled, not yellow and cake-like. Perhaps if we used a pastry brush to add cocoa powder to the Twinkie? Yes! Much better.


Finally satisfied with our narwhals, I lit the candle. 


A great start to the second half of The Cursive Project!

7/24/14

The Cursive Project: Moon

For Letter M of The Cursive Project, Trevor choose the word moon. Having taught about the solar system to 11 years' worth of 4th and 5th graders, I had a number of art projects in my mind. We ended up combining my favorites into something I never did in the classroom, primarily because of the drying time required. It's nice not to have limitations like that on projects we do at home.

Step one was to splatter yellow paint onto black cardstock.


We used a stencil brush, though an old toothbrush works really well too.


While that was drying, we worked on the moon portion of the project. We gathered our supplies: heavy watercolor paper, a circle template, white paint, flour, an empty roll of tape, and an empty pill container. We each cut a large circle from the watercolor paper and set it aside. We each put white paint into a container and then stirred in flour until the paint looked like spackle. (Trevor added a few drops of yellow paint to his; I kept mine pure white.) We used brushes to spread the thickened paint across our cut-out circles. When the circle was covered, we used the tape roll and pill container to stamp craters into the moon.


Here's how mine looked.


At this point, we set our moons aside to dry. It's very hot and dry here, and they still took a full 24 hours to dry completely. Plan on multiple days if it is cool and/or humid.

When the moon is dry, you can leave it as is... or not. I chose to use grey ink to add extra dimension and shadows to the moon. Trevor chose to cut his moon into a crescent. When you're happy with your moon, attach it to the splatter-paint background. We used a very strong double-stick tape.


Here is my finished moon:


This is Trevor's.


We're halfway done with The Cursive Project... on to Letter N!

7/23/14

The Cursive Project: Llama

Letter L of The Cursive Project couldn't have fallen at a better time. Trevor chose "llama" for Letter L, his godmother Jonna owns a llama, and she (Jonna, not the llama) would be coming to our house on the very day we were scheduled to make a llama craft! I asked Jonna for llama craft ideas and she said she could do a llama draw-along. Perfect!

First, we looked at pictures of Jonna's llama. Meet Leia. 


Time to draw a llama! I snapped a very quick picture of each step as I drew, so please forgive the poor photo quality. I also zoomed inconsistently, which makes the first steps appear larger than they should. Sorry about that.

Step 1: Draw two large raindrops next to each other. These are the legs. 


Step 2: Draw horizontal lines to connect the raindrops and form the llama's body.


Step 3: Add a downward curving tail and flat ovals for feet.


Step 4: Add a neck and head, positioned directly over the front teardrop. The top lip protrudes over the bottom lip.


Step 5: Add ears that point up and forward.


Step 6: At this point, you can add an eye and erase any extra guidelines. Instead, we cut out our llamas and used them as tracers to cut llamas from cardstock. 

This is my llama: 


Here is Trevor's. 


This is Jonna's. She added a dark patterned paper to the feet and ears to give them some definition. 


I love how they turned out. Our llamas are just the right size to use as a card, so now we have some cool llama cards to send! 

7/22/14

Entering a Collection

Over the last 35ish years, I've entered something in nearly every non-livestock division of the county fair, with one notable exception: I'd never entered a collection. As I was looking through the entry guidebook back in the spring, I decided to finally tackle a collection. I'd recently come across my 4-H hat and about 10 lbs. of trading trinkets that I'd received during my numerous trips as a State and National 4-H Ambassador. I thought they'd make a pretty interesting and unique collection display.

I started by going through all my trading trinkets and setting aside any pins, buttons, or other items with the 4-H emblem or name on them. I selected one from each state. It wasn't a complete collection of all 50 states, but it was close. Paired with my 4-H hat with all my awards on it, it looked pretty good. Most importantly, odds were very slim there would be another collection like it at the fair. It's not something you can just go out and buy.

According to the entry guidebook, the collection display boxes were three different sizes: 1' x 3', 2' x 3', and 3' x 3'. The small size was perfect for my display. While I was working on my display, Trevor was working on his own display of his Perler Bead art. He too decided that the smallest size would work best for his collection. We measured out the exact size on our dining room table and practiced setting up our stuff.  


When the entry delivery day came, Trevor and I made sure to be the first ones there. The display cases were first come first served and we both wanted one of the small ones. I helped Trevor check in, then left him on the Youth side of the building setting up his collection. I headed over to the Adult side and started mine. 

It was immediately apparent something was very wrong. I'd cut green craft foam to exactly 1' x 3' to serve as the base for my display. It didn't fit AT ALL. Not even close. Turns out the alleged 1' x 3' display case was actually about 8" x 46". My base was too wide and too short. It looked terrible.  

I called the Exhibits Coordinator over and showed her that my base, cut to the exact size specified in her entry guidebook, did not fit. She was very apologetic (though offered no explanation). She said that I was welcome to use one of the other sizes. This was not a great solution, as I didn't have any extra foam. I tried out the other two sizes (neither of which were remotely similar to their advertised 2' x 3' or 3' x 3') and settled on the medium-sized one. It left a large border around my display, but at least everything fit.  Here's my finished display:


Backing up, you can see that there's a lot of extra room in the case. That upper shelf is the alleged 1' x 3' space that I rejected. Hopefully whoever uses it didn't cut their base to size.


Here are some close-ups of the display:


My sign reads:
"I was a member of 4-H from 1983, when I was 11, until I aged out in 1991. My 4-H experience was amazing.  There's no doubt in my mind that 4-H was instrumental in making me who I am today. All these years later, when I look back on my 4-H career, I am so incredibly grateful for the opportunities and experiences I had. I was the State Winner in Breadbaking in 1988, served as an Alameda County All-Star in 1988-1989, earned my Emerald Star in 1989, represented California 4-H at the Model Assembly of the Organization of American States in 1989, was a California Diamond Star in 1990-1991, and served as California's National Ambassador in 1991-1992, just to name a few of the highlights.  
By diving into everything that was offered and constantly striving "To Make the Best Better," 4-H opened many doors for me and exposed me to the world beyond my city, county, state and country. Through 4-H, I had the opportunity to travel extensively. I attended conferences and trainings throughout California, as well as in Washington D.C., Chicago, and New York City. At each of these events, we were encouraged to bring pins, buttons, or other items representing our home to trade with new friends from around the world. There isn't a display case big enough to show all the interesting items I was given over the years, so I've limited this collection to trading items from different states (and Canada) with the word 4-H or a clover on them. Putting this collection together brought back many fond memories."  
.....

Meanwhile, over in the Youth area, Trevor was having the same problem I had: his carefully planned display, measured to exactly fit the dimensions given in the entry guidebook, did not fit the actual space. He ended up moving his display to the medium-sized area also.


His sign reads: 
"This is my collection of Perler Bead designs I've made. These aren't all of the Perler Bead designs I have. I still have other ones I haven't shown. I picked these ones because they are my favorites.

I've been making art with Perler Beads for a long time. First, I started making easy patterns by following instructions. Then, I made harder 3-D designs with instructions. Then I started making up my own designs, like the Ninjago characters, the robots and my name. Now, I'm even making my own 3-D designs, like the 3-D bunny!"

The fair opens in a little over two weeks. We still have to make and deliver our baked goods, but all of our non-perishables are there already. Once the fair opens, I'll let you know how everything does!

7/21/14

The Cursive Project: Kites

This post contains affiliate links. 

For Letter K of The Cursive Project, Trevor chose "kite." Earlier this year, he made several different styles of actual kites in Cub Scouts, so I didn't want to repeat that. Instead, I suggested that we make some kite artwork.  

A few weeks ago, my friend Tanya sent me a huge box of awesome craft supplies she no longer needed with the instructions to use what we could and donate the rest. (Thanks again, Tanya!) I pulled out my cloud squeeze punch and a bunch of papers from Tanya's box and we got to work.  

To make my card, I punched three clouds, inked the edges slightly with a light blue, and glued them to a blue cardstock base. Then I cut kite shapes from three patterned papers, making one smaller than the others. I glued a tail of embroidery floss to the back of each, and then added three little rectangles of matching patterned paper along the floss. I glued the small kite down in the highest position, then used foam squares to attach the other two.


Trevor punched three clouds, glued one down, and used the foam square to attach the other two. Then he chose three polka dot patterns and cut kites in three different sizes. He added white embroidery floss to the back of each, then glued them to the card, tucking one under a cloud. He used blue embroidery floss to create wind blowing across his card.  


I love that we used the same elements in essentially the same places, but our projects are quite different from each other's.