2/27/15

Trevor's First Layout

Trevor made his first scrapbook as a Tiger Cub requirement in October 2012. Despite how much he loved making it and how proud he is of it, he hadn't expressed an interest in scrapbooking since then... until last Sunday at 6:00 am. 

Trevor had so much fun roller skating on Valentine's Day and really wanted to make a page about it. Urgently. Right that very minute. At 6:00 am. I didn't have those prints yet, so I offered him the stack of printed photos to see if there was something else he wanted to document. He spread them all out on the floor and then started making piles. I handed him a stack of patterned papers, the trimmers, and some adhesive to use while I showered and made breakfast. When I checked on him, this is what I found:


He was so incredibly proud of it. He explained that he chose the two papers because the dots reminded him of Easter eggs. He chose the four pictures because two are of him dyeing eggs and two are of him hunting for eggs. He did his journaling on white so that it would be easy to read and in pencil in case he made a mistake and wanted to erase (which he did not).

He asked if I was going to put it in my album. I said that would be fine, or he could have his own album to put pages in if he's planning to make more. He said an enthusiastic, "YES!", so he now has his own album to house his pages. Hopefully I'll have more of his pages to share in the near future.

2/26/15

Styrofoam Koalas

My nephew Timothy recently returned from his Make-a-Wish trip to Australia. They had a fantastic time. I loved reading the updates, seeing the photos, and hearing all about it. Here's Timothy, holding a koala. 


The real-life koala inspired these styrofoam koalas. Make your own! Affiliate links below. 


---------


Styrofoam Ball Koalas


Materials: 


Steps: 


Paint the styrofoam balls grey. The easiest way is by pouncing the paint onto the surface of the styrofoam rather than trying to brush it on. I chose to poke a dowel into each ball so that I could paint them in one sitting instead of doing one side and then the other. 


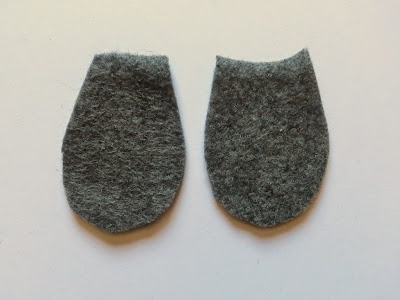
While the paint is drying, cut out grey ears and black noses and mouths. I laid the pieces out to check that I liked the proportions.


Once I was happy with the size of the ears, noses, and mouths, I rounded the inside edge of the ear pieces to match the curve of the styrofoam ball. Here you can see the difference between the rough shape (left) and the one I rounded (right).


Use strong craft glue to attach each of the facial features to the styrofoam ball, saving the ears for last. They will slump under their own weight if you don't hold them in place for a few minutes. After holding them for 2 or 3 minutes, the ears should stick without slumping. Allow them to dry completely without touching them.

When the koalas are dry, you can use them to decorate a favorite framed photo, like I did.


They also make really fun pencil toppers. If you used a dowel while painting them, there is already a perfectly-size hole in the perfect place!

2/25/15

Decoden Princess Scepter

Do you know what decoden is? One of the Make-and-Takes I did at CHA was called a Decoden Cupcake (scroll down to the bottom of the linked post to see it). It turned out to be my absolute favorite of the many, many Make-and-Takes I did. But it wasn't until I came home and looked up the word decoden that I learned why the cupcake project was called what it was. 

Unless you are literally reading my blog for the very first time, you know that I'm not a more-is-more crafter. My style is extremely clean and simple with very little embellishing. Which is why it surprised me to learn just how much I like to do decoden! When I received my box of goodies from the FaveCrafts Blogger Event and saw the styrofoam balls, I knew I wanted to do a decoden project! I decided to make a princess scepter that would coordinate with the heart tie-dye shirt we gave Allison. Affiliate links below.   


---------

Decoden Princess Scepter


Materials: 


Steps: 


Poke a hole in the styrofoam ball with the dowel. Then poke the other end of the dowel into a spare chunk of styrofoam so that it is supported upright. This will make it possible to apply sequins to all sides of the ball without making a giant mess. 

Use the craft stick to apply Snow-Tex to the surface of the styrofoam ball. Stick assorted sequins into the Snow-Tex so that they are firmly attached, but not buried. Try not to leave large gaps between sequins.


As soon as the ball is covered in sequins, sprinkle it with extra-fine glitter. The glitter will stick to the still-moist Snow-Tex. Let the Snow-Tex dry completely (I left it overnight). When it is completely dry, gently blow off any extra glitter and remove the dowel from the ball.


Paint the dowel pink. While it is drying, cut strips of Oly*Fun that are slightly longer than the dowel. I clipped them together with the amazingly-awesome Wonder Clips by Clover, which were also in the swag box. I don't sew, but I still have found a zillion uses for them in the 6 weeks I've had them. 


Put a generous amount of tacky glue in the hole at the bottom of the styrofoam ball. Remove the Wonder Clip and push the dowel and the Oly*Fun strips into the hole together. Poke the other end of the dowel back into the scrap styrofoam until it is dry.


Now it's ready for the special princess in your life!

2/24/15

Heart Ombre Tie-Dye Shirt

Here's the final version of the ombre tie-dye shirt Trevor and I made using the Tulip Mini Tie Dye Kit. 


After setting the dye following the manufacturer's guidelines, we washed and dried the shirt. Then we played with a few ideas of how to embellish the shirt before settling on what you see. The large heart on the pocket is cut from Oly*Fun (one of the other awesome materials I received at the FaveCrafts Blogger Event) and hand-stitched in place with a simple running stitch. We added a pink button on top of that and a trio of heart buttons along the hem on the opposite side. So easy! It was a birthday gift for my niece, Allison. She liked it. Trevor was thrilled.

2/23/15

Moonlit Owl Canvas Bag

Remember the plain canvas bag that I dyed using the Tulip Mini Tie-Dye kit? The tie-dye kit was one of many items I received from the FaveCrafts Blogger Event at CHA. I used three other items from the huge box of goodies (Owl Stencil by Stencil1, Swarovski crystals and Aleene's Tacky Glue) to transform the dyed bag into this: 


What do you think? It's the first of four items that I made (so far) using items donated by the sponsors of the FaveCrafts Blogger Event. More tomorrow!

2/20/15

Kleenex Box Critters

Trevor came home from school the other day with an unusual square lump in his backpack. He'd brought home an empty Kleenex box and he couldn't wait to show it to me. "Mommy! I used the last Kleenex at school and decided to bring the box home instead of recycling it! I have a GREAT idea for a project!" He squirreled it away until he had collected two more, then announced it was time for me to learn how to make his projects (by then he had two ideas).

Materials: square Kleenex boxes, Sharpies, scissors, tape, Kleenex

Kleenex Box Bunny:


Select the Kleenex box with the color and pattern that best resembles a bunny. Draw eyes, nose, whiskers and mouth using Sharpies. Open up a different Kleenex box and use it to cut two long ovals to make the bunny's ears. Fold each ear about one inch from the end to create a flat surface to attach it to the main box. Next, take a clean tissue and wad it up to make the bunny's tail. Use a loop of scotch tape to attach it.


Kleenex Box Quail


Select a Kleenex box and draw eyes on it. Use the scraps from the bunny's ears to cut a triangular beak. Fold it in half and tape it in place. Then cut out two matching wings and a topknot for the quail. Tape them in place. Done!

I love it when Trevor teaches me how to do a craft.

2/19/15

Twisteezwire Fruits

More fun with Twisteezwire!

Disclosure: I was given the Twisteezwires I used.


They were so easy to make! Except the grapes. Those were tricky and I'm not totally happy with them. I tried making a 2D version like the rest of the fruits and it looked too sparse. When I made a 3D set of grapes, they looked ok in real life, but photographed kind of wonky. I'm thinking of adding tissue paper or vellum to each grape, much like I added wax paper to Dot the Ladybug.

2/18/15

Tulip Mini Tie-Dye Kit

Everyone who attended the Fave Crafts Blogger Event at CHA received a huge box of products from the sponsors. It was loaded with all sorts of awesome stuff. One of the first items that caught my eye (and Trevor's) was this Mini Tie-Dye Kit.  


I'd never seen it before, and I absolutely love the concept. The bottles contain dye in a powdered form. You just add water up to the fill line, shake, and then squirt the dye right where you want it. Here you can see what the bottle looks like before adding water. That small amount of powder at the bottom is very concentrated. 


The kit comes with two bottles, a set of gloves, rubber bands, and detailed instructions that show how to make a variety of dyed patterns. The package said there was enough dye for 3 projects. We decided to dye a white toddler-size t-shirt, a small ivory-colored canvas bag, and this t-shirt:  


Trevor made it at Picnic Day last year. It had faded to dull pastels rather than the vibrant brights you typically associated with tie-dye. I'll start by showing you how it turned out, since it was such an dramatic transformation. Trevor followed the directions to create a spiral, then squirted the yellow and red dyes alternately to make this great design:


I did a simple two-tone with the canvas bag. I put yellow in the upper right and red in the lower left and let them bleed together.


Trevor wanted to try the ombre design on the toddler t-shirt. He saturated the bottom of the shirt with red dye, then used a dry, stiff-bristled paint brush to drag the color upward. He dipped the brush in water and dragged again. Neat!


Trevor has already worn his t-shirt as is, but we have plans for the other two dyed items. I'll share those when they're done.

I highly recommend the Tulip Mini Tie-Dye Kit. It was easy to use and delivered brilliant color. It couldn't have been easier to use and it was much easier to clean up than the typical dye bath. The colors faded a little bit with washing, but not much. As promised, there was enough dye for three projects. Two thumbs up!

2/17/15

Robber Minifig

I had so much fun scrapping the pictures of Trevor's 2014 Halloween costume! Rather than use the traditional Halloween colors, I pulled the greys, black, yellow, and red from his costume and worked with those. It was an unusual palette for me and I love how it turned out. 


I did something on this layout I almost never do, which is add a hidden element. The layout was almost done when I realized that I should include a photo of the actual minifig that inspired the costume. I was happy with my design and didn't want to mess with it too much, so I replaced a planned embellishment with a tag that holds the photo. Since it's near the top and pulls upward, the page shouldn't need to be removed from the page protector to look at the extra photo.

2/16/15

Valentine's Day

I've celebrated (or not celebrated) Valentine's Day in tons of different ways over the years. In fact, I don't think I've ever done the same thing on February 14 in all my 42 years. Some years have been great; others, less so.

One of the most memorable Valentine's Day celebrations I've had was when we joined my parents and my sister's family for a cruise to Hawaii over Valentine's Day in 2009. Here we are on 2/14/09 with our entry for the boat-building contest using items scavenged aboard ship. We designed the S.S. Tie Canic, so named because the base of it was empty cans tied together. My contributions included writing the name on the sail, stringing the beads, and cutting faces out of brochures we got from the Future Cruises office to make the portholes. It was a really, really fun day.


Of course, most of my Valentine's Day celebrations haven't been nearly as grand as a Hawaii cruise, but that doesn't make them less fun. This year was awesome. 

We started the day at a roller rink for their Little People session, which is an hour-long lesson for kids 10 and under, then a 2-hour skating session for kids 10 and under and their parents. Between the dim lighting, movement, and disco balls, the pictures we took of each other didn't turn out very well - grainy, blurry, and otherwise lousy. Too bad since we were all smiles! But I did get a photo of our skates that I like. 


We spent the afternoon making fresh pasta together. It was such a fun way to spend time as a family.


Because it was Valentine's Day, we used a heart-shaped cookie cutter to make our ravioli. It was no more difficult than any other shape would have been and it added such a festive touch to dinner.


We had chocolate mousse for dessert, also heart-shaped. Next time I make mousse, I'm going line the molds with plastic wrap so that I can remove the hearts intact.


Roller skating and cooking together may not be the stereotypical way to spend Valentine's Day, but it was fantastic. I highly recommend it.

2/13/15

Trick or Treating, 2014

The forecast called for heavy rain and possible thunderstorms on Halloween, but the skies were completely clear when we set out for trick-or-treating and stayed that way all evening. Trevor and his friends had a great time. This year, I didn't even attempt to take photos as the kids knocked on doors or zipped down the street to the next house. Just a decent group shot before it got completely dark and we were good to go.


I love Halloween.

2/12/15

Twizzler Dragonflies

About midway through making his Yoda valentines, Trevor was ready to quit. His hand hurt from coloring and cutting. He was starting to look around for distractions, and his eyes landed on the bag of Twizzlers. We started talking about ways that we could use the Twizzlers for a future craft. By putting our heads together, we came up with this incredibly simple dragonfly. Trevor liked the dragonfly so much that he decided half the class would get Yoda valentines and half would get dragonfly valentines.


Materials: Twizzlers, black Sharpie, heart punch, vellum, and scotch tape

Use the Sharpie to write the recipient's name and your name on the lines on the printed side of the Twizzler. Flip it over, and draw eyes and a mouth on one end. Punch two hearts from vellum. Arrange them so the tips are touching, then tape them to the Twizzler. So easy!

2/11/15

Yoda Valentines

Trevor knew exactly what kind of valentines he wanted to give to his classmates this year: a Yoda minifig holding a Pixy Stix lightsaber, similar to last year's Lego Ninjago characters holding lollipops. He drew a sketch on a piece of scratch paper and used the computer to look for a Lego Yoda printable. When he found just what he wanted, we printed out a bunch of Yodas and headed to the store for Pixy Stix.

We went to the candy aisle. No Pixy Stix. We went to the valentine aisles. No Pixy Stix. We checked endcaps, the snack aisle, and the checkout aisles. No Pixy Stix. Trevor was disappointed, but was willing to go back and look through all the candy to see if there would be an acceptable substitute. He settled on individually-wrapped Twizzlers. We put a bag in the cart and Trevor informed me that Yoda can't possibly use a red lightsaber, so he'd have to use a bad guy instead. I had no idea. Too bad we'd just printed out all the Yodas.

We paid, gathered our bag, and headed toward the exit. We both stopped in our tracks... Eureka! Pixy Stix! I can't fathom why the only Pixy Stix in the store are located PAST the checkout lines, but we grabbed a pack, looped around, and got back in line to pay. I asked if I could return the Twizzlers we'd JUST bought there at the checkstand, but no. We'd have to go stand in the customer service line, which was currently about 12 people deep. No way.

We went home and got to work. Here is the first completed Pixy Stix Yoda:   


Materials: Yoda minifig coloring page (Google to find one you like), color pencils, scissors, green masking tape, silver duct tape, tan cardstock, hole punch, scotch tape, and a tape runner.

Begin by coloring the Yodas and cutting them out. Wrap green masking tape around each of the Pixy Stix, stopping about halfway down. Wrap a small amount of silver duct tape to make the hilt of the sword.


Cut 4" x 6" pieces of tan cardstock. Arrange them vertically and write your valentine messages along the top and bottom of the cards. Punch a hole along the left side of each card where Yoda's hand will be. Slide a Pixy Stix lightsaber through the hole, then tape it securely to the back of the card. Use the tape runner to glue Yoda into place. 

Even though Trevor loved them, coloring and cutting all those Yodas got old quickly and he was ready to stop after making only half the valentines he needed for school. It turned out he had a good idea for using the Twizzlers that we hadn't returned. It was a much faster and easier valentine project. I'll show you those tomorrow.

2/10/15

Twisteezwire Love

Have I mentioned how much I love Twisteezwire?! (Yes. Twice.)  They sent me a bunch more of their wires (thank you!) so I've been playing. With Valentine's Day approaching, I thought it would be fun to make some festive decor. 

I started with one red Twisteezwire and some clear beads. I cut the wire into thirds and bent each to form a heart, twisting one end around the other to secure it. I threaded three beads on the longer end, then formed a small loop to keep them in place.


I repeated those steps to make two more hearts. I took a second piece of red Twisteezwire and used it to form a cursive 'Love.' After some trial and error, I discovered that the easiest way to do that was to write the word on a piece of paper, place the wire on the paper, and guide it into position. I added a bead when I got to the O and then kept going. When the word was complete, I added three beads to each end and held them in place with tiny loops. 


With the four components done, I used monofilament to hang them together like a mobile. Check it out!


The most challenging part of the whole thing was tying the darn monofilament where I wanted it. Other than that, the project was quite easy and definitely kid-friendly. I'm really happy with it.

2/9/15

2014 Christmas Card

I had a lot of fun scrapping and crafting with my friends last weekend. Despite doing a lot more chatting and eating than crafting, I still managed to finish a few projects. I'm really happy with this layout using our Christmas card photo.


It came together so quickly and easily. Love that.

2/6/15

On the Creative To-Do List...

I try very, very hard to have creative time each day. It's a priority for me and a big part of staying sane. On a typical weekday, I answer emails and read blogs for an hour or so before Trevor wakes up, work at either or both of my two jobs after dropping him off at school, do errands or chores, work on my own blog, and hopefully squeeze in 15 minutes of creative time before it's time for school pickup. Sometimes Trevor and I get some creative time in together after his homework if he doesn't have an after-school activity or playdate; occasionally, he plays by himself and I can spend some time in the craft room then before dinner.

Despite prioritizing creative time, I don't always have finished projects to show for it. I rarely start and finish a project on the same day unless it's something Trevor and I are doing together. This is all a very long-winded way of saying that I don't have a project done to share today. Instead, here's a look at what's in progress (on the creative to-do list, as it were), starting in the craft room:

Here's my desk. As you can see, it is a disaster. There are two visible layouts in progress, both two-pagers. I tend to put off two-pagers. There are actually several more layouts in progress (all single pagers) stacked underneath, all in different stages of completion. It's likely some or all of those will get finished before the ones on top. 


The desk is a disaster because I am doing a major purge. It's time to get rid of all the papers, tools, and other supplies that I don't use and make room for all the goodies I brought home from CHA. This is the floor of the craft room. Believe it or not, those piles have meaning to me. Now that I've gone through them, I just need to put them away in the proper place.


I'm hosting a crop tomorrow (yea!) so I got some photos printed. I'm hopeful that I'll have some layouts done and ready to share next week. I suppose it all depends on how much chatting I do and what interesting tools or toys my friends bring for me to play with.


Here's yet another pile of stuff on the floor. These are all the business cards and handouts I got at CHA.


I'm going through them and putting them into the journal I made at the Mega Block Party


Here is the swag from the Fave Crafts Blogger Event at CHA. I have some ideas sketched out for what I want to submit for the Best Blogger Craft contest; I just need to get started. Hopefully with the old stuff cleared out of the craft room, I'll be able to get going soon.


Before I do that though, I'm going to help Trevor finish his valentines. I'm a huge fan of homemade valentines, but I have to admit a small part of me was kind of hoping Trevor would go the purchased route this year. But no. He had a vision of Yoda standing up, holding a green pixie stick lightsaber. I offered to help, because I know from years of experience that making 30 of the same item is very tedious, especially when it's as involved as these valentines. When they're finish, I'll post a tutorial. 


So there you have it - just some of the items on my creative to-do list!

2/5/15

Camp Lassen

Another layout completed and into the album! 


This two-pager is about Trevor's first overnight Cub Scout camp. It was harder for me to scrap than usual because I wasn't there. Steve and Trevor came home with tons of pictures and stories, so I knew what the highlights were for them and used those to make the layout.

A few things to note about this page:

  • The background started as plain khaki cardstock. I stamped all over both pages with a pine tree stamp and Versamark ink. Before it dried, I swiped brown and green chalks across it to bring out the images. It make a fun, grungy background that was perfect for a camping layout.
  • The strip of green that goes the length of the layout is from BasicGrey's Oh Baby! Boy line, circa 2006. I wouldn't ordinarily think to look in a baby collection for a camping layout, but the scrap was sitting out on my desk, so I decided to use it. 
  • The chipboard oars on the top left and the leaves on the bottom right started out black (they're from the Mr. Campy line by Cosmo Cricket). I "painted" them by dipping a finger directly into a bottle of yellowy cream paint, a second finger into green and a third finger in brown. I smeared all the colors onto the black chipboard and let them dry. Then I went back with a brown marker and added grain and shadowing to the oars and veins to the leaves. 

I really like how it all turned out.

2/4/15

A Make-a-Wish Money Gift

For the past few birthdays and Christmases, I've come up with a creative way to give money as a gift to my now-14 year old nephew, Timothy. He's come to expect it, so I have to up my game each time. I think I succeeded with his Christmas gift. 

If you did not read yesterday's post about cystic fibrosis, please start there. 

As soon as I learned that Timothy would be traveling to Australia for his Make-a-Wish trip, I knew that I wanted to give him Australian currency for Christmas. I called my bank and ordered Australian currency in small bills. Turns out that the five is the smallest, so I got a big stack of those.


My plan was complicated. I bought a huge bag of Wonka candies (which Timothy loves) and immediately ate a bunch of the Nerds (because eating candy is the kind of sacrifice I'm willing to do for him.) I opened up the empty boxes and used them to disguise a cardboard tube.


Then I rolled up the money and slid it inside.


I put the tube in an empty mason jar....


... and stuffed the jar with candies. I added the lid, put a bow on top and set it aside. 


Of course, Timothy was not traveling alone. My sister, brother-in-law and niece were part of the Make-a-Wish trip. My parents paid their own way to tag along. I got Australian currency for Kari, Brian and my parents, put money in ziplock bags for each of them, and prepared containers of Skittles.


I used colored masking tape to cover the ziplock bags completely....


... then buried each in the Skittles until they weren't visible.


On Christmas morning, this is what Timothy found wrapped under the tree:


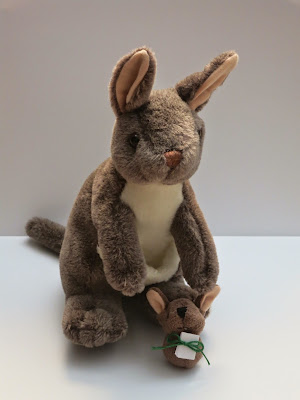
When he removed the joey, he found a tiny note tied around it. 


The note directed him where to search for an envelope. The envelope instructed him to gather his parents and grandparents before opening it.


Here's the assembled group, minus my dad and Steve who were just out of the photo on the left. Brian and Timothy's matching ugly sweaters crack me up. As does Trevor taking a photo over Timothy's shoulder with his new camera.

Inside the envelope, there was an Australia trivia quiz that Trevor and I wrote. Each answer was multiple choice and there was a letter beside each choice. The goal was to work together to answer the questions correctly and that would reveal where their presents were hidden. As it turns out, our trivia was a bit too hard, as they worked together to get a garbled mess! Eventually, they worked through it, correcting their answers and decoding the message. With the clue of which room to search, Timothy zoomed off and returned with this:


He kept the big one for himself and handed the small ones to his parents (Kari and Brian), Grandma and Grandpa. Kari was the most suspicious of the bunch, immediately digging through her Skittles and uncovering the money. Meanwhile, Timothy dumped his candy and found his wad of cash as well. He proclaimed the gift to be "very clever." Success!!


Now I have until October to figure out his birthday gift. I'm not sure if I'm going to give him money or really shake things up. It might be a good idea to keep him on his toes and learn to expect the unexpected from me. (Insert wicked cackle here....)