8/31/16

Build Your Own Catapult

My next Little Passports writing assignment was about homemade catapults. Right up Trevor's alley!


Materials: 
plastic spoon, tongue depressor, cork, 2 rubber bands and pom poms


Use the rubber bands to connect the spoon to the tongue depressor. Slide the cork under the neck of the spoon. Put a pom pom in the bowl of the spoon and you're ready to go!


I'd be remiss if I didn't mention some important safety considerations. Never point a catapult at people or animals. Launch soft items, such as pom poms, cotton balls, or marshmallows. Choose a clear area, such as the backyard, where nothing will be broken or damaged. 

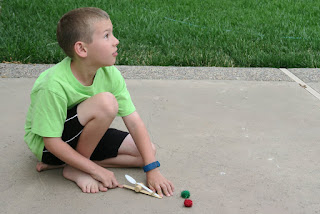
Trevor experimented with several different methods of launching pom poms, starting with the catapult on the ground. 

He discovered he improved his accuracy by holding the catapult upright. 


There are so many ways to use this catapult for family fun! Set up hoops or buckets with points for each pom pom that lands inside. Use the catapult and pom poms in place of bocce balls. Draw chalk targets on the garage door and try to storm the castle. What other games can you dream up?

8/30/16

Another Creative Way to Give Money

Trevor and I are forever trying to think up new, creative ways to give money as a gift. Here's the latest, a tin of money. Affiliate link below. 


A Tin of Money Gift


Materials:


Begin by taping the bills together, end to end. It's the same technique as for making the Dollar Bill Dispenser.


Accordian fold the bills so that they fit in the tin.


Tape the the end of the final bill in the stack to the bottom of the tin. 


Tape the end of the first bill in the stack to the top of the tin. 


Close the tin. You can wrap it, or add a ribbon or a bow, or give it just as it is. Who wouldn't want to receive a tin of money, right?!

 
You can see all my ideas for creative money gifts here!

8/29/16

Water Glass Xylophone

My latest assignment for Little Passports was to write about musical jars and the science of sound. Even though Trevor has made a water xylophone before, he was more than willing to do it again while I took pictures. This time, he used water glasses instead of plastic containers.

Step 1: Fill five glasses with decreasing amounts of water.


Step 1a: Apologize to rabbit for conducting science experiments in the dining room during his naptime. Explain to rabbit that if he wants to sleep undisturbed, he should not choose the room with the best lighting conditions.


Step 2: Use a metal rod (or wooden dowel) to tap each of the glasses. Add or subtract water to each until they are all in tune. 


Step 3: Add food color to each tuned glass.

 
Step 4: Play a song! You can play Mary Had a Little Lamb, Twinkle Twinkle Little Star, Hot Cross Buns, and many other simple songs with five or fewer notes. Add more glasses to play songs with a wider range!


Step 4a: Catch rabbit listening to music with interest. 


That's all there is to it!

8/26/16

Kitchen Science: How to Make an Eggshell Disappear

Have you ever done the classic experiment where you remove the shell from a raw egg, keeping the egg intact? I'd done it before, but Trevor hadn't, so when I had the chance to do the experiment and write about it for Little Passports, I jumped on the opportunity!

Day 1


Put two eggs into a clear container and cover them with vinegar.


You'll see bubbles immediately. Why? Vinegar is acidic, and the calcium carbonate that makes up eggshells is basic. The vinegar breaks the calcium carbonate into calcium and carbon dioxide, which is the bubbling you see.


Incidentally, those lightning bolts? After spending a ridiculous amount of time searching for a matching lid awhile back, I took out ALL my containers and used a Sharpie to draw matching shapes on each container and lid. All identical containers get the same shape. It is easy to tell at a glance if the lids fit, which has significantly reduced kitchen rage. But I digress.

Put the lid on the container and store it in the refrigerator for 24 hours.

Day 2


Take the container out of the fridge and remove the lid. Wow - foamy!


That foam is the calcium of the eggshells. 


At this point, you can proceed on to the next phase of the experiment if the eggshells are completely dissolved. We rinsed our eggs and they were indeed shell-less, but Trevor insisted we add more vinegar and let them sit overnight a second day just in case. I'm all about letting him direct our hands-on science, so I agreed... even though I kinda needed the photos promptly so I could write the article with a looming deadline. Oh well - one day doesn't matter nearly as much as letting Trevor direct his own learning. 

Day 3


We rinsed the eggs again and this time Trevor was convinced that the shells were completely gone. He gave an egg a tentative squeeze while I cringed. Fortunately, the membranes are pretty strong.


Trevor put each egg into a separate glass. He filled one with water and the second with corn syrup.


One difference was apparent immediately. Water and corn syrup have different densities. Trevor has done a lot of experimenting with density, but if he hadn't, this would have been a great opportunity to explore why things sink or float.


We put the eggs back into the fridge for 24 hours. 

Day 4 


Check out the eggs now! That's corn syrup on the left and water on the right. 


Trevor used a slotted spoon to remove each egg. The one in water was firm and plump, while the one in corn syrup was flabby and shrunken.


Trevor wasn't quite ready to figure out why. He wanted to play with the corn syrup for awhile. No problem - he's learning through play.


While he continued to play with the corn syrup, I rinsed the corn syrup off the egg. Here are the two eggs side-by-side on the table. Remember, they started out looking identical.


Here they are in Trevor's hands.


So what happened? The egg's membrane is selectively permeable. It allows small molecules, like water, to pass through, but blocks larger molecules, like the sugar in corn syrup. Egg whites are about 90% water, so as water passed freely through the membrane of the egg in water, it ended up taking in some water and becoming more firm. Corn syrup is about 25% water, so much of the water in the egg whites passed through the membrane into the corn syrup, resulting in the shriveled appearance.

We placed both eggs into water and returned them to the fridge overnight. Would the shrunken one plump up? Yes!

Day 5 


The final step of our experiment was to break the membranes and see if the eggs looked different than a standard raw egg. One option would have been to break them over a bowl or the sink, make observations, then throw out the egg. We went for the other option:


This was something I hadn't tried before, so I was eager to see what would happen. It was fascinating the way the yolk and some of the white came out just like it normally would. But a lot of the white was very watery and spread all over the frying pan. The membrane sat there like a burst balloon. I fished it out, then cooked the egg completely. We scrambled the second egg. Finally, it was time to taste....

Yuck! The vinegar that removed the eggshell was clearly made up of small enough molecules to pass through the selectively permeable membrane. Well, now we know! 

Kitchen science is so much fun!

8/25/16

The Last (?) Post about Cub Scout Belt Loops

Never say never, but I *think* this is my last post about Cub Scout Belt Loops, aka the Academics and Sports Program that ended in May 2015. I'd wanted to scrap photos of a few of the sports Trevor tried for the first time in pursuit of belt loops, separate from the 2-page summary layout I'll be making of his Bear Year. This is what I made:


A photo on a skateboard, a photo on horseback, and a lot of journaling about the many sports that he might never have tried without the structure of the Academics and Sports Program. 

8/24/16

Parrot Yarn Painting

Yesterday, I shared the beanie I knitted using the gorgeous self-striping yarn by Premier called 'Parrot.' Here's something else I did with the same yarn, which was obviously inspired by its name:


I've been wanting to try yarn painting for awhile but wasn't sure what to make. When it hit me that I could use Parrot yarn to make a parrot, I dropped everything and got started. 

The first step was picking an image. I could have drawn my own parrot, but I saved time and frustration by using this handy coloring page. I printed the page, trimmed it, and glued it to a piece of chipboard to give it some stability. 

Then it was simply a matter of laying down a line of glue, putting a piece of yarn on it, and trimming it to length.


I highly recommend Martha Stewart's Mini Glittering Glue and Fiskars' Micro-tip Scissors, as both allowed me to easily get into small places and apply glue or cut exactly where I wanted. As you can see, I started from the bottom, filling in sections as I went. I followed the direction of each shape and kept the blue sky level with the horizon.


It took about an hour to complete and I love the results! 

If, however, you do not have an hour and still want to try yarn painting, Trevor did a 5-minute monogram. He experimented with looping the yarn back and forth to make different textures. I just may try my own yarn painted monogram.


Are you inspired to give yarn painting a try? It's a lot of fun! Huge thanks to Premier for providing me with this yarn. 

8/23/16

Kid-Size Knitted Beanie

Remember my very first attempt at loom knitting? Here's my second project, a kid-size beanie using Deborah Norville Everyday Soft Worsted Yarn.


This hat was made with a single skein of yarn. I've always called this type of yarn 'color-changing' but apparently the correct term is 'self-striping.' Either way, it's so cool! This shade is called Parrot. 

(Amazon affiliate link)

Like the previous beanie, I made this using the Oval Loom Knitting Set by Leisure Arts. This time I used the smaller of the two ovals to make a kid-sized beanie.

Ultimate Oval Loom Knitting Set
(Leisure Arts affiliate link)

It was ridiculously easy to do. In fact, I started it at one of Trevor's friend's birthday party on a Friday night, and finished it the next day at another friend's birthday party! The project is easy enough that I could mindlessly knit while chatting with the other parents. Amazing, since it's only my second project ever. 

It's a little too small for Trevor to model, and I haven't seen my niece (the intended recipient) since completing it. So you'll just have to imagine how it looks on an adorable 3-year old. I still have half of the skein of yarn left, so I'm strongly considering making her a matching scarf, or possibly a mini beanie for her doll. 

Thanks to Leisure Arts and Premier Yarn for providing me with the materials to make this project!

8/22/16

Bancroft Garden Mosaic Mural

Steve, Trevor and I did something super cool on Saturday. We joined in a community build workshop to create a mosaic mural for the Ruth Bancroft Garden in Walnut Creek. The completed mural, designed by artist Donna Billick, will consist of two parts, each 20 feet long and 4 feet high. Billick's paintings of the murals were on display, along with some of the plants we'd be creating in clay. 


The first step was selecting what specific item from the mosaic we wanted to make. The designs were sketched out on 20' x 4' sheets of paper; once we decided what we wanted to make, volunteers carefully cut out the pattern. 


Our family decided to work together to make the large cactus in the middle of this photo. It had to be cut into four pieces so that it could fit in the kiln. 


The next step was getting clay.

 
Once we got our clay, we had to roll it to 3/4" thick. It was important to make sure it was wide enough for the pattern. 


Then we traced around the pattern. Here Trevor is working on the base of the cactus. 


Before going any further, we scratched the location number of our piece into the back side of the clay. It's important that the people who will be installing the mural can figure out how it all fits together! We flipped them right side up and used a variety of tools to add texture to our pieces. Steve is adding ribs to the top of the cactus. 


There were a lot of people participating. We arrived early in the morning, and people just kept coming. It's great to see so much interest in a community project like this!

 
After our cactus parts were sculpted, they had to sit in the sun for ten minutes or so. We took the opportunity to stroll through the adjacent park. We came back and added white slip to the pieces. Once the slip had dried completely, it was ready for underglaze. We looked up our cactus in a reference binder to try to choose as accurate glaze colors as possible. We started with a dusty green.


We added some gray shadows and lime highlights, being careful to make all four pieces as similar as possible.


Our last step was using the back of our paintbrushes to add a zillion tiny white dots on each rib of the cactus to mimic its spines. Here I am with the middle of the cactus, ready to go dry in the sun.


We had so much fun working together! 

 
I couldn't resist getting a quick picture of our cactus, loosely pieced together. 


These pieces, along with all the others, will be fired and glazed with a clear coat. Then sometime next spring or summer, they will be installed on the soon-to-be-built Visitor and Education Center at the Ruth Bancroft Garden. It's going to be really hard to wait, but so exciting when we can finally see it completed! Stay tuned!