Pages

10/31/16

Halloween 2016: Campfire Costume

Happy Halloween! Time to show off the costume that Trevor and I have been working on for the past month!


You can't tell in the photo, but the campfire lights up! 

Steve was on a business trip, but I dressed to coordinate with Trevor's costume. I'm a Webelos Scout. That's an adult uniform shirt I'm wearing, but the hat and neckerchief are Trevor's. 


This year, we trick-or-treated with seven other kids (four of whom dressed as cats).


After trick-or-treating, we split off from the cats and headed back to our house. Trevor took off his costume and then this happened. So cute.


---------

Campfire Costume


Materials: 


Steps: 


The campfire itself started as a flat piece of styrofoam. Using a serrated knife, we cut it into a donut shape that fit around Trevor's waist. We cut a piece of foam pipe insulation (the same we used for the eel I despise) into 6-8" lengths; these became the logs in the campfire. Then we started wadding up newspapers to make the rocks.


A small strip of masking tape kept each newspaper from un-wadding. 


The next step was vacuuming. As you can see in the previous two photos, cutting styrofoam makes a big mess!

We wrapped the styrofoam with gaff tape.


Next, we put a coat of paper mache on all of our rocks and logs. I say "we" but Trevor refuses to touch gooey things, so I have to do all the paper mache around here. He preps the newspaper strips, takes the photos, and supervises.


It took a few days for the paper mache to dry completely. Then, Trevor painted the logs brown....


.... while I painted the rocks grey. 


When the base coats were dry, we sponged different greys on the rocks to give a more realistic appearance. We used a black Sharpie to draw woodgrain on the logs. 

Then we cut black ribbon to make straps for the campfire. We used push pins to temporarily attach them to the styrofoam. 


He took off the costume and arranged the rocks. It was like a puzzle getting them to all fit nicely without gaps.


The next day, Trevor glued the rocks and the straps in place.


He tried the costume on and Trouble had to come check it out immediately. Rabbits are SO curious!


Trevor cut a bunch of flames from red, yellow and orange Oly*Fun. Love that stuff!


Before gluing the flames in place, he put on all three of my Hot Glue Gun Helpers on his fingers. He's nervous about getting burned when he uses the glue gun and these make all the difference in his confidence level. I love them too.


Here's the costume with all the flames in place.


We used more Oly*Fun on Trevor's black shirt. A line of gaff tape marked where the shirt would show underneath the campfire, so we kept all the flames above that line.


We found a string of battery-operated white lights and taped them to the inside of the campfire. Once Trevor gets the costume on, we can adjust the lights so they shine through the Oly*Fun. The on-off switch sits under one of the front rocks, so Trevor can easily turn the lights on or off.


With the basic costume done, we moved to accessories. Somehow, I don't have a photo of how we made the water bucket. It started out as an Easter bucket, which we primed and painted grey. Then we added an oval of blue craft foam to look like water. When he goes trick-or-treating, he'll lift up the "water" so the candy can go in the bucket. 

The marshmallows are Crayola Model Magic molded around the ends of a stick. When the clay dried, we used two different shades of chalk ink to give them a toasted look. 


We carefully opened and emptied a graham cracker box and a Hershey bar. We pushed the flaps of the box in and glued a ribbon handle in place. 


I cut a piece of cardboard to the size and shape of the Hershey bar, glued the wrapper back together, and attached it to the graham cracker box. 


The photo at the top of the post shows the costume through this step. We actually have one more accessory, though I don't think Trevor is going to wear it as part of the costume. We took a pipe cleaner and curled it into the shape of smoke. We glued cotton balls to it, then sprayed it grey.


We're both thrilled with how this costume came out. It was a lot of fun making it together.

10/28/16

40-4-Steve: US Bicycling Hall of Fame

Steve loved visiting the Pro Football Hall of Fame during a business trip to Ohio last year, so I suggested we add the Bicycling Hall of Fame to this year's 40-4-Steve list. I'm so glad I did! It's in nearby Davis, where Steve and I both went to college. The Hall of Fame wasn't there back then; its previous home was in New Jersey. But Davis is such a biking-oriented town that it's a perfect fit.


We loved looking at the many different styles of bicycles throughout history. The museum is very well thought out, interesting and educational. The only downside is that you're not allowed to touch the bicycles... except for one high wheeler, set up for photo ops! We all took turns. If you look carefully, you can see that this bike was built for someone who is at least as tall as Steve. 

Such a fun visit!

10/27/16

Fast, Single-Serve Microwave Chocolate Cake

Do you ever find yourself in the mood for chocolate cake but can't justify baking an entire cake just for yourself? Or perhaps you're short on time? What would you say if I told you that you can have a single-serving of chocolate cake literally three minutes from now with virtually no cleanup required?

I have not one but three recipes for you today.


You may recall that I did a blog series of mug meals while Steve and Trevor were away at Cub Scout Camp. I tested a variety of recipes and can highly recommend Pizza in a Mug, Omelet in a Mug, Oatmeal in a Mug, and Chocolate Chip Cookie in a Mug. Time to explore the wide world of cakes in a mug. 

First, a note about mugs. They come in many sizes. Most recipes assume you're using a large mug in the 14-16 oz. range. If you do not have a large, microwave-safe mug, do yourself a favor and use a ramekin or a bowl instead. Trust me. 

There are many, many recipes for mug cakes online, but after reading through several dozen, I realized there were two basic categories: from scratch and using cake mix. In general, I like baking from scratch, but the point of a mug meal is that it's quick and easy. Measuring a dozen ingredients is not quick and easy, so I skipped those to concentrate on the ones that use cake mix. All the recipes I found contained cake mix, oil and water in some proportion. Many, but not all, included egg. 


I realized that most of the recipes called for cake mix and liquid in equal proportions. Most ranged from 6 tablespoons each of cake mix and various liquids up to 8 tablespoons (1/2 cup) of each. I split the difference and went with 7 tablespoons each of cake mix and liquids. I also decided to stick with 1 T. of oil, since that was fairly standard and easy to measure.

With my basic plan in place, I looked at the variables next. The major one was the presence or absence of egg. I decided I'd make one version with no egg, one with one egg, and one with half an egg. After learning that an egg is equal to 4 tablespoons, I was able to calculate how much water to add to each recipe to bring it up to the 7 tablespoon level. You may be wondering why I would test out a cake with half an egg, as it is a real pain to whisk an egg and then divide it in half. The main reason is curiosity. If you scale down the instructions on the Betty Crocker cake mix, that's the closest to what the proportion would be. I assumed that adding half an egg would yield the cake most similar to what the box mix would make following the directions properly.  

I greased each 2-cup ramekin and then made my cake batters. Here you can see how they looked before going into the microwave:


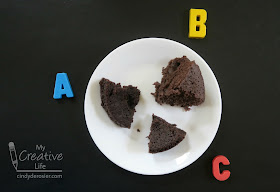
Here's how they looked after 90 seconds in the microwave:


There were some major differences that were immediately apparent. Cake A (the one without egg) did not rise. It baked up the darkest and the moistest. Both Cake B and Cake C rose well above the height of the ramekin in the microwave. However, Cake C collapsed midway through cooking and ended up almost as low as A. Cake B held its structure out of the microwave before sinking a bit as it cooled. 

I called in two eager taste-testers to examine the cakes. 


They both felt that Cake B looked correct and that the other two did not. They were especially suspicious of Cake C. I cut slices from each cake and they tasted them. Look at Trevor's face. He's reacting to Cake C, which he HATED.


Our observations:

A (no eggs): This cake was the darkest and had the strongest chocolate flavor. It was both crumbly and creamy. It was very soft and reminded Steve of pudding. 

B (one egg): This cake had the least amount of chocolate taste. It looked and felt the most similar to ordinary chocolate cake, but the texture was a bit too bouncy and more bread-like than cake usually is. It had large air pockets throughout the cake.

C (half an egg): This cake was oddly solid and didn't crumble like cake. The texture was OK, but a bit more like a souffle than cake. The chocolate flavor wasn't strong enough, but it was more pronounced than B. 


So which cake do we recommend? Trevor ranked them A-B-C. Steve ranked them B-A-C. I ranked them C-A-B. So three totally different opinions! I suspect if I'd frosted them, served them with ice cream, dusted them with powdered sugar, or topped them with a raspberry coulis, our votes would have changed. Each would be complimented by something different. 

Even though it was my favorite, Cake C is not going to be my go-to microwave cake because measuring half an egg is a nuisance. For a straight-out-of-the-mug, quick chocolate-fix, I'd recommend Cake A. For a more traditional cake experience, choose B... but top it with frosting, chocolate chips, or chocolate ice cream to boost the flavor. You really can't go wrong. 

10/26/16

Exploring Wyoming with Little Passports

Our next adventure with Little Passports took us on a virtual visit to Wyoming. The craft was inspired by Devil’s Tower. This structure is made up of many rock columns, some pentagonal and others hexagonal. So interesting! Trevor made a bunch of paper columns...


... and had a lot of fun peering through them.


Eventually, he attached them together to make his model of Devil's Tower. Then he made the model geyser.


We both really enjoyed learning about the animals of Grand Teton. We were completely surprised to discover that pronghorns can run close to 60 miles an hour. Not only that... pronghorns make one of the longest land migrations in North America! I had no idea. Little Passports always teaches me something new, which is part of why I love it so much.

The Wyoming State Journal had a rebus in it about the Red Desert. Trevor loves rebuses, so this was one of his favorite activities in the book. He also really liked the activity about Bighorn Medicine Wheel. He decoded the phrase on the page about Register Cliff, which was an important landmark for pioneers along the Oregon Trail. Then he figured out the answers to a puzzle inspired by Cheyenne’s Frontier Days Old West Museum.

The next day, we did the cooking project, a dessert called Wyoming Pudding. It's a simple apple-based recipe with raisins in it. I hate raisins, so I tried to talk Trevor into leaving them out, but he insisted on following the recipe exactly. He's right, of course. It's good practice to follow the recipe the first time, then make modifications in the future. Besides, raisins are very easy to pick out and put on Trevor's plate. Here’s our pudding, hot from the oven.


It was really good warm (minus the raisins). The leftovers were equally good cold the next day with whipped cream on top.


Where will our next Little Passports adventure take us? You'll find out soon!


10/25/16

Cackling Witch (or Clucking Chicken) Science Experiment

Tonight is 'Weird Science Night' for our Cub Scout Pack. I'm in charge of one of the stations. For my own sanity, I wanted to choose an experiment that wasn't messy, complicated or required any degree of focus. Picture three dozen 6-10 year old boys, in costumes, running around doing science experiments... and you'll probably see why I wanted to keep things simple.

My inspiration came from the Witch Craft Trevor and I made a few years ago.


Perhaps you're familiar with the Clucking Chicken experiment about sound? Well, a clucking chicken and a cackling witch sound pretty similar, so I decided that was just the right Halloween twist to put on this experiment.


---------

Cackling Witch Noisemaker


Materials:


  • paperclip
  • yarn (affiliate link), approximately 2 feet
  • plastic cup
  • hand drill (affiliate link) or nail 
  • paper towel
  • water

Steps:


1. Tie the piece of yarn to the paperclip.
2. Use the drill or nail to poke a hole in the bottom of the cup.
3. Thread the loose end of the yarn through the hole. Pull it all the way through until the paperclip stops it.


4. Fold the paper towel to the size of a dollar bill. Moisten it in water.
5. Hold the cup with one hand and the paper towel with the other. Grasp the dangling yarn near the top of the cup, pinching the paper towel around it.
6. Pull downward with a jerking motion. It should sound like a cackling witch!


What’s Happening:


You’ve created a sound board! When you jerk the string, it causes vibrations. These would be almost silent without the cup, but the cup spreads the vibrations and makes them louder. This is the same thing that happens in a piano or a music box – the wood amplifies the sound of the vibrations that we hear as music.


---------

Easy, not messy, and very little need for the kids to listen and focus. Will my sanity be preserved, or will I soon regret providing 38 boys with noisemakers in an enclosed space? How many parents will curse the day I taught their sons to make said noisemakers? Will any of them be speaking to me after the event is over? Or, will the ringing in my ears be enough that I can't tell whether anyone is speaking to me or not? Wish me luck!

10/24/16

Robotics Camp

Trevor did a robotics camp this summer and loved it. I stopped by to visit on the last day to snap some photos and watch Trevor's robot battle. It was pretty awesome. 


About the layout: I was really excited to be able to use the robot sticker to hold the title. I'm such a literal scrapper that I couldn't put a robot sticker on a page unless it was about robots, so it's been sitting in my stash for quite some time. I'd thought about grounding the robot so that he wasn't floating, but I picture him bouncing on that bottom border like a trampoline and decided to keep it that way. It makes me smile. 

The patterned paper is called 'Maze.' I've been hoarding it for years, waiting for the perfect photos to scrap once more about Trevor's love of mazes. That first maze layout is one of my all-time favorite pages, mostly because I included 3-year old Trevor's handwriting on it. Over the years, Trevor's love of mazes has decreased (slightly) as his love of robotics and engineering and more sophisticated puzzles has increased. Using this paper as the background for the layout makes sense to me. I'm happy with how it turned out and am glad to have it in the album.

10/21/16

Exploring Florida with Little Passports

Time to share another of our adventures learning about the US through Little Passports! This time, it's Florida.

We jumped right into the science experiment first. This State Journal had three easy experiments based on the three laws of motion. It tied in perfectly with the activity on the previous page about the Kennedy Space Center. The first experiment proves the First Law of Motion, that objects at rest stay at rest unless acted on by an outside force. By raising one end of a piece of cardboard, the tennis ball that had previously been still began to move because of the force of gravity.


To understand the Second Law of Motion, flick a basketball and a tennis ball with the same amount of force. You'll see that the acceleration (movement) of an object is determined by the mass of the object and the force applied to it.  


To prove the Third Law of Motion, thread a straw on a piece of string and then tie it between two high-backed chairs. Blow up a balloon and pinch its end, then tape one side to the straw. When the air is released, the force pushes against the balloon, causing it to move in the opposite direction. For every action, there is an equal and opposite reaction!


You may have noticed that we've been doing quite a bit of science for Little Passports: the disappearing eggshell experiment, the homemade catapult, the water glass xylophone, and all of the science experiments from each State Journal. That's because Little Passports is publicizing their new Science Expeditions Subscription (affiliate link). It looks incredible. I haven't seen it in person yet, but if it's anything like the quality of other Little Passports materials, which I'm sure it is, I guarantee you'll love it!

After completing the Florida-inspired science, we moved on to the rest of the activities. We counted fish on the Deep Sea Fishing page and learned about Florida's beaches. We read about Florida's history and learned about food chains in the Everglades. Trevor did the manatee dot-to-dot. We learned about famous Floridians and Trevor tried pronouncing all the words on the 'Hablas EspaƱol?' page. My Spanish is VERY rusty, but I did know all the words. 

Next, we followed the directions to weave baskets inspired by the Seminole tribe.


The basket turned out great, and so did the rocket model!


To conclude his Florida adventures, Trevor made us Cuban Sandwiches for dinner. Bread, mustard, pickles, ham and cheese...


... pressed, buttered and fried. 


Absolutely delicious! 


Another really fun adventure with Little Passports! 

10/20/16

Camp Lassen, 2015

Trevor will graduate from Cub Scouts in March, so it's time to get all of his Scout layouts completed. Today's is from Camp Lassen, 2015.


Once again, I struggled with this layout because I wasn't there and I had to decide which pictures best told a story that I didn't experience. It didn't help that it took place over a year ago; fortunately, I was able to look back in my daily journal. Not the first time it has come in handy!

10/19/16

Yarn Aquarium

I'm calling my latest kids' craft a Yarn Aquarium. It hangs low on the wall where preschoolers can reach to feel the yarn and place felt fish throughout the 'water.'


Materials: 
  • Yarn (I used the Deborah Norville Everyday Print "Pond")
  • Scissors
  • Wooden dowel (mine is approx 16" long)
  • Craft glue
  • Fishing line
  • Felt
  • Sharpie
  • Adhesive tabs

Steps:

Cut the yarn into lengths approximately 2 feet long. You'll need a lot of them, but I recommend cutting them in batches of about 20. 

Tie the yarn onto the dowel. You can do the strands individually, but I sped things up by doing two at a time. Either way, fold the yarn in half and set it behind the dowel with the loop at the top. Gather the ends and put them through the loop, then pull to tighten. 


Keep adding strands until the dowel is about 2/3 full. 


If there is a section that is heavy with one shade, simply slide the yarn over to make space to add more of a different shade. In this case, I ended up with too many blues in one area and wanted to add more greens amongst them. 


Much better. The colors are more even and balanced.


Add glue to the exposed ends of the dowel and wrap single strands of yarn around them to make a finished look. 


Tie fishing line to each end and hang your aquarium. You can trim the ends to make them even if you want. I chose to leave them irregular. 


Cut simple felt fish shapes in a variety of colors. Add a black dot for an eye, then attach an adhesive tab to the back.


Now add the fish to the aquarium! The tabs hold well for about 20 uses before they start to lose their stickiness. Just add another tab when that happens. The tabs don't damage this high-quality yarn at all. 


Speaking of yarn, I want to thank the fine folks at Premier Yarns for giving me this pretty yarn. I still have a lot left, so expect to see this shade again because I love it! 

Also, don't forget that I have a coupon code for you to save on Premier Yarns through October 31! For those who prefer to buy in-store, their gorgeous Sweet Roll Yarns will be at JoAnn Fabric starting next week. It's already in-store at AC Moore, for those of you on the East Coast.