Pages

7/31/17

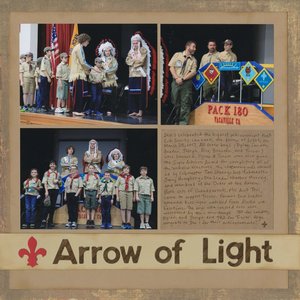
Arrow of Light

The Arrow of Light is the highest award given in Cub Scouts. Trevor and his denmates had their Arrow of Light ceremony in March. The ceremony is conducted by the Order of the Arrow, the national honor society of the Boy Scouts of America.

Arrow of Light (affiliate link)


The night was one of mixed emotions. We were all proud to see our boys' hard work recognized, but saddened that the Cub Scout journey was over and the seven boys would no longer be together. One of the last things a boy does before earning the Arrow of Light is to visit Boy Scout troops to find the one that is a good fit for him. Trevor was the only one to choose the troop he did. You can see this represented with the different neckerchiefs the boys are wearing in the posed photo after the ceremony. (The Scout with no neckerchief is not continuing on into Boy Scouts.) 


I'm proud of Trevor for choosing the right troop for him, even if it meant separating from good friends. So far, he absolutely loves his troop. And we've found ways for him to stay connected to his Cub Scout friends and share their scouting journeys. I'll share a layout about that soon.  

7/28/17

Native American Buckskin Bread

Back in my teaching days, I had a combination convection oven / microwave in my classroom that allowed us to do a lot of baking. Trevor's school doesn't allow ovens or even microwaves in classrooms, so there were quite a few history-related cooking projects that I wanted to do during my time with the fifth graders but couldn't. Buckskin bread is one example. 


Buckskin bread is vegan, named for the color of the finished loaf and not for any deer-related ingredients. It is a traditional food of many tribes of the Northwest and is like a dense biscuit. Native women would use plants including cattails, acorns, beans, chestnuts, or quinoa to make the flour, then the bread would be mixed with salt and water and baked over a fire. The modern version uses wheat flour and an oven.


---------

Buckskin Bread


Ingredients: 

  • 2 c. flour
  • 1 tsp. salt
  • 1 tsp. baking powder
  • 1 c. water

Steps:

  • Preheat oven to 400°F and grease a 9" pie pan. 
  • Combine the flour, salt, and baking powder in a bowl. Mix in the water. 
  • Press the dough into the pie pan. 


  • Bake for approximately 30 minutes or until the top is a very light brown. 
  • Turn the bread onto a rack to cool. 
  • Slice into wedges to serve. It is good with savory toppings or sweet things like jam. 

7/27/17

Decorating Picture Frames with Patterned Paper and Washi Tape

This post contains affiliate links. 

When my goddaughters' mom sent me the photos for their birthday frames, she included a few pictures of the girls with their birds. So I decided to frame those, too!


I began with unfinished wood frames and decorated them with patterned paper that is held in place with washi tape. If the girls want a different look for their frames, they can peel up the washi, remove the paper, and redecorate the frame however they want!

---------

Decorated Picture Frames

Materials: 

Steps: 

  • Add a coat of white gesso to the front, sides, and back of the unfinished frames. Let it dry. Sand lightly to smooth any rough areas or places where the grain is raised. 
  • Cut the patterned paper to the same size as the frame. Round the corners. Place the frame upside down on the back side of the patterned paper and trace the opening. Cut just inside the pencil line using the trimmer. 
  • Place the patterned paper right side up on the front of the frame. Use long strips of washi tape around the outer and inner perimeters to hold the paper in place. 
  • Add letter stickers and hearts to decorate the frame. 
  • Insert the photo. That's all there is to it!


7/26/17

Ellia at 8

Beautiful and spirited Ellia, eight years old already. This is even harder to believe than Trevor and Kylinn turning 11 this year!

Ellia at 8 (affiliate link)

I don't normally look back at the girls' birthday layouts until after I complete the current year's, but I did take a quite peek back at Ellia at 7 before starting this one. Her shirt is a similar color to last year's dress, so I wanted to make sure to go with a different color palette. I don't think I would have gone with pistachio, navy, grey, and watermelon, but I love it. You can look back on the rest of Ellia's layouts here and here. Happy birthday, Ellia!

7/25/17

Kylinn at 11

My goddaughter, Kylinn, turns 11 this week. It doesn't even seem possible that the brilliant, outgoing infant I fell in love with just a few short years ago is going into middle school!

Kylinn at 11 (affiliate link)

I'm really happy with this layout. It's colorful and whimsical, just like Kylinn. What a blessing to have her in our lives! You can see Kylinn's previous 10 birthday layouts here, here, and here. I love looking back on them and watching her grow. Happy 11th, Kylinn!

7/24/17

40-4-Steve: Riding a Horse

Despite the fact that his college girlfriend owned a horse and Steve went with her daily to see the horse, Steve had never actually ridden a horse. For the final 40-4-Steve activity, I found an instructor nearby and signed him up for a 1-hour introductory ride. Steve did really well and thoroughly enjoyed the lesson.

40-4-Steve: Riding a Horse (affiliate link)

All in all, I consider my 40-4-Steve project a great success. And I am very happy to finally have the last layout in the album.

7/21/17

40-4-Steve: Ropa Vieja

Toward the end of my 40-4-Steve project, I learned about a Cuban restaurant that opened just a few miles from our home. We'd had Cuban food before, but never their national dish. We decided that eating ropa vieja from an authentic Cuban restaurant would absolutely qualify as a valid 40-4-Steve item.

Ropa Vieja (affiliate link)

Of course, we ordered way too many different things. It is way too hard to choose just a few dishes when we visit a new restaurant. We liked everything we tried and enjoyed the leftovers as well. The ropa vieja was particularly delicious.

One more page to go before my 40-4-Steve project is complete!

7/20/17

Kit Xchange Craft, Bead + Travel Organizer

This post contains affiliate links. 

Kit Xchange recently sent me their Craft, Bead + Travel Organizer Envelope with two sizes of re-sealable storage bags. I've used many different products and hacks to organize craft supplies over the years, so I was eager to try this system. The first thing I noticed about the Organizer Envelope, besides the beautiful color (persimmon), is how high quality it is. The faux leather looks and feels very expensive. The edges are finished beautifully and the hardware is elegant. It's very professional. 


The organizer is 12.5" x 8.5" x 1" when closed, with a comfortable strap for holding it. When you unsnap it, the envelope folds open to reveal two fleece surfaces, two large zippered pockets, and a pretty black/white striped liner fabric.


The ring serves both to close the envelope and to hang it up while in use. When opened, the envelope measures 29" x 12.5".


To use the organizer, fill the re-sealable baggies with beads, jewelry, or other small craft items. The strong velcro on the back of the baggies attaches securely to the white surfaces. I used the smallest baggies (2" x 2.5") to hold seed beads. My beading tools and larger supplies fit nicely in the zippered pockets. I'll be putting findings in the larger (3.12" x 3.5") baggies.


I love how easy it is to see all my beading supplies at once. As you can see, you can easily fit five rows and six columns of baggies on each of the white surfaces. Best of all, you can constantly rearrange them as needed for different projects. 


I love my new beading organizer and can't wait to put it to the real test and travel with it! Speaking of travel, this would be great for transporting scrapbook embellishments, jewelry, sewing notions, trading pins or other small collectibles, and a whole lot more. In addition to the Envelopes, Kit Xchange also has Album Organizers. I totally want this blue one

Thanks, Kit Xchange!


7/19/17

40-4-Steve: Musicals

Steve and I both love musicals. We've seen a ton together, ranging from professional touring companies to community theater to films. One of my goals for the 40-4-Steve project was to see one (or more) new-to-us musicals. Mission accomplished! We saw a total of six in 2016 that neither of us had seen before.

Musicals (affiliate link)

Once again, I struggled with how to scrap this. Not only did I not have photos, but we saw six musicals in different places and on different dates. I thought about just scrapping the first one, but rejected that idea. I thought about printing out the Playbill logos for each, but that seemed weird and/or impossible for the ones we watched on film. I ended up cutting out the banner from a program from our local community theater where we have seen the majority of the musicals we've seen recently. The page is plain, but it conveys the information and is a rest for the eyes in an album with a lot going on. 

7/18/17

Golf Flamingo

I found a random golf tee in the house, so naturally I painted it pink and made it into a flamingo. If that doesn't seem like the logical thing to do, you're probably not a craft blogger. I debated calling it a Golf Ball Flamingo or a Golf Tee Flamingo or a Golf Ball and Tee Flamingo, but for some reason I like Golf Flamingo best.

---------


Golf Flamingo


Materials (affiliate links)


Steps


  • Use the sandpaper to rough up the golf ball and the tee. This will help the paint stick.
  • Paint the golf ball and the tee pink. Let them dry.
  • Thread the pipe cleaner through the golf ball at the 1:00 and 8:00 positions. Take the 8:00 end and fold it back into the golf ball at the 7:00 position. Bend it so that it is secure. Bend the 1:00 end to make the neck. Fold the end in on itself to make the face. You might need to trim the pipe cleaner first.
  • Use the glue to attach the golf ball to the tee. 


  • Glue one eye on each side of the face.
  • Glue one feather on each side of the body. 


Poke the flamingo into the grass. The extra long tee means that he won't be hidden if your grass is longish like ours. 


From this angle, it looks like he's giving me the side-eye. 


I'm strongly considering making a whole flock of these flamingos. I'm also thinking about how I can turn one into a Christmas ornament. Oh, the possibilities!


7/17/17

US Geography Games and a Winner!

As a former fifth grade teacher, I can easily identify all 50 states on a map and can name their capitals without hesitation. Apparently, what I cannot do is draw them by memory. My friend Nikki sent me a link to a Can You Draw the States? challenge. This is how I did:


The program prompts you with each of the states one by one, which you then draw using your mouse. You get a letter grade for how you did. I got an A+ for Nebraska and an F for Alaska, just to give you an idea. Now, to be fair, I have a new mouse and am not used to its sensitivity, not that my mouse skills were ever all that good. I can't draw a nice rectangle to save my life, as you can clearly see by looking at the Dakotas, Wyoming, and Colorado. 

Despite how ridiculous some of the states look, I suspect I did better than many. Time.com promises, "We'll be anonymously recording your drawings in order to analyze how different people view states. Stay tuned for GIFs of many different attempts at the same state." I can't wait. 

---------

If you're looking for more online games to test your knowledge of US geography, I recommend Sporcle.com. There are a bunch of fun quizzes, ranging from the very easy to the ridiculously difficult. Find the US States Ultimate Minefield is my favorite among the latter category.  

---------

And finally, it is time to award a winner for the Little Passports giveaway. Congratulations to

KAREN POIRER-BRODE

Contact me at cindy.mycreativelife@gmail.com and I'll get you set up with Early Explorers for your grandson!

7/14/17

Exploring Washington Through Little Passports

Our latest adventure through Little Passports took us on a virtual trip to Washington, my parents' home state. I've spent a lot of time in the Evergreen State and Trevor has been there three times, so it was a lot of fun to get to know the state a little better.

First, Trevor made the model of the iconic Space Needle. I went to the top as a kid, but Trevor has never been there. Someday!


We learned that the Space Needle is 605 feet tall, with 25 lightning rods on top. The elevator ride to the observation deck (located at 520 feet) takes 43 seconds. It took 400 days to build and can withstand a wind speed of 200 miles per hour!

Our next activity taught us about neighborhoods in Seattle. We decoded the names of Washington's National Parks and learned that the Olympic marmot and Olympic short-tailed weasel are endemic to the state. We did a hidden picture activity about mushrooms and a word search about volcanoes. We read about famous events in the history of Washington and then did a crossword to translate Washington's state motto (Alki). We did a rebus about orcas and a dot-to-dot about the Wooden Boat Festival in Port Townsend. 

It's always fun to see what recipe Little Passports has chosen to feature for each state. For Washington it was blueberry jam! Blueberries are one of Trevor's favorite foods, so he was very happy. 


His jam tasted great in a peanut butter sandwich!


The science experiment in the Washington state journal investigates how the Space Needle can withstand strong forces from winds and earthquakes. We learned that the Needle is designed to sway around one inch for every 10 MPH of wind. Wow! The experiment is easy to do and really helps kids visualize how the Needle stays standing in extreme conditions. Give it a try!


Materials: 

  • cardboard
  • newspaper
  • masing tape
  • tennis ball
  • hair dryer

Steps:

  • Roll newspaper into a tube. Add tape so it holds its shape.
  • Place the tennis ball on top of the tower. The tube should not buckle. If it does, use extra newspaper to make a tube that is stronger. When the tower is strong enough to support the tennis ball without buckling, remove the ball and proceed.
  • Tape the tower to the cardboard base. If it is not stable, make the base wider or heavier. (The base of the Space Needle weighs 5850 tons!)
  • Put the tennis ball back on top of the tower. Turn on the hair dryer on low and point it toward the tower. If you've built a strong structure, it will sway but not fall. 
  • Try putting the hair dryer on high. Does your structure still stand? Trevor's did!


We had great fun with our virtual trip to Washington and look forward to visiting there in person again!

7/13/17

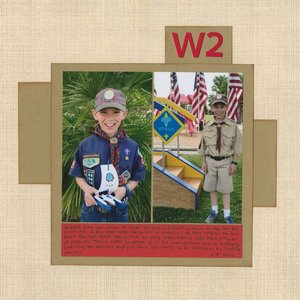
The Tan Shirt

It's a big deal for most Cub Scouts to make the transition from the blue uniform the younger kids wear to the tan uniform of the older Scouts. This can happen any time during the 2-year Webelos program. Trevor switched shirts at the end of his fourth grade year, at the midpoint of his time in Webelos.

W2 - Tan Shirt (affiliate link)
The two photos were taken about two weeks apart. You can see that Trevor is wearing the same Webelos hat and neckerchief in both photos. We made the decision not to transfer his many patches and other awards off the blue uniform so that he could keep it as a reminder of all he accomplished as a Cub Scout. 

7/12/17

Satin Ice Fondant Flowers and More

This post contains affiliate links. 

If you watch baking shows, you know that most professionally decorated cakes are made with fondant. If you attend weddings, you know that most fondant tastes disgusting and that the vast majority of people peel it off and leave it on their plate uneaten. I'd always wanted to try working with fondant, but didn't want to make a cake covered with something that everyone would just throw away. 

When I attended Creativation, the folks in the Satin Ice booth convinced me to try eating their fondant. What a surprise! It is flavored like vanilla and actually tastes good. This is a game-changer! They sent me home with some sample packs. Because trying out products is always more fun with friends, I decided to host a cupcake decorating get-together. It took a lot of self-control for Trevor (ok, maybe it was me) not to jump in and start decorating before our friends arrived.


Once they did, it was game on! There were six of us (our family of three, plus Karl, Gayle, and their 6 year-old daughter). 


In addition to the Satin Ice fondant, I set out store-bought vanilla frosting, a bunch of different sprinkles and sugars, some FooDoodlers, the PME Butterfly Plunger that I also received at Creativation, candy eyeballs, and my favorite set of alphabet cookie cutters

We had a lot of fun decorating. Everyone's cupcakes turned out great... and so different! We did each make at least one with our initials, so you should be able to tell whose is whose. 


We all agreed that the Satin Ice fondant is easy to work with, rolls out smoothly, and actually tastes good. Most of us tried mixing colors and found that it wasn't too difficult to get the colors we wanted. Gayle and I both experimented with marbled colors with great success.

Want to try making fondant flowers? It's actually really easy. 


Fondant Daisy

  1. Cut five matching yellow-orange circles with a small round cutter. Pinch the edge of each circle to form the petals. Set them aside.
  2. Roll out green fondant. Use a plastic knife to cut three leaf shapes. Smooth the edges, then use the knife to draw veins on the leaves. Set the petals on top of the leaves. 
  3. Cut a small yellow circle for the center of the flower. Set it on top of the petals. 
  4. Let the flower dry for at least 15 minutes, then place it on the cupcake. 

Fondant Rose

  1. Roll out the green fondant. Use a plastic knife to cut three leaf shapes. Smooth the edges, then use the knife to draw veins on the leaves. Set the leaves aside. 
  2. Take a small ball of red fondant (larger than a pea, smaller than a marble) and press it between two fingers to flatten it. Roll/fold it to make the center of the rose. 
  3. Use the same amount of fondant to make the first petal. Press it thinner this time, and roll it around the flower center. Pinch the bottom together to keep it in place. 
  4. Continue adding petals using the same technique, but slightly increasing the amount of fondant used to make each petal. Each time you add a petal, rotate the flower so that the petals are evenly spaced. It takes 8-10 petals to make a blooming rose. Be sure to pinch the base together as you go.
  5. Pinch away any excess fondant from the base of the rose so that it will sit flat. Place the leaves on top of a cupcake and the rose on top of the leaves.


Here are some of the products we used for our cupcakes. I will receive a small commission for any purchases you make through these links and it will not cost you any extra. Thanks!


7/11/17

40-4-Steve: Homebrew

Most years I do almost no scrapping over the summer, other than layouts for my goddaughters' birthdays. This year, I've actually gotten quite a bit of scrapping time, which has been a real treat. I want to finish up my 40-4-Steve album, so I tackled this page about him entering his first homebrew competition.


I'd put off scrapping this one because I didn't have photos. Inspiration struck when I renewed his American Homebrewers Association membership and received a large AMA sticker. Paired with the bottle ID form for his entry, there was no need for photos.

7/10/17

50 States Album Update + Little Passports Giveaway!

I recently debuted my United States Travel Resource and have received a lot of wonderful feedback from many of you. Thank you for all your kind words! I am thrilled to have a digital home for our family's travel recommendations, scrapbook pages from our travels, and the crafts, recipes, and science experiments we've done that were inspired by the 50 states.


The Travel Resource also includes photos of all 19 (and counting!) completed pages from Trevor's 50 State Album, along with links and ideas for starting your own. I just added his most recent pages from our January trip to Arizona for Creativation and our June trip to explore Iowa and Nebraska. Click below to enlarge each image to read his journaling.


To celebrate the debut of my US Travel Resource, Little Passports is generously providing one lucky reader with a 3-month subscription to either the USA Edition (age 7-12), the World Edition (age 6-10), or Early Explorers (age 3-5)! 

To enter, visit Little Passports to decide which edition you'd like to win, then leave a comment on this post telling me which one you'd choose. For bonus entries, pin any image from the US Travel tab above to Pinterest and share this blog post to Facebook and tag @cindy.mycreativelife. You'll get an extra entry for each image you pin and each time you share! I'll pick a winner next week. Good luck!


7/7/17

The Latest Craft Roundups

Time for another batch of roundups that I made as Editor of Fun Family Crafts! First was Flower Crafts. Two of these are mine and three different ones are edible. Can you pick them out?


Next, Zoo Crafts. We have over 1800 animal-themed crafts, so no matter what animal you want to make, we probably have a tutorial for it! I included the most typical zoo animals in the roundup, though. Two of them are mine. 


The next round-up I made was for ladybug crafts. Amanda, my boss and the owner of Fun Family Crafts, LOVES ladybugs and is responsible for almost half of the 57 ladybug crafts currently on the site. One of the crafts featured in the round-up is mine. Can you spot it? (Pun intended.)


I loved putting together this round-up of watermelon crafts. It was hard to narrow it down to which ten projects to feature. One is mine, plus I've added the yogurt pops on the bottom row to my must-try list!


Hat crafts needed an updated graphic. None of these are mine. I don't think I've ever published a hat craft. I had a lot of fun picking hats to put on the title. 


Finally, sand crafts. One of these is mine, which is somewhat surprising since I absolutely hate the feeling of sand. 


As always, I made these collages with PicMonkey. It's so easy and really fun (my favorite part of my job!) They're adding new images and fonts all the time, including some that appear on these graphics. If you've never checked out PicMonkey, please do! I highly recommend it.