Pages

10/31/18

Trevor's Tasty Tournament

Happy Halloween! I'll be sharing Trevor's costume next week. In a way, it relates to this post!

---------

Like most families, we eat dinner every evening. Unlike most families, we turn dinner into a game whenever possible. Jonna's most recent visit was the perfect opportunity to try Trevor's Tasty Tournament, a cooking challenge Trevor created based on Guy's Grocery Games

Trevor's Tasty Tournament began with a dice roll to determine who would cook in each round (appetizer, entree, and dessert). Jonna won and selected the appetizer round. Trevor won the second dice roll and selected dessert, leaving me with the entree. Then it was time to determine which games we'd be playing. Recognize what Trevor is holding? It's a maze game from his Maze Party, with rubber bands arranged to create a Plinko board. 


Trevor designated a game for each of the five sections where a marble could fall. From left to right, the games were: Grocery List, Budget Battle, One From Every Aisle, Letter of the Alphabet, and 8-Item Express Lane. Jonna went first. Her marble fell in Letter of the Alphabet. Trevor removed the plastic letters from the fridge, put them in a bag, and pulled out M. Jonna would be creating an appetizer using ONLY ingredients that start with M. 

My marble fell in One from Every Aisle. I would be making an entree using exactly one ingredient from every aisle of the grocery store. This was by far the most challenging of the potential games, so I was looking forward to giving it a try. I'm always up for a challenge!

Trevor got Budget Battle. He would need to make a dessert using a budget of $15. He lucked out. It's pretty easy to make dessert for under $15.

With our limitations set, we drove to the grocery store. Jonna searched for M items while Trevor monitored that I got exactly one item from every aisle. He wouldn't let me think about things and return to an aisle; I had to grab one thing and move to the next aisle, just like on the show. It was about 100 times harder than I thought it would be. I needed time to think and plan, but alas, no. When my shopping was done, Trevor did his shopping, calling out prices for me to record as he selected his items. We met up at the checkout line, purchased our ingredients, and headed home.

Jonna purchased mozzarella, mushrooms, marinara, muffin mix, meatballs, and a Mediterranean mesclun mix.  


She made mozzarella-stuffed meatballs and breaded them with muffin mix before baking. She served the meatballs on a bed of Mediterranean mesclun with mushroom marinara sauce. 


It was delicious! The judges weren't convinced the muffin mix added much, but praised Jonna's use of M ingredients and her restraint in not making us eat mustard marshmallows. 


After our delicious appetizer, it was my turn to make an entree out of... what, exactly? I couldn't even remember some of the ingredients I bought, as the shopping experience of picking one thing per aisle was pretty much just a blur. Fortunately, Trevor had taken notes to ensure I didn't cheat and skip an aisle or get more than one item per aisle. My ingredients included: ground beef, a bell pepper, frozen avocado chunks, canned tomatoes, ranch dressing, root beer, kaiser rolls, Fritos, raspberry jam, seasoning salt, cauliflower fries, and Monterey Jack cheese. Ack!


I chopped the pepper, then cooked it in root beer, added raspberry jam, and let that reduce. I seasoned the meat with the seasoning salt and then made patties. The cauliflower fries went into the oven. So far, so good. I put the tomatoes and avocado and a little bit of ranch in the blender to make a dipping sauce for my fries. But then I made a big mistake. I added some Fritos to the blender. I was not prepared for the repulsive color or texture that resulted. Ugh. I added more chunks of avocado to the horrifying glop I'd made, thinking that might make it look less like something that had already been eaten, but it didn't help much. I toasted the rolls and spread them with the reduced pepper-root beer-raspberry sauce, added a hamburger patty, and melted the Monterey Jack on top. It is one of the ugliest meals I've ever served, but it tasted good. 


The judges were critical of my glop, of course, and didn't like that I hadn't altered the fries at all. They liked the burger and praised the unique sauce; everyone was surprised how well root beer and raspberry worked on a hamburger. 

After a suitable break, we were ready for our final course, dessert. Trevor spent his $15 budget on five items: salted caramel pretzel ice cream, peaches, caramel sauce, toffee cookies, and almonds. 


He sliced the peaches and cooked them in caramel sauce until they were soft. Then he chopped the almonds. Each plate got two cookies, a scoop of ice cream, peaches, and almonds on top. 


While the judges felt he should have made either the ice cream or the cookies or both, they knew he was limited by the budget. He couldn't have afforded all the individual ingredients he would have needed. The judges applauded his decision to get almonds from the bulk bins so that he could get only the amount he could afford. And the dessert was delicious!

Trevor's Tasty Tournament was a great success and we're looking forward to trying it again sometime soon.

10/30/18

Party in a Block

When I shared my I-Spy Game using the Craft Block, I mentioned that I'd be sharing another idea after my nephew's birthday. Timothy turned 18 (!!!) yesterday, so it's time to share his....


Now that my sister's family lives in Idaho, we weren't able to celebrate Timothy's birthday with him (first time ever- sniff). I needed a gift that would be easy to send since I wouldn't be seeing him in person to deliver it. I decided to make him a portable party! The Craft Block is stuffed with everything you need to have a great birthday party - balloons, candles, noisemakers, candy, ribbon, bows, favors, confetti, and money. This would be a great gift for anyone you can't see in person on their special day: college students, members of the military, long-distance family, or pretty much anyone else! Read on to make your own. 


---------


Party in a Block


Materials:


Steps: 


Start by gathering up your supplies.


Drop the items into the Craft Block, one at a time. Use the chopsticks to adjust their positioning. I wanted the swirly top to face outward, so I lowered it in with chopsticks and put it just where I wanted. 


Continue to fill the craft block until there is no more room. Give it a shake to help everything settle, then rotate it to fill in gaps. You want it full so that things don't shift or break in the mail. 


Put the rubber seal on the Craft Block and send your package! It's up to the recipient to figure out how to remove the items! (You can include chopsticks in the package if you want to give them a hint.) Enjoy!

10/29/18

What Do Campfires and Opossums Have in Common?

Blogging, at least the way I do it, is hard work. I love creating projects and I love writing about them. Both take a lot of effort, but I enjoy them so much that it doesn't feel like I'm working when I'm crafting or writing.

On the other hand, optimizing and promoting my posts is work I do not like. I want to send quality content out into the world and have people magically find it on their own without any effort on my part. 99.9% of the time, that's not going to happen. However, sometimes magic does happen and my posts are found by just the right person at just the right time.

Example #1:


This week, my campfire costume was featured by the Chicago Tribune. I received a request by a reporter out of the blue, asking permission to include my tutorial. Needless to say, this was thrilling. And I absolutely love that the project that was featured was jointly designed and made by Trevor and me, worn by Trevor, and photographed by Steve. It's my name that is published in the Tribune (you guys, MY NAME IS IN THE TRIBUNE!) but all three of us contributed.


Example #2:


Over the summer, I was contacted by a writer for a Portuguese magazine called Amanhecer (in English, Dawn) asking permission to include my cardboard tube opossum in their next issue. My copy arrived in the mail this week. It's in Portuguese, so I can't read it (although there are English and Spanish cognates I can read!). It's very exciting to see my work in a print magazine, especially with them in such a decline. Here's the cover:


And here's my opossum ("a unique marsupial animal that lives on all of the American continent"):


It's all very exciting to have people find and love my content without me having promoted it to them. And in the vein of sharing more happy news, I had my first 7-day streak with Amazon sales this week. Woo hoo! Feel free to help me keep the streak going, LOL!


Oh, and the answer to the question about what campfires and opossums have in common? Well, besides both being projects I recently had published, they are both nocturnal, and they appear together in a traditional folktale.

10/26/18

October Roundups

I made six roundups this month as part of my job as Editor of Fun Family Crafts. As always, I made all of the graphics using PicMonkey (affiliate link).

First up: Kids Crafts for Special Days in October. We have several bazillion awesome Halloween crafts (ok, maybe more like 1200) so the first and most difficult step was narrowing them down to six of the most eye-catching images that screamed October. I didn't want it to be just Halloween, since there are lots of other crafting opportunities in October. I ended up choosing a witchy owl, my Ho Ho bat, Frankenstein cookies, leaf votives, craft stick jack-o-lanterns, and cheese dressed up as candy corn. I think it's a good balance, if a bit heavy on edible crafts.


I put together this roundup of Homemade Mummy Costumes in an effort to capitalize on the huge amount of traffic that one of our mummy costumes was receiving, and to help our readers see various options for mummy costumes in one place. I chose to showcase sewing and no-sew options for boys and girls, as well as a version for babies.


I made this roundup of The Best TMNT Costumes for Kids for the same reasons. One post was ranking very well, so I wanted to draw attention to our other options. I picked these four images for their variety.


I had so much fun putting together the roundup of Monster Crafts and Recipes. What can I say? I love googly eyes.


We had a Spider Crafts and Recipes roundup on the site already, but it was really outdated and needed to be refreshed. I love how it turned out. Two of the spider crafts are mine. Do you recognize them?


When I made the roundup of Kids Crafts for Special Days in November, I ran into the same problems as with October's. There are so many cute turkey and pilgrim crafts, but I didn't want the whole thing to be Thanksgiving. So I added Bert & Ernie (Sesame Street Day), an airplane (Aviation Month), and some bear cookies (Hug-a-Bear Day). 


I saved my favorite for last: Scrabble Crafts. I love Scrabble. I love Scrabble crafts. And, as it turns out, I love graphic design that involves Scrabble fonts. This one is a pin, not a roundup. 


Now I want to do some crafting, stat!

10/25/18

Fabric-Covered Frame

If you have some leftover fabric, say from the drawstring bags you recently made, use that fabric to cover an inexpensive frame. I used beaver-print fabric to make a frame for Steve to display a photo of his Wood Badge patrol, but I can think of a lot of other applications. Need to hem a prom dress or other special occasion fabric? Use the scraps to cover a frame that will hold a photo of the special event. Making a quilt or blanket for a new baby? Make a matching frame. Outgrown a Halloween costume? Use the fabric to make a frame to display Halloween photos.

Note that this project takes a LOT of drying time. Ideally, you'll let multiple layers of Mod Podge dry completely between applications, then let the whole project cure for 3+ weeks. In other words, don't get started on December 23 thinking you'll have Christmas gifts ready in time for family and friends.


--------

Fabric-Covered Frame


Materials:


Steps:

Remove the backing and the insert from the frame. If it has glass, remove that too. Place the fabric upside down on your work surface and lay the frame on top. Cut around the frame, allowing about 0.5" of extra fabric on all four sides.

Use the brush to apply a thin coat of Fabric Mod Podge to the front of the frame. Carefully set it facedown on the upside-down cut out piece of fabric.

Flip it so it is face up and let it dry for 15 minutes.

Working with one side at a time, apply Mod Podge to that side and back of the frame. Gently pull the fabric over smoothly and press it in place. Do the same thing on the opposite side. Now move on to the top and bottom sides. You'll do the same technique of Mod Podge and gently pulling and pressing the fabric into place, but you'll need to tuck any extra fabric at the corners underneath.

Cut an X in the fabric covering the opening from corner to corner. Trim the fabric so that there is enough to cover the inner edge of the frame when you wrap it toward the back but not so much that it gets in the way of the tabs that hold the photo. After trimming, apply Mod Podge to the wood and press the fabric into place.


At this stage, it will look something like this. As you can see, I didn't worry too much about making the back look good.


Let the frame dry overnight. At this point, you can either put a second coat of Mod Podge on to really seal it well, or leave it as is. Either way, now you need to let it cure for at least 3 weeks. 

After it is cured, add the photo, then cut a piece of cardstock to cover the back and glue it in place using craft glue. It protects the photo, but can be removed without harming the fabric if you ever want to switch out the photo. If you want to use the included dowel to prop up the frame, punch a hole in the cardstock before you glue it in place. 


Alternately, you could add a sawtooth hanger. Steve's frame will sit in a picture rail, so I didn't do either of those.

As long as you plan ahead to allow for the long curing time, these make very nice gifts. They take very little active time and cost very little to make. Give it a try!

10/24/18

12th Birthday Party

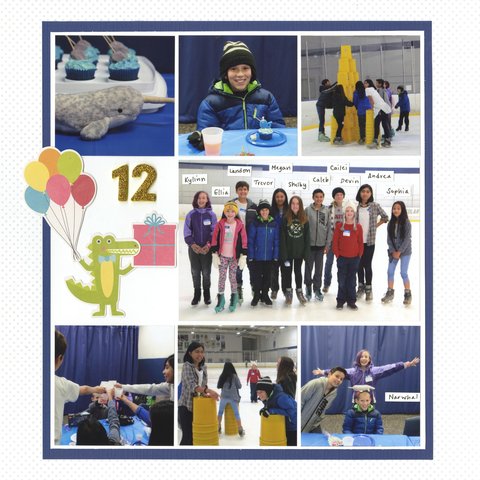
One of my favorite things about blogging is that I can tell more of the story and include more photos of an event than I can squeeze onto a scrapbook layout. So while I want the important photos and the story to appear in the album, it helps knowing that the details are preserved here on the blog. Because I shared so many details from Trevor's narwhal-themed ice skating birthday party back in June, I didn't feel compelled to include close-ups of the narwhal items we made on the layout. Instead, I packed it with photos of Trevor and his friends having fun.

12th Birthday Party (affiliate link)


I debated whether to include the grinning alligator on a page about a narwhal-themed birthday, but I couldn't resist. He fit the space perfectly and looks so cute holding the present and the balloons. 

You may have noticed that the only journaling I did was to label the kids (and Narwhal). The photos answer the rest of the basic questions:
  • What: Trevor's birthday party
  • Where: ice rink
  • When: Trevor's 12th birthday

You might argue that, years from now, one of Trevor's descendants won't know when his birthday was and thus what year this took place. Nor will they know which ice rink we visited. But I'd argue that both of those questions are answered by other layouts in the same album. For the record though, I'll note both of those here, with the optimistic (though perhaps unlikely) expectation that my blog will be accessible to future generations: This party took place at Vacaville Ice Sports on June 8, 2018, the day after Trevor's 12th birthday. And it was awesome. 

10/23/18

Cardboard Tube Tin Man

Cardboard Tube Dorothy and Cardboard Tube Scarecrow have a new friend.


While he has a great personality (all heart, that guy), he is not very photogenic. I mean, he has a nice smile and all, but he tends to reflect everything around him, making it hard to see the real him. 


---------


Cardboard Tube Tin Man 


Materials:


Steps:


Cut a piece of Oly*Fun that is slightly taller and slightly wider than the cardboard tube. Line it up flush with one opening of the cardboard tube and use tape to hold it in place temporarily so it doesn't shift. Wrap the Oly*Fun around the tube, securing it with hot glue. The edges will overlap. Set the Tin Man's body with the flush end down on the table. There will be excess fabric on the end that will be his head. Fold the excess fabric over the top and down into the cardboard tube. Remove the tape.

Cut a 2" high strip of Oly*Fun and curl it into a tight tube with the shiny side out. Glue it closed. Tape the tube to the dull side of a larger rectangle of Oly*Fun (about 2" x 8"), as shown below.


Curl the rectangle to form an open cone shape, as shown below. Put a piece of tape to hold it in place. Now make adjustments. You might need to curl it more tightly or loosely. You might need to raise or lower the tight tube. When everything looks good, secure it in place with hot glue. You can remove the tape or leave it. 


Trim the edges of the cone, then use hot glue to secure it on top of the Tin Man's head. 


Use craft glue to add googly eyes. Draw on a nose and a mouth. Finally, glue rhinestones down the front of the Tin Man to mimic the rivets.  


I chose to glue them rhinestone-side down because the flat side looked more like rivets to me. Not that you can tell in the photo, because they're all reflecting something. 


This trio of friends will be meeting someone new fairly soon. I am confident he will be less reflective, if nothing else. Right now he is just a piece of faux fur with a major shedding problem. Stay tuned!

10/22/18

Drop Everything and See "Loving Vincent"

I'm not a movie person. I go to the movie theater once or twice a year on average, watch the DVDs that Trevor get as gifts, and occasionally rent movies from the library. I rarely know what is playing in the theater, and odds are good that even if I do know what's playing, I haven't seen it and probably never will. I say all that to emphasize how unusual it is for me to recommend a movie.

I vaguely recalled hearing about "Loving Vincent" when it came out in theaters, I believe on NPR. I was fascinated by the concept of an entirely hand-painted movie. And then I promptly forgot all about it until I came across a list of the best movies of 2017. I put a library hold on the DVD. And then I promptly forgot all about it again, until I got a message from the library saying my hold was in.


Loving Vincent (affiliate link)

I loved it. "Loving Vincent" is more beautiful than I'd imagined. While the plot is excellent and reason enough to see the movie, it was the artwork that kept me mesmerized and the primary reason I'm recommending it to you. The color, the visible brushstrokes, the detail - everything came together perfectly. I tried to imagine how much time it would take to create the paintings to animate one small movement and it blew my mind. My absolute favorite part of the movie was the end credits, where Van Gogh's actual paintings of the characters in the movie were shown side-by-side with the paintings done for the movie. How amazing to see Van Gogh's paintings come to life the way they did, and such a clever way to do the credits. 

This brief video about the making of "Loving Vincent" will give you a better idea of what went into this movie - 125 artists, almost 66,000 paintings, 12 frames per second, and a commitment to stay true to Van Gogh's style, even as it changed across his paintings.


If you saw "Loving Vincent" I'd love to hear what you thought. And if you haven't seen it yet, I hope I've inspired you to do so!

10/19/18

"If the World Was Crazy..." Poems

I've been out of the classroom for over 12 years now. While I have kept my teaching credential current just in case, I have no plans to return to classroom teaching. Trevor has largely outgrown the teaching materials I've been keeping and using with him to supplement the education he gets in public school. I'm not getting rid of everything, but it's time to go through my teaching materials and pass them on to someone who will use them. 

In the process, I came across a poem I wrote as a sample for my students in 2005. After reading "If the World Was Crazy..." by Shel Silverstein, I challenged each student to write their own version of the poem. The original poem has three stanzas. In the first, the author describes what he would eat if the world was crazy. In the second, what he would wear, and in the third, what he would do. I asked my students to write a one-stanza poem using a different verb than eat, wear, or do. Anything else was fair game. We brainstormed some good options (i.e, one syllable verbs that rhyme with something): play, go, cook, taste, try, use, ride, learn, hear, feel, etc.

I wrote my example, using the verb cook, in front of the students. I demonstrated counting syllables and following the meter and rhyming structure of the original poem. They loved watching me write a silly poem and were very excited to give it a try. Unfortunately, I didn't save copies of my students' work, which is a shame as some were really fun and creative. I am so glad I saved my own. Last week (thirteen years after writing the poem), I added some illustrations to accompany it, which I'll pass along to a teacher friend to use as a sample. 


As I was looking for links to Shel Silverstein's site, I came across this delightful version of "If the World Was Crazy." It makes me want to animate my poem. Watch with the volume up. 


Shel Silverstein was one of a kind. I am so glad to have grown up with, and passed on to my students, his whimsical and unique poetry.


10/18/18

Color Me Creative

I was browsing at the library during Trevor's book club meeting and came across a really cool book by Kristina Webb. Kristina is a young artist from New Zealand, best known for her Instagram art. Her book is unlike anything I've seen before. The first half of the book is an illustrated autobiography (which is fascinating) and the second half has 50 creative challenges. 

Color Me Creative (affiliate link)

The autobiography portion is reason enough to get this book. Despite her young age, Kristina Webb has led an extremely interesting life. The text is beautifully illustrated with her artwork from throughout her life, including scans of drawings from early in her childhood. 

But the real treasure for me is the second half of the book. Kristina has included 50 fun and unique challenges, designed to be completed directly on the pages of the book. I was so inspired to jump in and create. Because it was a library book, I obviously couldn't start coloring on the pages. (Bummer.) Instead, I figured out a way to cut an arc from copy paper, line it up with Kristina's face drawing, and draw on the paper rather than the book. 


The prompt for the Headdress Challenge says, "Finish off the drawing of this girl and give her something fun on the top of her head. A flower wreath, perhaps, or a beautiful crown? A massive bow? Maybe even animal ears. Whatever you decide, just have fun with it."

And I did. I styled her hair with a bun on top of her head. Then I added a whimsical bun wrap.   


I colored in her blonde hair first, then dotted her chocolate brown bun wrap with colorful sprinkles. The cherry is part of the bun wrap. 


In retrospect, her hair looks more like spaghetti and meatballs than the ice cream sundae that inspired me... except for the sprinkles. My nephew went through a stage in life from about age 2-5 when he put sprinkles on EVERYTHING he ate, but other than that, I can't recall ever seeing sprinkles on spaghetti. So I'm committed to my original idea. It's an ice cream sundae. 

I did a few more of Kristina's challenges before returning the book to the library. I'll wait to complete the rest of them when I have a copy I can write in. 

I highly recommend Color Me Creative! The book is so much fun and would make a wonderful gift for girls and women who love to be inspired creatively and enjoy drawing. 

10/17/18

Trevor at 12

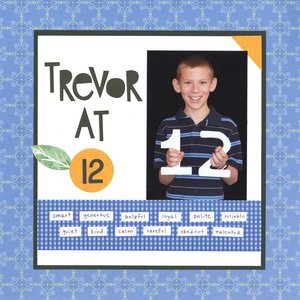
Here's my annual "Trevor at..." layout. It's crazy that he's 12!

Trevor at 12 (affiliate link)

This was the third of three layouts I recently finished away from home. I somewhat like it, but I would have chosen a different font for the title and a different way of highlighting the 12 if I'd had my entire stash at hand. Still, I am very happy to have finished it and pleased that I was able to do something I'd never done before. 

10/16/18

Dimensional Beaver Cards

When I said I'd created gifts for the Beaver Patrol, you knew I'd made coordinating cards, right? 


---------


Dimensional Beaver Cards


Materials: 

  • brown cardstock
  • white cardstock 
  • paper trimmer
  • scissors
  • brown marker
  • black marker
  • craft glue


Steps: 


Prepare the materials. Use the paper trimmer to cut:
  • brown cardstock - 9" x 3.5"
  • white cardstock - 8.5" x 3" 

With scissors, cut: 
  • two white teeth
  • two white eyes
  • two brown ears
  • one brown nose
  • one brown tail 


Use the brown pen to outline the nose and draw crosshatches on the tail. Use the black pen to draw pupils on the eyes. 


Fold the brown paper into thirds. Glue two teeth onto the top and two ears on the sides. 


Center the white paper on the brown paper and glue it in place. It will trap the ears and the teeth. Refold the brown paper, which will add folds to the white paper that is now glued to it. 

Glue the nose and eyes to the front of the card. 

Fold a small flap on the end of the tail, then glue that tab to the card. You want the tail to flop down when the card is out of its envelope...


.... but fold up for mailing. 


Quick trivia question: What do you call a group of beavers?


Answer: Colony.


Steve used all of the beaver cards I made, but I like them so much I may need to make more. Although now that I think about it, are there occasions that really call for a beaver card? International Beaver Day is April 7, so maybe that's just the occasion I need to justify more cards.