2/28/19

7 Important Tips for Traveling Successfully with Toddlers

First, let me state the obvious: I don't have a toddler. But I used to have one. Before he turned three, Trevor had visited two foreign countries (Canada and Mexico), three states (Alaska, Hawaii and Washington), and numerous places within his home state of California. As I've been preparing for my presentation about educational family travel at Pinners Conference, I've gone through my packing lists, journals, and scrapbooks and have been reminiscing with Steve about our baby/toddler travel experiences. I thought I'd share with you some of the things that worked for our family to make travel with our toddler as pleasant as possible.


I took this photo of Trevor in 2008 when he was two. I remember thinking what a great traveler he was already, confidently navigating the hotel hallways while pulling his own suitcase. That brings me to Tip #1.

#1 Give Your Toddler a Suitcase


Yes, it's one more thing for the adults to carry when the toddler randomly decides he is done pulling his own suitcase. Fortunately, that almost never happened with Trevor. He loved his suitcase. Having his own suitcase (a hand-me-down from his beloved Big Cousin, Timothy) let him have some say in what toys to bring, gave him something to do while I was unpacking at a hotel, and made him feel important and included. I had him watch me pack his essentials into his suitcase at home, then showed him how much space was left for books, stuffed animals, and other small toys. When we'd get to our destination, I'd give him a drawer or other location so that he could keep busy unpacking (and thus stay out of my way while I unpacked everything else).


#2 Overpack Diapers


Perhaps you heard about the passengers stuck on a train in Oregon for 37 hours and their efforts to cobble together homemade diapers after parents on board ran out? It goes without saying that you do not want this situation. We had our own diaper nightmare during a family reunion in San Diego. Trevor was on antibiotics for the first time and they affected his tummy (to put it delicately). He blew through our full supply of diapers for a 5-day trip (based on a worst-case scenario plus 10%) within 2 days. Steve went out at 4:00 am to try to find a place to buy diapers and discovered our rental car had a flat tire. Fun times. It may be annoying to bring home extra diapers you'd packed, but not nearly as annoying as having no diapers and no way to get diapers. 


#3 Pack the Thermometer and Infant/Child Medications


Even if you're sure you won't need them because your kid is never sick, please do yourself a favor and pack both the thermometer and medications. The advice nurse is going to want to know your toddler's temperature when you call in the middle of the night (ask me how I know). You may think you can buy medicine if necessary, but that is not always the case. When Trevor had a major allergic reaction while camping, there was no nearby Walmart to get children's Benadryl. And when your child's face is inexplicably swelling, you'll wish you had the antihistamines on hand. Or the meds to bring down their fever. Or whatever else randomly happens while traveling. It's definitely better to be safe than sorry.


#4 Embrace Your Toddler's Schedule


When traveling, it is not convenient to stop everything in the middle of the day for naptime. Know what else isn't convenient? Temper tantrums. Know that your toddler is going to need sleep when you want to be out exploring, or a meal at a time that makes no sense to you, or a diaper change as soon as you board public transportation. (Don't even get me started on the horrors of traveling with a very recently potty-trained toddler who gives you 15 seconds of warning before it's too late). Do what you can to plan your activities to be flexible and accommodating, and definitely plan for naps, quiet time, downtime, and routines.


#5 Car > Train > Plane


I am not a fan of car trips. I don't like spending time getting to where we're going; I just want to be there already. I abhor sitting in the back seat to entertain a bored and squirmy toddler who wants out of his carseat and doesn't understand why he's stuck in the car. Therefore, you'd think that I'd advocate plane travel with toddlers. And I do... if you're crossing oceans or headed somewhere for such a short time that it would be impossible to drive there and back. But if given the choice of a 1-hour flight compared to a 6-hour drive, I'm going with the drive if there's a toddler involved. Driving allows you to overpack (like diapers - see Tip #2) and bring along all sorts of other things that you'd leave home if you were flying. Driving allows you to stop and change a diaper whenever you want. (Ever changed a diaper in an airplane bathroom? *shudder*) Driving allows you to stop at parks and rest stops and get out and run safely and without bothering anyone. Driving means not having to deal with setting up your carseat on the airplane, or checking the stroller, or convincing security that they need to let you carry milk on the plane, or begging your recently potty-trained child to just go potty now before we get on the plane because the captain isn't going to let us out of our seats to go until the plane is at cruising altitude and even then there might be a line.

In my opinion, trains are the middle ground between cars and planes when it comes to toddler travel. There's usually room to move around and no need to stay buckled up every second. There's plenty to watch and places to explore. Diaper changes are still a problem, but so much better than planes. But, you can't stop when you want to and you can't seriously overpack. Trade-offs.


#6 Bring New Toys and Tiny Snacks


I would have lost my mind on some of our early trips if not for two things: new toys and tiny snacks. First, new toys. Before traveling, I would wrap up unfamiliar toys (a combination of new items, toys borrowed from friends, and old things Trevor hadn't seen in a long time). Every 30 minutes or so, he'd get to unwrap something.

I'm a big fan of tiny snacks (Cheerios, raisins, Puffs, etc) for toddlers because picking things up one by one takes a lot of time. Tiny snacks can double as an activity when you're stuck in a car or a plane, as well as once you've reached your destination and have to keep your toddler entertained during waits.


#7 Reserve the Crib Ahead of Time


Hotels and cruise ships have cribs for you to use. However, they do not have enough for more than a handful of families to be using them at the same time. You don't want to find out once you arrive that someone else is using the crib you'd counted on. Call ahead and reserve a crib if your toddler needs one.


---------


I am so glad that we traveled while Trevor was young, because I think it's helped develop him into the great traveler that he is now. Steve and I have so many good memories of those early trips as a family of three (and we're doing our best to block out the bad memories - like that San Diego trip!) Traveling with a toddler is not for the faint of heart, but nothing about life with a toddler is for the faint of heart, right? Any tips to add? I'd love to hear what has worked for your family.

2/27/19

Russian River

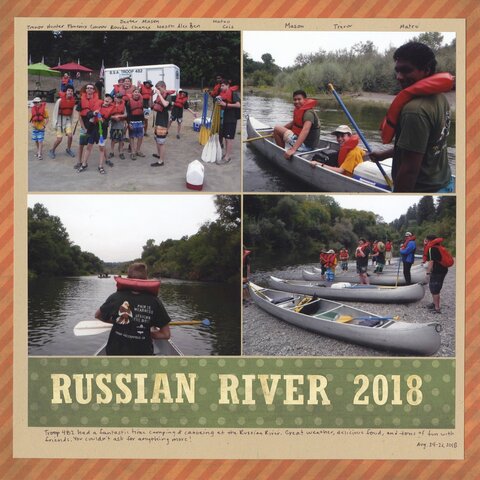
Here's another page documenting one of Trevor's Scout trips. They did a camping and canoeing trip last August at the Russian River and had a great time.

Russian River 2018 (affiliate link)

Another simple grid design with the focus on the photos. I added a little bit of journaling, including the date, then labeled each of the boys along the top. Quick and easy. 

2/26/19

More Logo Design Work

I already have a bachelor's degree (International Relations) and a master's degree (Education), but if I ever go back to college it will be in Graphic Arts. Despite a lifelong love of everything having to do with art and design, I never took any classes in those departments. I really wish I had. It took me a long time to learn what I know now, things that are probably covered the first day of a design class. 

There are a lot of problems with being entirely self-taught, the primary one being that you don't know what you don't know. When you receive a syllabus, the professor literally hands you a list of things you don't know. By the end of the term, that same piece of paper is a list of things you DO know. That hasn't randomly happened to me, where someone gives me a comprehensive list of design principles or art techniques that I haven't heard of. I only figure out what I don't know when someone mentions it, or I do research to figure out why I'm having a particular problem. Once I learn that new thing, I still don't know what ELSE I don't know.    

Anyway, I say all this because I am getting increasingly confident with some aspects of design, to the point that I have been making logos and doing basic design work for friends. I have a lot more to learn (although what that is, I'm not sure), but I feel good enough about my skills to help out friends who need it. Most recently, I made this:


I made it for my friend, Doug, who is a member of the Belmont Model Railroad Club (obviously). Doug and I go way back. Thanks to the miracle that is Facebook, I found a photo of us together at a 4-H conference in 1989. That's Doug on the left with his arms out. I am the blonde with the dark suit. (Because it's perfectly normal for 17-year old girls to travel in black business suits.) The other two are Michael and Piper, for the record. I have no idea where we are posing, but it's probably somewhere in Washington DC.


Anyway, Doug needed a logo for the model train club based on this photo:


I made the logo using PicMonkey. I know I talk about PicMonkey all the time, and I apologize if I come across as some sort of MLM cult member who won't shut up about this fabulous product that you should definitely buy, but I use PicMonkey daily and love it. 

Anyway, the first thing I did was to convert the photo to black and white. Then I removed the background using the Clone tool. I removed the numbers from the side of the train and from above the windshields.


Then I used the Posterize tool. I adjusted the slider to get the minimum number of colors to still give good definition. In this case, it is 5.


I opened a 2000 x 2000 blank canvas, then added the posterized train as an overlay. I flipped the image, then added the initials of the club (BMRC) to where the numbers had been in the photo. I played around with text options and locations before choosing a simple text from a font (Special Elite) that is part of PicMonkey's library.


Finally, I added a dark rectangle behind the text. I sampled colors from the train so that I wasn't adding additional colors to the logo. 


I sent the files to Doug and he was happy. Hopefully the rest of the Belmont Model Railroad Club will be too.

2/25/19

Reptile and Amphibian Crafts for Kids

I currently have two giveaways going on. If you haven't entered both, follow these links:


---------

Given how many known species of reptiles (10,000+) and amphibians (7,000+) there are in the world, you'd think that it might have taken me quite awhile to catalog all of my reptile and amphibian craft tutorials. Nope. It took about one millionth of the time it took to complete the mammal page. Check out exactly how many reptile and amphibian crafts I've made over the years:


I obviously need to step up my game. What do you think my next reptile or amphibian craft should be?

2/23/19

Creativation VIP Swag Bag Challenge Hop

Welcome to the Creativation VIP Swag Bag Challenge Hop!


So what's the Creativation VIP Swag Bag Challenge Hop, you ask? Each of the VIP Creators who attended the Creativation show received a huge bag of products donated by 26 of the exhibiting manufacturers. Each of us is using the same products from eight of those manufacturers to make something original. You can hop from designer to designer to see which direction each of us went with the same materials. As you do, leave comments on each video or blog post as you hop, because the sponsors are giving away 7 *fabulous* prizes! The more places you comment, the better your chances of winning!

These are the eight items we used (affiliate links here and throughout the post): Hero Arts stamp set, Sakura pen, Westcott scissors, Supertite adhesive, Izink Diamond Paint, The Crafter's Workshop Medium, Joggles Art Parts and Charms, and a Paper Rose die. In most cases, we received more than one color, style, product etc. from each manufacturer, so you might see some variety in what we used.


While I use some of these items semi-regularly in my crafting, I can count on one hand (one finger?) the number of times I've used metal dies and texture pastes. And metal body parts are definitely not one of my frequently used supplies! Ah, but what fun is a challenge if it isn't challenging, right? Right!

Ready to see what I made?


I let the dresses, metal arms, and a sentiment from the stamp set guide the direction my project took. Here I played with the placement of the two girls on the die cut, which I cut from a pale grey cardstock


Once I had the basic concept in place, it was time to prepare the components. I spread the modeling paste onto a square board, using a palette tool. When I got it just the way I wanted it, I pressed the die cut shape into it, then lightly covered it here and there with the modeling paste. 


Before I put away the paste, I put the thinnest coat possible on the two metal arms. I wanted to paint them skin tone and was hoping the paste would both smooth out the metal and allow acrylic paint to adhere to it. Success on both counts! While I had the skin tone paints out, I painted the heads to match the arms. 

I used the Izink Diamond to color one dress green...


... then used Izink's spray ink to color another dress blue. I punched a heart from the grey cardstock scraps and colored it with Izink pigment ink. When the inks were dry, I added Stickles on top of the blue dress and the heart. I matted the stamped sentiment with another piece of the same grey cardstock and added silver Stickles to that. When it was dry, I matted it again with a piece of grey cardstock that I colored with the Sakura pen. I outlined the die with the pen as well, then colored the edges of the board before adding black Stickles on top. 


Time for the hair. I have this cool twisty DMC floss that I used to make the girls' hair. For the blond, I wrapped the floss around three of my fingers, then cut it along the outsides of each finger. I put glue on the head and wrapped the floss up and over so it hung down the back. 


For the brunette, I unraveled the floss first to give her curls. I wrapped the floss around two fingers and then cut it and glued it in place. 


I attached the heads to the dresses, then glued everything to the base.


Here's another look at my finished piece:


So, about those prizes...


We are giving away 2 Supertite Glue packages, a Hero Arts $25 Gift Card, three Joggles $25 Gift Cards, and A Vintage Girl $25 Gift Card! Comment below by March 8th for a chance to win. We'll be announcing the winners on March 12. We recommend subscribing so that you'll know if you win.

Now hop along to the next VIP Creator, Ann Strecko Koeman!

2/22/19

How Is This Comfy?

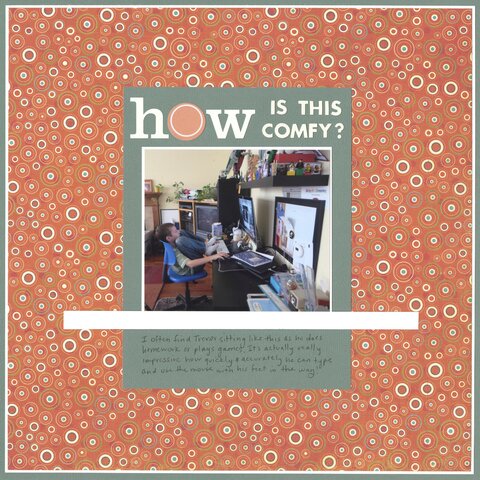
Anyone else ever catch their kid sitting in a really weird position? Trevor can type and/or use the mouse just as fast with his feet on his desk as he can sitting properly. It's quite a talent.

How Is This Comfy? (affiliate link)

It's not the first time I've photographed (and then scrapped) Trevor using furniture incorrectly and it probably won't be the last!

2/21/19

Cut and Color Giraffe Craft

Today I have a giraffe craft for you. (Try saying "giraffe craft" quickly ten times. I sound like a yapping dog after the third "giraffe craft.") My goal was to design a realistic, simple, and kid-friendly giraffe project that could accompany a report or classroom study of giraffes (as opposed to a whimsical giraffe just for fun). I accomplished this by looking at a lot of images of giraffes before I started and as I worked. I learned a lot in the process, including a new vocabulary word: ossicone.


---------


Cut and Color Giraffe Craft


Materials: 

  • construction paper (yellow, light blue, green)
  • scissors
  • three shades of brown colored pencils (mine are sage, terra cotta, and chestnut)
  • craft glue
  • photos of giraffes

Steps: 


Start by cutting out the shapes you will need for the head: an elongated footprint-shaped face, two ossicones, and two ears.

Studying the photo of the giraffe, use the lightest color to barely sketch the facial features. Ignore any markings for now. Use the other pencils to darken the eyes, nostrils, ossicone tops, and inner ears. Shade the giraffe lightly using all three pencils, again using the photo as a reference.


Glue the giraffe's head together. Fix any shading, then use the lightest pencil to add the giraffe's spots. Set the head aside. 

Cut a long neck from the same construction paper. It should taper slightly. Using the lightest pencil, draw the giraffe's spots. Observe that the spots get larger lower on the giraffe's neck. Use all three pencils one at a time to draw short hairs along the length of the back of the neck. 

Glue the neck to the light blue background paper, trimming it so it's flush with the bottom of the paper. Add glue only to the middle of the back of the head and attach it to the neck. By leaving the ears and mouth area without glue, you can bend them forward slightly to achieve depth. 

Cut green leaves and glue them to the edge of the paper. 


Giraffes are really amazing animals. 


2/20/19

Cat in the Hat Fascinator for Dr. Seuss Day

Dr. Seuss Day (aka Read Across America Day) is celebrated annually on March 2, the birthdate of the beloved children's author. Schools, libraries, and community centers plan fun events that celebrate reading and often include Seuss-themed crafts and treats. I've come up with a simple fascinator-style hat made of recycled materials that's inspired by The Cat in the Hat. I'll be sporting my new hat on March 2 for sure! Affiliate links below.


---------

Cat in the Hat Fascinator


Materials:


Steps:


Use the foam brush to put a coat of gesso on the cardboard tube and the juice lid. When it is dry, put gesso on the other side of the juice lid.


Paint the tube and the lid with Wicker White. You want full coverage of the tube and both sides of the lid. 

Next, tape off the sections of the cardboard tube that will remain white. A standard cardboard tube is 4.5" and the Cat in the Hat's hat has 5 bands of color (red, white, red, white, red), so each band will be 0.9". By happy coincidence, I had 0.94" painter's tape on hand, which is plenty close enough. I used an engineering scale and pencil to mark the tube before I realized my tape was the right size; if I was teaching this in the classroom, I'd have the kids do the measuring as a skill practice and introduction to a different type of measuring device than a standard ruler. 


Paint the top, middle, and bottom sections red and let the paint dry completely. Remove the tape, then glue a piece of cardstock to one end of the tube. 


When the glue is dry, use scissors to cut the cardstock into a circle. The tube provides a guide for the scissors to follow. Glue the tube to the juice lid and let it dry completely. 


Finally, glue a plastic hair comb or bobby pins to the bottom of the juice lid (hair combs are more secure, but bobby pins are cheaper - your call). Your fascinator is ready to wear!

As I was writing this post, I realized what I need to make my fascinator even better. There, I've fixed it! 


I wish I'd thought of this back in my teaching days. It would have made Read Across America day even more fun! 

2/19/19

Mammal Crafts for Kids

I finished the mammal crafts page! YAY!

It took about a zillion hours of work to find all of the mammal crafts I've made over the past 8 years, create the square graphics, and organize them with links. Then it took me forever to decide which one mammal would represent them all on the navigation image. After significant internal debate, I settled on a panda. Click on him to see all of my mammal crafts.


Ready for the final total? I have 101 mammal crafts to date! Of those, 40 are rabbits. The next most common animal is reindeer (6), then beavers, elephants, dogs, and lions (4).  

I am so happy to have them all organized! On to reptiles and amphibians.... 

2/18/19

Brightech Lamp - GIVEAWAY!

I've told you how much I LOVE my new magnifying lamp. So I'm really excited to tell you that Brightech is giving away a Lightview XL 2-1 Magnifying Lamp to one of my readers!


This energy-saving lamp has the widest viewer of any magnifying lamp on the market, offers 225% magnification, converts easily from a floor standing lamp to a table lamp, and produces bright white light without glare. The heavy base makes it really sturdy, but I have no difficulty moving it from room to room. 

So far, I have used my lamp to read fine print, thread a needle, sew patches, work on a jigsaw puzzle, remove a splinter, fix the missing part of a rub-on, do Diamond Art, color match at night, and about a million other things. I really do love it and am so happy that one of you will win one. 

Follow the link below to enter the giveaway. Good luck!

WIN A BRIGHTECH LAMP!

2/15/19

Trick-or-Treat 2018

Halloween photos might just be my very favorites to scrap. I don't know why. With the limited color palette and same types of photos year after year, you'd think I'd get tired of it. But I don't. Maybe because the different costumes each year keep things feeling fresh.

Halloween 2018 (affiliate link)

Fun fact: The journaling card is actually the reverse of the green paper at the top of the layout. There was a skeleton girl on the right side of the card that I didn't like, so I chopped her off and positioned the photos to disguise the chopping. I fussy-cut the two spiderwebs from another journaling card that was on the bottom half of the green paper. It's rare that I use both sides of the same piece of paper on a layout!

2/14/19

Paint Pouring "Be Creative Every Day"

I've been having so much fun customizing my make-and-takes from Creativation. Look what I did with the paint pouring project from Testors!


I wrapped the canvas with the adorable heart ribbon (LA Ribbons). Then I stamped the sentiment (Gina K Designs Crafty & Creative), colored the brush (Chameleon Marker), fussy cut it, mounted it on pink cardstock, fussy cut that, then popped it up with foam dots. My canvas is now on display in the craft room. 


If you're interested in trying paint pouring, there are quite a few companies in addition to Testors making pouring mediums or ready-to-pour paints. You can also make your own. Last year, I shared a kid-friendly, low-mess paint pouring project. I'm totally inspired to try again!

2/13/19

Scout Fun!

We're coming up on the 2-year anniversary of Trevor bridging to Troop 482. I've made a lot of layouts about the trips Trevor and his fellow Scouts have taken during those two years, but I haven't done much to document the other activities. And as neat as the special trips are, I wanted to be sure to record a few of the ways that Troop 482 makes their regular meetings and short-term events lots of fun too.

Scout Fun! (affiliate link)

It's a simple layout, but I love that photos from things like Chess Night and the patrol cooking challenge are now in the album. I was sure to include in the journaling that Epic Patrol served loaded nachos, with the mystery ingredient (pickles) incorporated into their homemade salsa. I know that years from now, we'll look back at this layout and smile.    

2/12/19

Trouble Mini Album

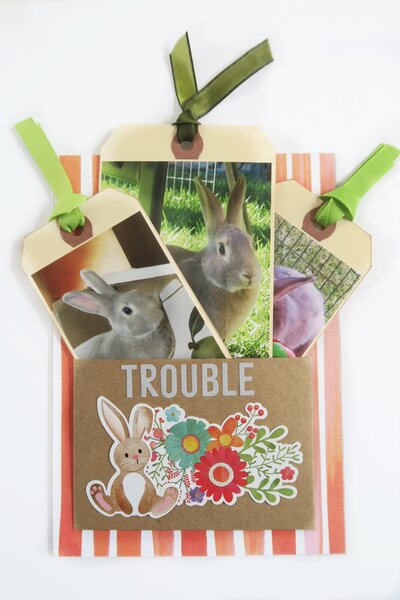
Remember the make-and-take tag album from the Deflecto booth at Creativation? I added photos and a few other touches. I love it.

Trouble - Mini Album (affiliate link)


All the photos I used were ones I already had printed. There are ten photos on the three tags. I just trimmed them to size and added them to the fronts and backs of the tags. You can see the tags here. I love that rabbit

2/11/19

Beaver Valentine - "I Chews You!"

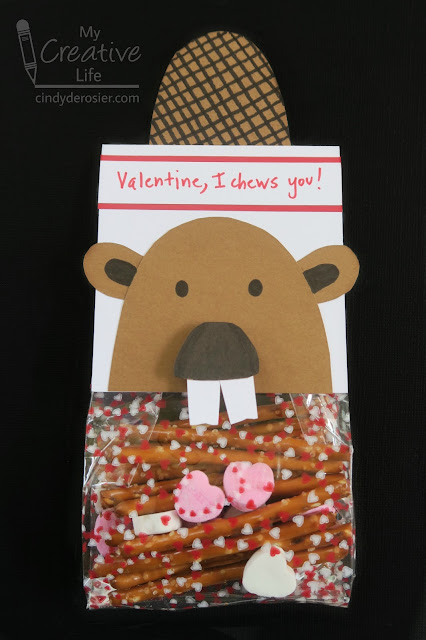
Continuing with my cute animal + pun theme, here's another idea for a homemade valentine.


---------


Beaver Valentine - "I Chews You!"


Materials: 

  • construction paper (white, red, brown)
  • scissors
  • red pen
  • craft glue
  • black Sharpie
  • treat bag
  • pretzel sticks
  • conversation hearts
  • foam dots


Steps:


Cut a piece of white construction paper so it is about the same size as your treat bag. Fold it in half to form the base of the treat topper. Write "Valentine, I chews you!" in red pen on a strip of white paper. Mat it on a strip of red paper and then glue that near the top of the folded treat topper. Cut two teeth from the white scraps and set them aside.

Cut a rough semi-circle from brown construction paper to make the beaver's head. Cut a slightly smaller oval for his tail. Use the scraps to cut two ears and nose. 

Use the Sharpie to add two eyes to the beaver's face. Color in the nose and the inner ears. Draw parallel diagonal lines on the the tail, first in one direction, then again so the two sets of lines meet at a 90° angle. 

Fill the treat bags with pretzels and conversation hearts. Staple the treat topper to the filled treat bag. 

Glue the ears behind the head, then glue the head to the front of the treat topper. It should hide the staples. Glue the teeth behind the nose, then use foam dots to attach the nose. Glue the tail to the back of the treat topper. 


A little update on my massive 'organize my animal crafts' endeavor. I am working on the mammals, doing a handful each day. I'm around 80 and counting. As you can imagine, there are quite a few rabbits, but the rest is a fairly balanced mix. Well, other than reindeer and beavers, which are both over-represented. No matter. I'm really enjoying looking back on my animal crafts. Having them all in one place will make things so much easier and is already inspiring me to make the animals that are not well-represented yet. 


2/8/19

Please Craft with Cindy: StickTogether, Rinea, Bernat, Chameleon Pens, and Diamond Art

I brought home so many goodies from Creativation that I want to experiment and play with, and to then review for you. But the manufacturers were so generous with what they gave me that it would take me until Creativation 2020 before I could use it all. 

This is only SOME of the products that came home with me.

Unless... I invited friends over to craft with me! I sent invitations to anyone I could think of who was local, kid-free, and either retired or flexible enough with their job to pop over to my house on a Monday with very short notice. 


It would be an open house - come when you can and stay however long works for you, or until I kick you out so I can do afternoon carpool. It ended up being six people, including me, which worked out beautifully. As friends showed up, I gave them an overview of each of the products and then let them work on whatever they wanted. No schedule, no structure, just time to try out the items and share their thoughts. 

Below are each of the activities we did. I've included affiliate links so you can try these crafts for yourself!

---------


StickTogether


I fell in love with StickTogether at Creativation and mentioned it as one of my cool product picks. I was one of those kids who hoarded my stickers and literally never used them because I loved them so much I thought they were too special to use. So doing a craft where I peel and stick whole sheets of stickers one at a time is highly satisfying to me. It makes up for the stickering I didn't do as a kid.

Anyway, StickTogether is a great activity for several people to work on together. It's relatively mindless and very relaxing. It's easy enough that you can chat while you work, which was perfect for my get-together.

Any guesses what this design is going to be? 


I'll be revealing the finished image soon!

---------


Rinea


If you're not familiar with Rinea, it is foiled paper that you can die-cut, shape, punch, emboss, cut, tear, and so much more. It combines the sturdiness of paper with the ability to hold its shape like foil. Playing with it is so much fun!


We got out the Fiskars punches and a bone folder and went to town with Rinea!


---------

Chameleon Pens


Chameleon Pens are double-sided alcohol-based markers with a twist. Each pen has a built-in chamber that allows you to create shading with a single marker. Color Tops allow you to blend one color with another! It's a really cool concept. 


We used Chameleon's Color Cards to experiment with the pens. The effects are so neat!


---------

Bernat Blanket EZ


Pre-looped yarn is super trendy right now, so I was really excited that Bernat gave me a skein to try. I was skeptical that it would be as easy as they claimed, as I have tried twice to learn to crochet without much success. But I'm happy to report that it was very easy... and a lot of fun!


Five of us took turns working on the scarf and before we knew it, we'd nearly finished the skein. It was at that point that we checked to see how long the scarf was. Answer: hilariously, ridiculously long! Here's a really poor quality bathroom selfie so you can see how my new scarf fits me:


I realize that when I loop it around my neck, the ends won't be dragging on the ground, but I need to wrap it at least three times to get the ends short enough and that's uncomfortable for me. My plan is to undo about a foot and bind it off so my scarf fits me more comfortably. And the next time I use Bernat's EZ yarn to make a scarf, I'll know not to use up the whole skein before checking the length!! Speaking of checking, click the link to see all the fun solids and blends they have. 


---------

Leisure Arts Diamond Art


I'd done (and loved) Diamond Dotz before, so I was really excited to learn that Leisure Arts is now making their own Diamond Art, powered by Diamond Dotz. Same great product, tons of great designs! None of my friends had done any sort of diamond art. 


Also new to them: My Brightech lamp. I captured the jaw drop when she realized that the lamp provided enough magnification and glare-free light that she didn't need her glasses. Honestly, you all need to get this lamp. I am now using it nearly every day for one thing or another. It can sit on the floor or a tabletop, is super easy to adjust, and makes crafting in the evenings (or on overcast days) a piece of cake. The magnification is a super awesome bonus. 


---------

Wizardi


Wizardi is another manufacturer of diamond art, with designs on either wood and on canvas. They sent me home with a wooden dreamcatcher kit to try. 


There are several key differences between Leisure Arts' Diamond Art and Wizardi. Everybody tried both. I'll be showing the finished projects and doing a thorough comparison of the two soon. 


---------

I had so much fun during 'Please Craft with Cindy' that it is going to be a regular event. If you're local to me and would like to join in the fun sometime, let me know and I'll add you to my list!