9/30/19

Footprint Unicorn

It's been awhile since I've shared a footprint craft. I used to do them with Trevor all the time to preserve his tiny feet in my memory. His feet are no longer tiny. He's just a little bit shorter than me and his feet are about the same size as mine. 

Trevor is not into unicorns. This footprint unicorn was inspired by my niece, Allison, who lives and breathes unicorns. Her feet, small and cute, are 600+ miles away from me now, so I had to use my own foot for my craft. Affiliate links below. 


----------

Footprint Unicorn


Materials:


Steps: 


Trace your foot on a piece of white construction paper. This will be the unicorn's head. Cut it out, then trace your arm on the large white scrap. This will be the unicorn's neck. Cut it out. Cut two ears and two nostrils from the remaining white scraps. 

Cut a horn from pink construction paper. Cut two inner ears from the pink scraps.

Lay strips of purple diagonally on the horn, glue them in place, and then trim the excess. Cut two eyelids from the purple scraps.


Cut a bunch of yarn pieces approximately 2" long. The easiest way to do this is to wrap the yarn many times around the fingers of one of your hands, then cut it on both sides of your hand to get pieces all the same length. Set aside 2/3 of the yarn to use for the mane. Tie one piece of yarn around the remaining yarn to make a tight bundle. 


Glue one strand from the bundle behind the middle toe of the cut-out foot. 


Glue the ears and the horn in place, then bring the yarn bundle forward and arrange it to make the forelock. 


Use the sharpie to darken the nostrils, to draw a mouth, and to add eyelashes to the eyelids. Glue the eyes, eyelids, and nostrils to the unicorn's face. Glue the remaining yarn to the back of the neck. Finally, glue the unicorn's head to the neck. 


You can't see the sparkle in the yarn very well in the photo, but I love how it looks in real life. Change out the yarn with pastels, or bright rainbow colors, or whatever you prefer. With a mythical creature, there's definitely no right or wrong!


9/27/19

Monaco

We had such a great time in Monaco last spring. It's a beautiful country and our time there was far too short. 

Monaco (affiliate link)

Picking which photos to scrap wasn't as difficult as usual. It would have been much harder if we'd been able to take photos inside the prince's palace, but we weren't. Instead, I included one photo of the changing of the guard to help us remember the palace. Along with photos from the Grand Casino, the Rock of Monaco, Prince Rainier's tomb, and the famous Gran Prix hairpin turn, they tell the story of our visit fairly well. 

I was particularly pleased to dig up and use that chipboard race car! I've had it for quite a few years. I layered three different stickers from the same collection to hold the title banner. The polka dot strip is from Scenic Route (sigh... miss them). I'm happy with this layout.

9/26/19

Construction Paper Sandwich

May I offer you a sandwich? This one has LOTS of fiber. 


---------


Construction Paper Sandwich


Materials:

  • construction paper or cardstock
  • scissors
  • brown ink
  • glue


Steps:

Cut two bread-shaped rectangles from medium brown paper. Cut a slightly smaller bread-shaped rectangle from cream-colored paper. Glue it to one of the rectangles, then ink the edges of both pieces of bread. 


Cut circles of red paper for tomatoes. Tear green paper and then wad it up. When you uncrumple it, it looks like lettuce.


Glue the tomatoes and the lettuce to the underside of the top piece of bread. 


Cut yellow squares of cheese, then ink the edges. Glue them behind the lettuce. To give my sandwich dimension, I glued folded strips of scrap paper to the bottom piece of bread before gluing the top part in place.  


Here's the completed sandwich! It looks (almost) good enough to eat. 


Out of curiosity, what's on your perfect sandwich? I like lots of cheese, avocado, lettuce, tomatoes, cucumbers, and a tiny bit of onion. Yum. I could eat that every single day. 

9/25/19

Storage for Leftover Diamond Dotz and a GIVEAWAY!

I'm officially obsessed with Diamond Art! In addition to the llama, the rose, and the others I've shared on the blog, I've finished three more projects and started another. I will eventually share them here, but first I wanted to show you what I did to tame my growing collection of leftover Diamond Dotz. After completing the first few projects, I used the included ziplock bags to hold my extra Dotz. That worked fine, but by the 7th or 8th project, I had a mess on my hands. It took awhile, but now I have an organization system that I LOVE. Check out the before and after!


Interested in organizing your leftover Diamond Dotz? It's so worth it! Not only is the mess contained, but it's so easy to combine the same colors from different kits. The containers are portable, flexible, and spill-proof. Here's what the container I used (affiliate link here and below) looks like from the bottom (plus my hand to provide scale):


Each box holds 24 small containers. The lid comes out entirely, or you can flip the top back to pour out a small amount of Dotz. They're basically Tic-Tac containers.


I added the labels using a P-Touch. I got it for Steve years ago and he uses it to label everything (it's been 5 years and HAREWARE still cracks me up). It's come in handy so many times and it was absolutely perfect for this organizational project.

---------

Astute readers probably noticed the word GIVEAWAY in the title. My friends at Leisure Arts have just introduced two fabulous new Diamond Art lines: Holiday Diamond Art and NFL Diamond Art and I get to give away the design of your choice!

  
Even better, you can choose your prize from among all of the Diamond Art kits that Leisure Arts offers! Trust me, you will have a very hard time picking just one.

For a chance to win, take a look at this photo below and tell me in the comments which Diamond Art kit it is. Then tell me which kit you'd like to win! 


You have until next Wednesday, October 2 to leave a comment. Sorry to my international friends, but the winner's shipping address must be in the continental US. 

Off to work on my nearly-completed Diamond Art... as I said, I'm obsessed!

9/24/19

Hunger Action Month, A Delicious Veggie Scramble Sandwich, and How to Help

September is Hunger Action Month. Hunger is a major problem that affects approximately 1 in 8 people. I feel strongly that no one should go hungry. Together, we can make a difference by advocating, raising awareness, donating money, and volunteering our time to help eliminate hunger. 

Our local food bank provides food to more than 178,000 food-insecure people, 25% of whom are children. Trevor and I have been helping with produce distribution this month. Not only is it hugely rewarding to give people much-needed food, but it's a lot of fun! Our site manager, Nick, cranks up the oldies and we all chat and share recipes and ideas for the week's produce. 


In fact, one of our dinners last week was inspired by our conversations during produce distribution. One man mentioned how much he likes to put vegetables in omelets, pointing to the carrots. I've made omelets with all sorts of vegetables, but never carrots. Why not give it a try? I gathered carrots, zucchini, and tomatoes from our garden and whipped up a scramble, which I served as a sandwich in buttery, toasted ciabatta bread. Delicious!  


In addition to helping with distribution, we went to the Food Bank with the Scouts to bag produce. You can see the apples in the foreground. That was just one of several bins that size. In the background you can see some of the pallets of onions on the left and potatoes on the right. Out of the frame - carrots, pears, cabbage, and much more. It is very satisfying to see all that produce and know that it will be feeding the hungry. 


During Hunger Action Month, I encourage you to do what you can to make a difference. That might mean advocatingdonating money or volunteering your time. If you'd like to join our family to distribute food, just let me know and I'd be happy to bring you along. If you can't do anything else, please take the time to learn a little bit more about the issue of hunger

If you are local to me and need food for whatever reason, please know that there are many resources out there. Tell me what you need or check this list for distribution sites.

9/23/19

New-to-Me Foods

I've been working hard to build out my Fun with Food page. It's already home to Edible Crafts, Recipes from United States History, and Family Cooking Competitions. Now I've completed the fourth category:


There, you'll find all sorts of interesting foods I've tried for the first time (chicken hearts, miracle berries, and dried lily bulbs, for example) along with taste tests and eating challenges. Check out what I've tried and add to your own culinary bucket list. And if there's something else you think I should try, please let me know!

9/20/19

Barcelona

Here's the next page from our April adventures in Europe:

Barcelona (affiliate link)

As always, the first step in making the page was narrowing down which photos to use. It was raining when we were in Barcelona, so we took significantly fewer photos than in other cities. That should have made it easier, but it was actually the opposite. I struggled to find pictures to represent the breadth of what we did. I finally narrowed it down to these nine. I chose yellow and red for this layout to reflect the colors of both the Spanish and Catalonian flags. I had to use tiny writing to fit everything I wanted to say into the two small journaling blocks, but I managed!

9/19/19

Rainbow Name Art Ornament

I've made another name art project.


Yes, I know I already have a lot of name art projects. What can I say? I love name art. Someday, years from now....


Anyway, here's the tutorial. I made mine as a rainbow ornament, but obviously you can use whatever colors you'd like. Affiliate links below.

-----------


Rainbow Name Art Ornament


Materials:


Steps: 


Trace a circular object once on white cardstock and then twice on black cardstock. The size doesn't matter that much - use a saucer or a roll of masking tape or whatever else is handy. 

Use the pencil to lightly write the middle letter of your name in the center of the circle. (For Cindy, that's the N.) It should extend all the way from the top to the bottom. If your name has an even number of letters, write the two middle letters centered in the circle. (For example, Trevor would center EV where I've written N.)


Working toward the right, lightly sketch the additional letters of your name. Each letter should touch the next letter. The last letter should touch as much of the right-side curve as possible. Sketch lightly, as it's hard to get it right on the first try and you'll likely need to erase.

Go back to the center and work toward the left, adding the first letters of your name. Again, each letter should touch the next letter. The first letter of your name should touch as much of the left-side curve as possible. 

When you are happy with your name, trace it with the Sharpie.  


Erase the pencil lines, then use the microtip scissors to cut out your name. 


Color in the letters with the colored pencils. You can use whatever colors you want, but I made a 5-color rainbow from left to right. Work slowly, being careful not to wrinkle or rip your name. I colored mine directly on the table pads you see in the photo because I wanted the texture to show up. I assumed (correctly) that the texture would distract from imperfections better than if the color were uniform. 

Cut out the two black circles and glue the name to one of the circles.  

Cut foot-long lengths of embroidery floss in colors that match your name. Use an overhand knot to tie them together at one end. Twist the colors together very tightly, then knot the other end. Some of the twisting will undo itself. Tape the two ends to the back of the black circle with the name, then use glue to sandwich the other black circle over it to help secure it in place. Everything should line up perfectly, but if it doesn't, just trim a little until you're happy. 


Enjoy your name art ornament!

9/18/19

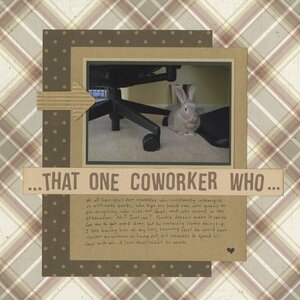
... that one coworker who...

Steve and I both work from home, but Steve is not the one I refer to when I mention my coworker. My coworker weighs 6 pounds and sits under my chair almost every workday. He answers to Trouble... when he chooses to answer, that is. 

... that one coworker who... (affiliate link)

I've been known to complain about my coworker snatching my papers, sneaking into the craft room, or gooing on the hem of my jeans while I'm trying to get things done. When I took the picture of my coworker sitting innocently under my chair, I knew I wanted to make a page about how we all have that one coworker. I started brainstorming all the wacky things my coworker does and laughed the whole time I was doing the journaling for this page. Silly Trouble! 

9/17/19

Prosopagnosia (Face Blindness)

Well, that was interesting:


Steve sent me a fascinating article about prosopagnosia, also known as face blindness. I've always wondered if, along with my aphantasia, there is something wrong with my ability to recognize people. I joke that I would be the worst-ever person to witness a crime, because I honestly wouldn't have any information to provide to a sketch artist. I used to spend a ridiculous amount of time studying my students' photos during the first few days of school in hopes of recognizing them if they wore a different color shirt to school, or talked to me from somewhere other than the desk I'd assigned them. For whatever reason, my brain wants to associate people with the color of their clothing or the location where I met them instead of anything actually useful, like facial features. I am notorious for not being able to tell movie characters apart, which I think may go a long way in explaining why I don't really enjoy movies. I spend the whole time confused because I don't know who is who. I am also notorious for not recognizing people I know if they're in an unusual setting or wearing sunglasses or something. One of my most embarrassing moments of all time was during a trip with Steve celebrating our first anniversary. We were about two hours away from home, visiting a state park, when someone who obviously knew me said hello and started chatting. He was tall and wearing sunglasses. I had no idea who he was. Instead of following normal social conventions and guiding the conversation so I could figure out who it was, I actually asked. It was my boss. The principal of the school where I taught, a man I'd seen multiple times a day for 9 years. Embarrassing, to say the least. I babbled about never seeing him in sunglasses and wait - you're wearing a hat, too! That's why I didn't recognize you! You never wear hats!

People always joke about how no one ever guessed that Clark Kent was Superman. He probably would have had me fooled.

Anyway, my score of 61% put me a hair above the diagnosis point for prosopagnosia, which sounds about right. I don't have problems finding my friends amongst other people, nor do I unintentionally snub friends regularly (at least, not that I know of...) But I'm definitely below average when it comes to recognizing people.

If you have 20 minutes, take the Cambridge Face Memory Test and let me know in the comments how you do!

9/16/19

Easy Tape-Resist Tree with Fall Leaves

Check out this fall tree I made, with absolutely no drawing or painting skills required. It's like magic! Affiliate links below. 


Tape-Resist Tree with Fall Leaves


Materials:


Steps:


Orient your chipboard vertically, then put a strip of 3/4" tape straight down the center to make the tree trunk. Fold the ends around to the back of the chipboard.

Use the 1/2" tape to add branches extending diagonally up from both sides of the trunk. Stagger them with uneven intervals between them for a more realistic look.

With the 1/4" tape, add twigs to the branches. Vary their length and angles. 


Dip the edge of the sponge into sky blue paint. Dab it over the tape, covering about half of the exposed chipboard. 


Put red and yellow paint near each other on a palette. Dip a q-tip into one color, then make dots to fill in the unexposed chipboard. Each time you dip, alternate paint colors between yellow and red. This will create the oranges and give the tree a more realistic, random look. 


Carefully pull up the tape, revealing the unpainted chipboard tree.  


When the paint is completely dry, use a dark brown colored pencil to draw lines on the tree to simulate bark. The lines should always go the length of the trunk, branch, or twig. 


Finally, use a lighter brown colored pencil to color in the tree. 


See? No drawing or painting skills needed! And it's a lot of fun. Give it a try!

9/13/19

The Ultimate San Francisco Bucket List

A friend of mine is planning to follow her son, a recent graduate, out of state. Before she moves, she's making an effort to visit as many San Francisco attractions as she can, figuring that she's unlikely to return to the area often in the future. And despite living just outside of SF for 25 years, there are plenty of places she hasn't yet explored. I was helping her brainstorm a bucket list and wanted to share it with all of you. Obviously, this isn't an exhaustive list of every single cool thing to do in San Francisco; instead, I consider these the most iconic things you can only do in SF and that it would truly be a shame to miss.


"Cindy!" you might be saying. "You have included TWO seafood items on this list!" I know. As someone who doesn't eat seafood, it might seem strange that I would include clam chowder and crab as San Francisco must-do items. But both are iconic, an important part of the SF experience. If you're a fellow seafood-phobe, try a tiny bite of someone else's. I've eaten clam chowder and crab in San Francisco and I never have to again. But I can say that I have!

I've been working hard to update my list of recommended places to go in California. It's taking forever, but this post gave me the motivation I needed to complete the San Francisco section. There, you can find links to everything I've listed above and more. And as we visit more locations in San Francisco, I'll continue to add anything else that I recommend. Despite living near San Francisco my entire life and spending a lot of time exploring, there is always more to see and experience. San Francisco is a city like no other and I'm so glad to live where I do. 

9/12/19

Coffee Filter Folklorico Dancer

Mexico celebrates their independence on September 16 (not May 5, as some mistakenly believe). Celebrate Mexican culture with a craft featuring a beautiful folklorico dancer.


Coffee Filter Folklorico Dancer


Materials: 


  • 4 dyed coffee filters (tutorial here)
  • skin tone construction paper 
  • scissors
  • craft glue


Steps:


Color the coffee filters and let them dry completely. Fold three coffee filters in half, then layer them inside each other to form the skirt. Set the skirt aside. 

Cut the fourth coffee filter in half, then accordion-fold it. Crease it well, then twist the waist area to hold the folds. 

Cut a head, neck, and arms from the construction paper. 


Add hair by cutting black construction paper to match the shape of the head. Add a piece on top for a bun. Nothing should be glued at this point. 


Take time to refine your shapes. I slimmed up my dancer's face and snipped the blouse to give the impression of sleeves. I put her hair more upright and made her belt smaller. I also gave her legs (both from the same piece of paper, but the light is making it look like two different colors). 


Cut out black shoes. When you're happy with how everything looks, glue it all together. I added a fun flower brad (affiliate link) to her hair as a final touch. You can add a face; I chose to leave it blank.  


To my Mexican and Mexican-American friends and readers, I wish you a joyful independence celebration on Monday!


9/11/19

Plaid's Let's Paint Live - Sunset Cactus

Check out my cactus painting!


This painting was the third I've done from Plaid's Let's Paint Live events. (Click to see my starfish and my other cactus.) The cartoony style of the cactus is unlike anything I've ever painted before, which is exactly why I was so excited to jump in and try it. I always learn so much during these paint events and they always take me out of my comfort zone.

Plaid hosts Let's Paint Live nights on the first Thursday of each month at 7:30 pm Eastern. If that time doesn't work for you (it's only 4:30 pm here in California), just watch the recording whenever it's convenient. (As a plus, you can hit pause.) The next FREE Let's Paint Live is Chrysanthemum, by the fabulous Priscilla Hauser, on Thursday, October 3.

9/10/19

A Visit to Glashoff Sculpture Ranch

About 8 years ago, our family started to notice fabulous custom mailboxes popping up in the agricultural area in our city. New ones showed up each month or so. Now nearly every rural property in our area has its own personalized mailbox made from reclaimed materials, each the work of local artist Phillip Glashoff. We'd been admiring Glashoff's work for many years. His whimsical sculptures are all over our area - in restaurants and offices, in the lobby of the Downtown Theater, and in homes. His art is instantly recognizable, yet each piece is one of a kind. 

Last weekend, we made an appointment to visit Glashoff Sculpture Ranch, where Phillip Glashoff lives, works, and displays his art. It is incredible. 


Glashoff Sculpture Ranch is in the Suisun Valley, less than 10 miles from our house, in the heart of wine country. 


The road into the property is lined with dozens of whimsical characters. 


Artwork is on display in every corner of the ranch. There is so much to see. 


Every sculpture starts with reclaimed materials, which Glashoff sources from junkyards. He collects materials he knows will be useful, but doesn't start with a design. Instead, he lets the materials guide the artwork. When you look closely at a sculpture, you recognize the gears, silverware, springs, pipes, garden tools, and other items that inspired the piece.


I am smitten with the many animal sculptures. 


I love the musical instruments, too. 


I love this photo that Steve took...


Yes, that's a full-size real car. 


And it wasn't the only one. 


Here are some oversize keys to go with the cars.


Hey, another Liberty Bell replica


This assortment of mailboxes is for sale. I tried, but it's impossible to pick a favorite. 


We had such a fun time exploring Glashoff Sculpture Ranch together.


I highly recommend a visit to Glashoff Sculpture Ranch. Visits are by appointment only; field trips are available as well. We can't wait to go back and see what's new!