Pages

10/31/19

Money Bookmark - The Perfect Gift for Book Lovers

My nephew, Timothy, turned 19 on Tuesday, which means that I have another money gift to share. I used a $2 bill to make a bookmark, then hid money in the pages of a book. Ideally, this would have been a book that Timothy had specifically requested, but Timothy does not read for pleasure (sigh). Instead, I chose a 25 cent classic from the Friends of the Library sale that his little sister might enjoy. Affiliate links below.


---------

Money Gift for Book Lovers


Materials:


Steps: 


Cut a 3 x 7" piece of cardstock. Attach a $2 bill to the cardstock using removable Glue Dots. It should be centered on three sides, with extra cardstock on one side. 

Cut a 4" x 16" piece of contact paper. Peel up half of the liner, then position the cardstock on it. Remove the rest of the liner, then smooth it over the over side of the bookmark. Trim off the excess contact paper. 
Punch a hole in the cardstock (don't punch through the actual money) and use the embroidery floss to make a tassel. 


Insert the bookmark into the book. 


Insert more money in random pages throughout the book. 


To get to the money, the recipient should peel back the contact paper, then gently lift the bill off the cardstock. Rub the Glue Dots to remove them and the money is ready to spend. 

Happy birthday, Timothy!


10/30/19

'You Are So Sweet' Cake Card

Back in my teaching days, I taught my students about the importance of thank-you notes and other ways of showing appreciation. We wrote letters or made cards for guest speakers, regular parent volunteers, or others who helped out in the classroom. I recently found this sample of a card in my teaching files. It's really easy to make, with plenty of room inside for a nice note and/or tons of signatures. 


'You Are So Sweet' Cake Card


Materials:


  • construction paper
  • scissors
  • markers
  • glue


Steps: 


Fold a sheet of construction paper in half. With the fold on the bottom, lightly sketch the shape of a plate and cake (as shown above, minus the candle).

Cut out the cake, keeping the folded edge intact.

Use the scraps to cut a rectangular candle and a flame.

Color the plate, candle, and flame. Draw frosting onto the cake. Write 'You Are So Sweet' across the plate.

Glue the flame to the candle, then glue the candle to the inside of the card.

Write your message inside the card, then it's ready to give.


10/29/19

Icebreaker Name Art

This name art project is one of my favorite icebreaker crafts. Write your name in block letters on white paper, then color in each letter to answer a question about your favorite thing. Then share with the group what each letter represents. 


My letters answer these questions:

  • What is your favorite dessert? (chocolate chip cookies)
  • What is your favorite color combination? (purple, orange, and pink - my wedding colors)
  • What is your favorite way to travel? (cruises)
  • What is your favorite holiday? (Christmas)
  • What is your favorite animal? (rabbits)


Be sure to give lots of choices for questions, so that everyone can pick the ones that mean the most to them. Here are some other ideas:

  • What is your favorite sport?
  • What is your favorite fruit?
  • What is your favorite season?
  • What are your favorite pizza toppings?
  • What is your favorite TV show?
  • What is your favorite candy?
  • Who is your favorite superhero?
  • What is your favorite flower?
  • What is your favorite musical instrument?
  • What is your favorite month?
  • Who is your favorite cartoon character?
  • What is your favorite ice cream flavor?
  • Who is your favorite Disney character?
  • What is your favorite kind of weather?

10/28/19

Wax Paper Window Card

I have well over 100 scraps of paper sitting in a pile on my desk, each with a craft idea sketched on it. Every once in a while, I sort through the scraps and make one of my favorites. This time, I challenged myself to reach into the pile and pull out a random idea and make that. Here is my Wax Paper Window card:


---------

Wax Paper Window Card


Materials: 

  • cardstock (white, grey, blue, brown, pink, green)
  • scissors
  • craft glue
  • wax paper
  • silver washi tape
  • brown ink


Steps: 


Cut the following items: 
  • 8.5" x 5.5" from white cardstock (fold in half to make a card base)
  • 4.25" x 5.5" from grey cardstock (cut a square from the center to make the window
  • 4" x 4" from wax paper
  • 4" x 4" from blue cardstock 
  • 5.5" x 1" from brown cardstock 
  • a pink flowerpot
  • green leaves (ink the edges to give them dimension)


Glue the wax paper to the back side of the window, then glue the blue paper over that. Turn the card right side up and add 5 strips of washi tape to form the grilles and then the rail of the window (yes, I had to look that up).

Cut the ends of the brown cardstock on a diagonal so that it matches the width of the window rail. Glue it in place. Glue the leaves behind the flowerpot, then glue the flowerpot to the window sill. Finally, glue the entire card front to the card base.

You can add any message you'd like. I think this would be nice as a 'Thinking of You' or 'Get Well Soon' card.


Travel the world. Without leaving home.

10/25/19

Kind People are My Kind of People

Way back in my beginner teacher days, my aunt Vickie (then a 4th grade teacher and now a curriculum specialist who doesn't seem to understand how to retire) taught me how to do a cool art project with sharpies, cling wrap, and aluminum foil. I used a page from one of my favorite coloring books by Leisure Arts to show you this unique craft. Affiliate links below. 


---------


Kind People Are My Kind of People


Materials:


Steps: 


Remove the coloring page from the coloring book. Put it on top of a piece of chipboard, then cover it with plastic wrap. It should be tight and without wrinkles. You can tape the back if you'd like. 


Use the sharpies to color in your design. Outline everything in black for the best results. 


Carefully remove the top half of the plastic wrap and check that your coloring is dark enough. I didn't outline with black and my design looked too washed out, so I carefully rewrapped the plastic wrap and did the outlining. 


Carefully remove the plastic wrap and set it aside. Remove the coloring page - you can use it for a future project.

Cut a piece of foil that is bigger than the chipboard. Gently ball up the foil, then unfold it and smooth it out. Don't ball it up too tightly or you'll have difficulty smoothing it. Repeat this process if necessary, then wrap the foil around the chipboard. Cover the foil with the plastic wrap and tape it on the back side. Mount the artwork onto black cardstock that's been trimmed to 9" x 11.5". 


You can do this with any coloring book (Leisure Arts has tons of great ones!), or draw a design or quote of your own. Be creative!

10/24/19

Sparkly Unicorn Diamond Art

I'm doing something I've never done before - posting a Christmas gift on my blog before giving it to the recipient. In this case, however, the recipient is my 6-year old niece, Allison, and I'm fairly confident she doesn't read my blog unsupervised. Not only that, but I kinda already told her what the gift would be. In fact, I posted a picture of Allison (and my godson Teagan) helping me with Allison's gift when we visited back in July.

So Allison knew that I would be taking the completed unicorn Diamond Art and turning it into something sparkly and fabulous for her, but she didn't know exactly what. Neither did I, to be honest! I debated all sorts of options before settling on wall art. I think she's going to like it. I wish you could see just how sparkly it is! Affiliate links below.


---------

Sparkly Unicorn Diamond Art


Materials:


Steps: 

Complete the unicorn, following the instructions on the package. Use microtip scissors to carefully cut it out. 

Paint the wood canvas with black paint. When it is dry, add a coat of Extreme Glitter. The more coats you add, the more sparkly it gets. I did two coats and got tons of sparkle. (Allison likes sparkle. It's practically a requirement for being a 6-year old girl to love glitter in all its forms.)


Cut the cardstock to size, then use a strong craft glue to attach it to the inside of the wood canvas. Use the same glue to attach the unicorn, alphabet letters, and heart(s) to the cardstock.


Diamond Art makes a fantastic gift for practically anyone on your gift list. My favorite diamond art manufacturer, Leisure Arts, has a huge (and growing) number of designs to choose from. If someone on your list would prefer to receive a completed design instead of doing it themselves, you have plenty of time to make this thoughtful gift before the holidays.

10/23/19

Google Maps State Welcome Icons

As a kid, I remember how exciting it was to drive across a state line and see the "Welcome to _____" sign right at the border. We made frequent drives from our home near San Francisco to the Seattle area, where my parents grew up and all of our relatives lived. The "Welcome to Oregon" sign was exciting, as it meant we were almost halfway there. The "Welcome to Washington" sign was so much better, mostly because it meant we had less than three hours to get to my grandparents' house, but also because the state line is in the middle of the bridge over the Columbia River and I thought it was neat that the border was in the river.

As an adult, I still love driving across a state line and seeing the welcome sign at the border. For the past few years, I've stopped staring out the window as we approach a new state and instead stare at my phone (obviously, as a passenger, not a driver). Why stare at my phone? Because of the Google Maps State Welcome Icons. If you are using Google Maps when you cross a state (or country) border, a welcome banner appears across the bottom of the screen. Each features an occupation, character, or famous person from the state. We LOVE trying to guess what the character. None of us predicted New Jersey's would be a waitress.


Or that Kentucky's would feature a Kentucky Derby hat wearer, rather than a jockey. 


It didn't occur to me until recently that I should do a screen capture when they pop up. Fortunately, others have thought of it and you can find images travelers have shared from their trips to various states. I haven't done much searching, because I don't want spoil the surprise on states I haven't seen yet.

All this leads me to wonder if there's an icon for Hawaii. It is impossible to drive into Hawaii from another state or country, so it stands to reason there wouldn't be an icon, but would Google really leave one state out? I doubt it.

10/22/19

Fall Roundups

It's been a long time since I've shared any Fun family Crafts roundups. Here are the latest ones I've done. You can click on each graphic to go to the post and find the tutorials. 

First, jack-o-lantern crafts. The graphic came together quickly and easily, but boy did I struggle with the text in the post! Should I use hyphens? An apostrophe? Spaces? Ack! At Fun Family Crafts, we use the tag "jack o lantern" on the back end for consistency, but use a variety of different spellings on the visible portion of the blog. I mixed things up throughout the text, hoping to capture a variety of search terms, but went with jack-o'-lantern for the graphic. One of these is mine. Do you recognize it?

ideas for fun jack-o-lantern crafts for kids

When I made the graphic for the Mummy roundup, I intentionally chose projects with some color in them so that the entire thing wouldn't just be a wall of white with occasional eyeballs. Doesn't that pumpkin cookie mummy look delicious?! I would have chosen it even if it didn't have the bits of orange adding color to the photo. 


I just love fall colors, both in nature and in graphic design. When I made the graphic for the acorn roundup, I stretched one photo across three columns, making it a colorful header below the actual header. Not only do I love the way it looks, but it let me arrange the other nine photos into a perfect grid (and you all know how much I love a grid). 


When I looked through all 75+ ghost crafts we've featured, I was pleased with the variety. I was also impressed with how many were edible! Half of the ones below are edible - can you spot them? And speaking of spots, aren't the Charlie Brown brownies the cutest thing ever?


With 600+ fall-themed projects on the site, I was overwhelmed choosing just ten crafts for a fall roundup. I avoided anything that was more Halloween or Thanksgiving than fall, then tried to get a good assortment of materials, age levels, and subject matter. One project is mine... and I didn't even intend it to be for fall!


This roundup was all about pumpkins, as opposed to the earlier jack-o-lantern roundup. I made this right before lunch and it wasn't until I was pulling the pictures together that I realized practically every pumpkin craft I chose was edible! I made a few substitutions, leaving just four edible crafts. And then I had lunch. 


As always, I made these graphics with PicMonkey. It is so easy and they're constantly adding to their already-huge collection of fonts, graphics, frames, textures, and special features. I use PicMonkey for all of my photo editing as well. I absolutely love it! 

10/21/19

Construction Paper Dragon

One of my friends commented about the disappointing lack of dragons among my collection of Mythical Creature crafts. So I made one: 


Construction Paper Dragon


Materials:

  • construction paper
  • scissors
  • glue
  • pens
  • googly eyes


Steps:


Fold a piece of construction paper, then sketch a dragon with the belly along the folded line. Cut out the dragon, being sure not to cut along the fold.

Unfold, then refold the paper the opposite direction so that any pencil marks are hidden.


Fold down the wings so that they are on opposite sides of the dragon's body. 


Put a thin layer of glue on the inside of the dragon, covering every part except the wings. Press it together. 

Use pens to decorate your dragon. Use stripes, dots, or other patterns.


Draw nostrils, then add googly eyes. 


There's so much room for creativity with this project. Elongate the tail. Twist the horns. Shrink the wings. Use a rainbow color scheme. The sky's the limit!

10/18/19

Greater-Than Less-Than Craft Stick Alligator

Chances are, you were taught which way the greater-than and less-than symbols face by imagining them like an alligator's mouth. The hungry alligator wants to eat the larger number, so his mouth should open that direction. This craft stick alligator, complete with moveable jaws, is great fun to pair with a greater-than less-than math lesson. Affiliate links below.


Greater-Than Less-Than Craft Stick Alligator


Materials:


Steps:


Drill holes in the craft sticks. I used my beloved Craft Drill; in a classroom setting, I'd probably pre-drill the holes. Or, I'd have a parent monitor a drilling station. 

Paint the sticks and the brad green. Set them aside to dry. 

Use scissors or a punch to cut a green circle. Then cut two rows of white teeth. 


When the paint is dry, use the brad to connect the two craft sticks. The brad should be tight, but no so tight that you can't open and close the jaws easily. 

Cut the green circle into two uneven parts. The larger will be the eye and the smaller is the nose. 


Glue both green pieces into place. Add the googly eye, then use the black pen to draw nostrils on the nose. Glue the teeth in place.  


Use the alligator to help you solve greater-than and less-than projects, or make it as part of a reptile study. The alligator is the State Reptile of Florida, Louisiana, and Mississippi, so if you live there, that's another good reason to try this craft! 


10/17/19

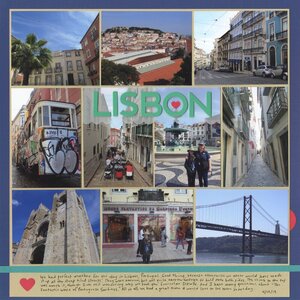
Lisbon, Portugal

We had a wonderful time exploring Lisbon, Portugal back in April. In narrowing down the photos, I chose tiles, views, the funicular, steep and narrow streets, the cathedral, sardines, and Cristo Rei. Alas, I didn't have room for the glove shop

Lisbon (affiliate link)

I barely had room for the title, either. I took advantage of some relatively empty sky to house the title. It's hard to see here, but it's on a piece of scalloped vellum, which helps draw the eye. The little pops of red form a visual triangle between the only people pictures I included. I'm very happy to have another layout from our European adventure in the album.

10/16/19

"We All Wear a Lot of Hats" Name Art

We all wear a lot of hats. Some hats are literal, while others are figurative. This name art project is a fun way to look at the many hats we wear.  


I don't wear a lot of literal hats, but I wear tons of figurative hats, many of which are listed on my artwork. Some are difficult to represent with a drawing - what hat does a neighbor wear, for example? Or a blogger? I chose a chef's toque to represent my love of cooking and food, as well as my job as meal preparer for our family. The Scout hat is one of the few literal hats that I do wear in my role coordinating community service projects for Trevor's troop. The warm hat represents the time I spend at the ice rink each week, watching Trevor progress as a skater. The graduation cap represents my love of education and time as a classroom teacher, as well as everything I do now to teach others. The flower hat represents me as a Lutheran, even though I have never worn a hat to church in my entire life and no one else in my church does either. 

To make your own artwork, write your name in block letters in the middle of a sheet of copy paper. Add a hat to each letter, representing jobs/career goals, hobbies, sports, religion, or anything else that represents you. Draw a line about an inch below the letters to give them something to stand on. Add smily face and legs. Color in the characters, then list all the many hats you wear underneath.


10/15/19

Taco Tuesday: Paper Taco Craft

I just missed National Taco Day, but at least I'm sharing this on a Tuesday! I'm not sure we really need a National Taco Day, now that I think about it. So many restaurants, cafeterias, families, etc. celebrate tacos every week. Anyway, the next time you have tacos, pair them with this craft. Affiliate links below.


---------


Paper Taco Craft


Materials:


Steps:


Fold the yellow cardstock in half, then cut a half circle, keeping the fold intact. This is your taco shell.


Use the brown colored pencil to make dots all over the taco shell. Don't make a pattern- just randomly dot all over the place. 


Glue strips of brown and red construction paper inside the taco shell. 


Now tear the tissue paper into strips. Keep going until you have a nice pile of lettuce.


Add glue all over the inside of the taco shell and add the tissue paper lettuce. 


Good enough to eat, right? Happy Taco Tuesday!


10/14/19

Empty Bowls

As it turns out, we did lose power during the Public Safety Power Shutdown last week. It was out for 48 hours, which was inconvenient, but not that bad. We had to make some changes to our routines, but it was well worth it to prevent wildfire outbreak. The PSPS allowed us to see where we can improve in our own emergency preparedness. It also helped me appreciate all the conveniences we have that we take for granted.

Anyway, I'm back and wanted to share a really neat event we attended this weekend. It's called Empty Bowls and it's a fundraiser for our local Food Bank.


Ceramic artists, as well as students from the community college and high schools, donate gorgeous, one-of-a-kind bowls to the event. As attendees arrive, they select their favorite bowl. The bowl becomes theirs to keep, as a reminder of the problem of hunger and the many empty bowls in our community. 


It was SO hard to choose our bowls! There were so many beautiful choices. I found a sage green one that I aodored right as Trevor fell in love with a blue bowl. 


Steve pointed out that I'd chosen the 'wrong' bowl because I hadn't stuck with our family colors. He was totally right, and as soon as he said that, I wanted a red bowl instead of the green one I'd picked. Steve happily took the green and I picked out a red.


We set them down at a table and went to check out the silent auction and raffle prizes.


The raffle and auction are organized by 4-H members and staffed by high schoolers. 


All the prizes had something to do with food or bowls. 


At the silent auction table, we ran into one of our all-time favorite people, Trevor's first grade teacher. She's a 4-H Mom and has been volunteering with Empty Bowls for years. 


Soon, it was time to eat. We each brought our bowls to the serving table, where we had a choice of three different soups: Tomato Vegetable, Creamy Potato with Bacon, and 15-Bean. The soups were made by soup kitchens served by the Food Bank and are the same hot meals that people in need receive. 


It was really hard to choose one soup because they all looked and smelled fantastic! I had the Creamy Potato (YUM!). Between the three of us, we tried all the flavors and they were all delicious. Along with soup, we got bread and lemonade or ice tea. 


Next, we heard presentations about the Food Bank's mission, as well as stories of the people they serve.


4-H members acted as MCs for the event and did an outstanding job. I'd expect nothing less from 4-Hers!


The evening ended with cookies and a tour of the Food Bank facility. We've volunteered at the Food Bank often enough that we could give the tour, so we skipped it. About half of the people attending Empty Bowls had never been to the Food Bank before and they appreciated the chance to see everything and learn more about how this organization manages to distribute 25 million pound of food to people in need each year.

They also got to see where this commercial was filmed:


It looks like a familiar warehouse store, but it's not! This was filmed at the Food Bank in Fairfield, in the same building where we enjoyed Empty Bowls.

Despite being so involved with the Food Bank for so long, this was our first Empty Bowls. But it won't be our last! All three of us loved it and will definitely go back.