Pages

11/29/19

Gift Guides

I don't enjoy shopping, unless it's for food or craft supplies. Anything else is a chore rather than a pleasure. On top of that, I hate crowds. Needless to say, Black Friday is not my thing. Thank goodness for online shopping! If you're like me and are shopping from home this season, you might enjoy the gift guides I've put together.

With only a few exceptions, the items in my gift guides are things that I own, use, love, and/or paid for. I am recommending them to you because I love sharing neat stuff, I want to support the manufacturers of awesome things, I want to provide my readers with a useful service, and I regularly buy things I've learned about from other bloggers' gift guides. I hope you'll find mine useful.

Most of the links in my gift guide are affiliate links. This means that I receive a small commission based on any purchases you make after clicking my link, at no extra cost to you.

From my Gift Guides tab, you will find gift ideas for kids, teens, families, travelers, bakers, scrapbookers, crafters, and rabbit lovers.


If you can't find quite what you need in my gift guides, I am always happy to give individual recommendations. I'll gladly point you toward something I think your recipient will love. Happy shopping and thanks for your support!

11/28/19

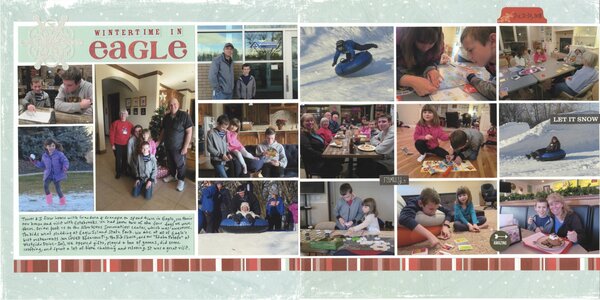
Wintertime in Eagle

Last year, my parents came to our house for Christmas, then Trevor and I went back with them to their new home in Eagle, Idaho, where my sister also lives. (Steve stayed home to work and take care of Trouble.) Trevor and I spent four days seeing the sites, eating great food, playing in the snow, and enjoying time with family. 

Wintertime in Eagle (affiliate link)

It was fun putting this layout together. I included four snow pictures (Trevor, Kari, and my mom sledding, plus one of Allison throwing a snowball), three restaurant photos, four photos of board games, one of crafting, one where my brother-in-law worked, one of just the cousins, and a photo of my parents with the three grandkids. Lots of great memories there!

11/27/19

Orange Art Box - December 2019 ... and a Giveaway!

Our December Orange Art Box arrived this week! Grandma was here visiting and joined in with the unboxing and crafting. There are affiliate links throughout this post. 


Orange Art Box is a monthly subscription box for kids age 5 and up. Each box has a theme with everything you need to make multiple projects. This was our second box and is was awesome. Trevor and Grandma jumped right in with making cards, then moved on to drawing arctic animals and playing with Model Magic.  


We crafted right up until dinnertime, then put the extra supplies away. We'll be able to make a bunch more stuff before our supplies run out. I love how packed each Orange Art Box is.

Here is what we've made (so far!):


Orange Art Box is having a fantastic Black Orange Friday special! With the purchase of a 3-month subscription, you get a FREE Canvas Set with paint, brushes, a palette, and 2 canvases. With a 6-month subscription, you get the Canvas Set plus an Orange Art Box Apron. With a 12-Month Subscription, you get the Canvas Set, Apron, and a fabulous Birthday Box! This box has all sorts of crafts and supplies to make your birthday extra special. 

Not only that, but I get to give away December's Orange Art Box! To enter, leave a comment on this post by Sunday, December 8. I'll announce the winner on Monday, December 9. I apologize to my international friends, but this giveaway is only open to US addresses. Good luck!

11/26/19

Fingerprint Family Christmas Tree

This festive Christmas tree centerpiece is a special keepsake because each portion is decorated with a different family member's fingerprints! Look closely at the base - each person signed their name. Since the two wood pieces come apart, the tree is really easy to store. I wasn't able to find the same tree I used, but there's one I like even better in the materials list. Affiliate links below. 


Fingerprint Family Christmas Tree


Materials:


Steps:


Paint the wood tree pieces and let them dry completely. 

There is space for up to 8 family members to participate per tree. Each tree is made up of two wooden pieces, each with a front and a back, each of which can be divided into left and right. Below, you can see that I signed my name at the left-hand side of one base, then used my fingers to add dots of paints only on the left-hand side of the tree. Someone else will fill in the right-hand side, while two other people do the same with the other wooden piece. 


After those front four sections are dry, the last four family members can complete the left and right sides of the backs of the two trees. 


After all the paint is dry, assemble it to create an 8-sided tree with each family member's name at the bottom. 


I suggest buying multiple trees to allow for your family to expand. As inlaws, children, or others join the family, have them add their signature and fingerprints. Over time, you'll have a priceless keepsake that preserves wonderful memories of those with whom you've celebrated Christmas. 

11/25/19

Christmas Signs Using Die-Cuts

A painted wood sign + Christmas die-cuts = the easiest Christmas decoration ever! Affiliate links below. 


Happy Holidays Santa Sign


Materials:


Steps:


Paint the arrow and let it dry completely. Add a layer of Mod Podge and position the die-cuts. After the Mod Podge is dry, add a coat over the top to seal the die-cuts.

11/22/19

Snoopy on Ice Picture Frame

Back when I was planning Trevor's Peanuts-themed birthday party at the skate rink, I laminated and fussy-cut some of the Peanuts gang, not sure how I'd use them. I still didn't have a plan when the party rolled around, so I just taped them to the wall as decorations. I didn't throw them out, though. When I came across them this week, I decided to add them to a picture frame. It's really easy to make your own - affiliate links below. 


Snoopy on Ice Picture Frame


Materials:


Steps:


Paint the bottom portion of the frame white. Without cleaning the brush, mix some blue paint with a small amount of white on a palette, but do not blend them completely. Use horizontal strokes to create a cloudy (yet predominantly blue) sky. 

When the paint is dry, adhere your characters to the frame.

Add dots of white Enamel Accents to the sky. Let it dry completely. 


11/21/19

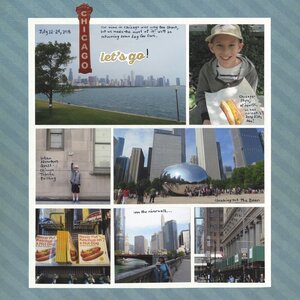
Chicago 2018

I tried something completely different with this layout - I did my journaling directly on the photos. And rather than keep it all in one place like usual, it's spread out in multiple locations. I'd already cut out a bunch of photos I'd liked to have included and I didn't want to axe one more just to make a journaling block. 

Chicago - Let's Go! (affiliate link)
There's something else unusual about this page and that's the subtle title. I'd intended to use the skyline photo for a large title, but after I cut out the CHICAGO marquee it seemed repetitive to write CHICAGO under that. Instead, I went looking for a sticker. I liked the way "CHICAGO, let's go!" sounded, so that's the title. 

We had such a fun time in Chicago. If you'd like, you can read all about our time in the Windy City and see the pictures that didn't make the cut for the layout. 

11/20/19

Let's Paint Skill Builders: Painting a Pear

I love to paint but I don't really know what I'm doing, which is why I absolutely LOVE the Let's Paint videos by Plaid. I've been sharing the Let's Paint Live paintings I've done, but I wanted to introduce you to the Let's Paint Studio Lessons. The Studio Lessons include monthly projects and weekly Skill Builders. They are so helpful for people like me who are looking to learn the basics.

This week, I watched the Painting a Pear Skill Builder. Here's my finished pear:


There's plenty of room for improvement, but I learned a lot and am happy with my first attempt. And while part of my goal was to improve my painting skills, I had a secondary motivation to do some painting: to test out my new heat gun. 

My friends at Wagner sent me the Studio Precision Heat Gun (affiliate link) and I'm happy to say it worked perfectly! There are a lot of places within the video where you have to pause and wait for the paint to dry; instead, I just gave it a quick zap with the heat gun and I was able to move right on. What a time-saver! Here I am in the middle of the project. In retrospect, I should have done a posed photo so that the heat gun wouldn't be blurry, but I'm nothing if not authentic. The heat gun was going as I snapped the photo with my bad hand!


Now that I have a heat gun, I'm sure that I'll come up with all sorts of ways to use it. Although honestly, if I never use it for anything other than speeding up the time it takes paint to dry, it'll still be totally worth it!

11/19/19

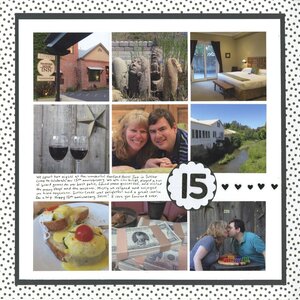
15th Anniversary

Steve and I celebrated our 15th anniversary back in May. We spent two nights at the fabulous Hanford House Inn in Sutter Creek. We had a wonderful time. 

15th Anniversary (affiliate link)

As usual, I tried to pick photos that summed up our visit: exploring the town, geocaching, walking along the creek, drinking lots of wine, eating like kings, visiting the museum, and playing board games on our patio. So many happy memories when I look at this page. 

11/18/19

Cardboard Tube Reindeer Gift Packaging

When you're a craft blogger, literally everything is a potential craft supply. Even the cut-off sleeves from a reindeer costume. In this case, those sleeves became gift wrap that looks like a reindeer and hides fun surprises inside. Affiliate links below.


Cardboard Tube Reindeer Gift Packaging


Materials:


Steps:


Cut the sleeve into two pieces. Set the piece without the seam aside and cut the seamed piece into half. 

Gather holiday washi tapes, candies, and other small gifts. Test that everything fits into the cardboard tube. 


Wrap the non-seam piece tightly around the cardboard tube. Stuff the excess material into the tube on both ends. This will secure the fabric in place. No glue needed!


Wad the two extra piece of sleeve material into the two ends of the tube. This prevents the items from falling out. Cut roughly 1/3 off each pipe cleaner. Take that cut piece and twist it around the larger piece to form 3-pronged antlers. Slide the antlers into the tube. Still no glue needed. The material will hold it in place. 


Stand the reindeer upright. Use the Supertite to glue googly eyes and a pom pom nose to the reindeer. Now nestle the reindeer among the other gifts under the tree.


Quick and easy, and so super cute!

11/15/19

Diamond Art Scissors Hair Accessory

With my fabulously-organized stash of leftover Diamond Dotz, it's super easy to pull out exactly the colors I need to bedazzle just about anything. In this case, a pair of chipboard scissors.


But it's not just a pair of scissors - it's my new hair accessory, inspired by Fiskars beloved orange-handled scissors!


My original plan was to turn it into a necklace, but I already have a scissors necklace. Affiliate links below. 


---------

Diamond Art Scissors Hair Accessory


Materials:


Steps:


Paint the scissors (orange on the handles, silver on the blades). When the paint is dry, use craft glue to attach the dots to the scissors. Finally, use E-6000 to attach a bobby pin to the back of the scissors. Your masterpiece is ready to wear!


---------


You probably already know how awesome Fiskars scissors, trimmers, punches, and other craft tools are. But that's not all they make! Fiskars makes my favorite gardening tools as well. Here are some of my favorites.

11/14/19

Bible Verse Christmas Tree

In my continuing obsession with adding leftover Diamond Dots to everything, today I have a Bible verse Christmas tree ornament. It's perfect for Sunday School, youth group, or an adult craft group.  Affiliate links below.  


Bible Verse Christmas Tree


Materials:


Steps:


Use the craft drill to make a hole in one end of the craft stick. Paint the stick brown. Paint the star Treasure Gold. Set both aside to dry.

Cut the cardstock into strips that are 1" x 2", 1" x 3", 1" x 4", and 1" x 5". 

Choose a Bible verse you like (ideas below) and write it onto the paper strips using the Sharpie. I recommend doing a rough draft on scratch paper to get the spacing right. 

Add dots of craft glue to the paper strips, then put colorful Diamond Dotz on each spot. 

Cut a piece of fishing line and thread it through the hole. Tie a knot. Glue the star over the hole. Glue the paper strips to the craft stick. 


Bible Verse Options:


Isaiah 9:6
His name shall be called Wonderful Counselor, Mighty God, Everlasting Father, Prince of Peace.

Isaiah 40:3
Prepare the way of the Lord, make straight in the desert a highway for our God.

Psalm 118:24
This is the day that the Lord has made; let us rejoice and be glad in it.

Luke 2:10
Do not be afraid. I bring you good news that will cause great joy for all the people.

Luke 2:11
For unto you is born this day in the city of David a Savior, who is Christ the Lord.

Luke 2:12
And this will be a sign for you: you will find a baby wrapped in swaddling cloths and lying in a manger.

John 3:16
For God so loved the world that he gave his only begotten Son, that whoever believes in him shall not perish but have eternal life.

Romans 15:13
May the God of hope fill you with all joy and peace in believing.

2 Corinthians 9:15
Thanks be to God for his unspeakable gift.

Philippians 4:4
Rejoice in the Lord always; again I will say, Rejoice.

11/13/19

Creating Custom Diamond Art from a Kit

One of the items in my Prime Con swag bag back in May was the Rainbow Tree Diamond Art by Leisure Arts (affiliate link). It's pretty, but as I got new Diamond Art projects to review, I kept moving this one to the bottom of the stack. Rather than complete it as intended...


... I used the kit to create my own custom design!


The first thing I did was to cut out a cardstock heart that was approximately the same size as the tree image. I traced the pattern onto the protective plastic using a Sharpie. 


I cut out the heart, following the lines I'd drawn on the plastic. I cut off the color guide from one side of the canvas and threw the rest of it away. 


Then I got to dotting! Because the canvas was printed, I started out by following the color guide, filling in the reds, oranges, and yellows on the left. 

Three problems arose: First, I didn't want the black branches to show, so I had to get creative there. Through experimentation, I found that hiding the black was the most effective when I did an ombre transition of color directly across the black areas. You can see a little bit of the black in the light yellow area, but it's camouflaged well elsewhere. 


My second problem was that there were two tiny areas (upper left and in the middle far right) where there wasn't any adhesive because my heart had extended slightly beyond the size of the tree. I solved that problem with craft glue. The dots stuck beautifully. 

Problem #3 was that the dots didn't perfectly fit the arbitrary heart shape I'd cut out. Take a closer look: 


The perfectionist in me was annoyed that the rows aren't smooth and perfect all the way around the heart like they are along the bottom left, but I got over it. I haven't decided what I'm doing with the finished heart, but I'll choose something that allows me to camouflage the edges. 


I completed 98% of my heart using the colors in the kit, but I've amassed such a large collection of leftover dots (see my storage system here!) from other kits that I used some other colors to help with the ombre effect I needed to cover the black.

I've been using my leftover gems to dot everything that doesn't move. It's so much fun! Tomorrow I'll show you a fun Christmas ornament and Friday my new hair accessory, both made with leftover Diamond Dotz.

Holiday Diamond Art

11/12/19

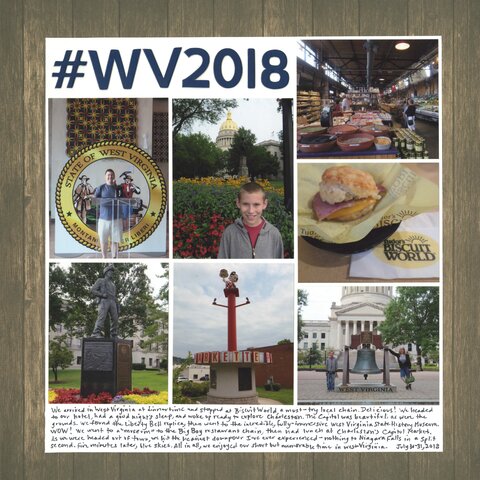
West Virginia 2018

I recently ordered a bunch of photos from our 2018 six-state adventure. West Virginia was actually the fourth of the six states that we visited but the easiest to scrap, so I started with it. 

West Virginia 2018 (affiliate link)

Since we were only in West Virginia for 24 hours, it was easier than usual to select my photos. I didn't include pictures of the inside of the Capitol nor of the downstairs area of the incredible State Museum, but I have plenty of photos of each in my blog post about our visit to West Virginia. I think the layout and the blog post complement each other nicely. 

More travel pages to come... eventually! In the meantime, I'm glad to have this one in the album. 

11/11/19

Plaid's Let's Paint Live: Farmhouse Pumpkins

Time to share another painting from Plaid's Let's Paint Live events! (Click to see my sunset cactusmy starfish and my other cactus.) I always learn so much during these paint events, which is what I love about them. This one took me WAY out of my comfort zone.


Not only is it about as far from my usual style as you can get, but it was my first time painting with a palette knife. That was a really fun challenge.

I didn't realize it when I started, but I accidentally challenged myself further. Since I didn't see myself displaying a heavily distressed, farmhouse-style painting of a pair of blue pumpkins, I opted to paint on watercolor paper rather than a pricier wooden canvas. My paper was 9" square (rather than 12" like the recommended wooden canvas), which meant I needed to scale things down. Not a big deal, except that I had to be a lot more careful with the palette knife to fit it into smaller spaces. Combined with the fact that the palette knife didn't move as smoothly across the textured watercolor paper as it would have across the wood canvas, I hadn't exactly set myself up for success. No matter- I learned a lot and I had fun. Mission accomplished.

Just for fun, here's a look at the sample project:


Compare it to this screen capture of the one instructor Jessie Pniewski painted live:


When I look at her two paintings together, I see why mine is so heavily distressed, even though that goes against my usual style. Because the tool and technique were completely new to me, I was following along closely with the live version, distressing heavily while Jessie distressed heavily.

Plaid hosts Let's Paint Live nights on the first Thursday of each month at 7:30 pm Eastern, which means the next one is Thursday, December 5. Jessie will be teaching three adorable painted holiday ornaments. I can't wait!

11/8/19

Dirty Pour Coasters

Have you tried paint pouring yet? I've shared two paint pouring projects in the past (here and here) and it is so much fun! If you haven't done paint pouring yet, I hope this Dirty Pour Coaster project finally inspires you to try it. Affiliate links below.


---------

Dirty Pour Coasters


Materials:


Steps:


Pick up to 5 paint colors for your project. Pour equal parts of paint and Pouring Medium into each cup, and stir gently to combine. Learn from my mistake and do not introduce bubbles into the paint.

Protect your work surface and wear gloves (trust me). Elevate each coaster by putting it on an upside down cup.


I've titled this project Dirty Pour Coasters, but I'm not actually doing a dirty pour in the photo above. That's the first step to a Puddle Pour. To make a Puddle Pour, pour the first color into a puddle on the surface. Pour the second color into the center of that puddle, and repeat for each of the colors. Then pick up the coaster and tilt it to allow the paint to flow to (and eventually over) the edges.


For a Dirty Pour, add each color to a separate cup.


Pour the paint onto the coaster and let it flow over the edges. This is a basic Dirty Pour. Instead of pouring the paint, you can place a coaster upside down on the cup of paint, then quickly invert the two. This is called a Flip Cup, which is a type of Dirty Pour. Lift the cup and let the paint flow across the coaster.

We experimented with each technique.


A Dirty Pour tends to create more marbling than a Puddle Pour, but no matter how you make them, they're really pretty. 


Trevor and I had issues with bubbles, which I believe is because of my overly aggressive mixing of the paint and Pouring Medium. We each left the bubbles on some of our coasters, hoping they would go away on their own (spoiler: they didn't) and used a toothpick to pop the bubbles on the other coasters. This was tedious. Better not to introduce bubbles in the first place. 


We let our coasters dry for 48 hours, then removed them from the cups and painted undersides and any exposed wood on the edges. When that was dry, we cut self-adhesive felt to size and stuck it to the underside.  


I highly recommend getting some paint and Apple Barrel Pouring Medium and giving paint pouring a try. Obviously, you're not limited to making coasters, but I think they're a good beginner project. They make a great gift, too!