Pages

6/30/20

Marbled Candy Melts and an Accidental Spiderman Cupcake

We did a socially-distanced cupcake drop to welcome the newest members of Trevor's Scout troop. There were some extra cupcakes, so instead of frosting them like a normal person, I decided to do some experimentation with Candy Melts (affiliate link). I was wondering if I could treat the candy like paint pouring and get some cool marbled designs.


I took the paper liners off the cupcakes and elevated them on empty K-cups. Then I poured Candy Melts over the tops, hoping they'd behave like ganache and leave a smooth, shiny coating. It was clear I needed to thin the Candy Melts a bit, so I followed these directions using shortening. My experiment was semi-successful. I had to use a toothpick to swirl the colors and to encourage it to run over the sides. Cupcakes with more of a dome would have worked better. 


Once the candy set, I moved the cupcakes into silicone cupcake baking cups. Pretty!


Steve pointed out that the blue/red swirl would be perfect for a Spiderman party theme. Total accident, but cool nonetheless. Here's a pin for you if Spiderman is your thing. 


Did you notice the cup on the right-hand side of the second photo in this post? I dripped different colors of Candy Melts into a plastic cup, swirled it around, then set it upside down on parchment paper to set. I'd hoped to be able to slide the hardened candy out of the cup intact, but it didn't work. What did work was pouring Candy Melts into a Dixie cup, then tearing it away when the candy was set. 


I had a lot of fun playing with Candy Melts, as always. There is so much you can do with them!

6/29/20

Ranch Cheese Bites

When I blogged about my massive organization project to index all the recipes I've shared here, I didn't mention that I've also been working on the even-more-massive project of dealing with my huge collection of recipes torn from magazines, given to me by friends, or passed down from family. There's another category of recipes I've been dealing with as well - ones that I personally created for a contest. I used to enter a lot of cooking competitions, most of which required using an original recipe. I came across one I developed for a competition at the 2003 California State Fair featuring Real California Cheese. I haven't made my appetizer since that contest, which is a shame since it's delicious. The judges thought so too, as I won first place and a decent chunk of change for my efforts. 

I'm hoping that adding a digital version of the recipe here will encourage me to make it again, or possibly inspire one of you to give it a try. 


Ranch Cheese Bites


Ingredients:

  • 8 oz. Real California Monterey Jack Cheese
  • 2 T. plain bread crumbs
  • 1 T. ranch salad dressing and seasoning mix
  • 1/8 t. pepper
  • 1 egg white
  • 2 T. butter for frying


Steps:


Slice cheese into 16 cubes, approximately 1" in each direction. Insert a toothpick into each cheese cube and set aside. In a small bowl, combine bread crumbs, ranch seasoning mix, and pepper. In a second bowl, lightly beat the egg white. 

Dip each cheese cube first into egg white and then into the bread crumb mixture, being sure to thoroughly coat the bottom and four sides. 

Melt butter in a frying pan over medium heat. Place no more than 4 cheese cubes into the melted butter to brown on the bottom. After 20 seconds, turn the cubes to one side. Continue turning every 20 seconds until all the sides have been cooked. Remove from heat and repeat with remaining cubes.

Ranch Cheese Bites should be served immediately or within 30 minutes of completion. The recipe makes 16 appetizers, enough for 4 people.


6/26/20

Cereal Box and Newspaper Tree

Some of my favorite crafts are those made with materials reclaimed from the recycle bin. This tree is made entirely of painted cereal boxes and newspaper. 


Cereal Box and Newspaper Tree


Materials:

  • cereal boxes
  • newspaper
  • Folk Art paint
  • scissors
  • glue


Steps:


Open up the cereal boxes to expose the insides. Paint one box with shades of blue to make a sky and another with shades of green for the leaves. Paint some newspaper with shades of brown.


Cut a rectangle from the blue cereal box to use as the background. Layer a piece of green on top to make the grass. Cut a tree shape from the newspaper. Glue the trunk in place, leaving the branches free. 


Cut a bunch of rounded shapes from the green cereal box. Layer the largest ones under the branches, gluing them in place. 


Finally, glue the smaller green pieces on top of the branches, anchoring them. 


I've started hoarding cereal boxes because I have a bunch of ideas for additional projects. Expect to see some coming soon!

Adult Coloring Books

6/25/20

Lime Slice Felt Coaster (and a Return to Brazilian Lemonade)

Since the lockdown started, we've been getting a produce box every ten days from our local beloved farm/market. Every box has been a delight, stuffed with beautiful fruits and veggies with a value that far exceeds the price we pay. Our latest box has some gorgeous limes, which reminded me of exactly how bad my previous photos of Brazilian Lemonade were. So I made a batch and took a new photo. 


If you've never had Brazilian Lemonade, it's definitely worth a try! Particularly if you like limes, since there aren't actually any lemons in Brazilian Lemonade

As you can see from my photo, my Brazilian Lemonade is sitting on a lime slice felt coaster. It is the second of many fruit slice coasters I've been sewing. This one is very similar to the lemon coaster, but there is an important difference (besides the color). Did you know that while most lemons have 8 or 9 segments, most limes have 10 to 12? I made my lime with 10 segments. Affiliate links below. 


Lime Slice Felt Coaster


Materials:


Steps: 


Cut out a circle of light green felt, approximately 4" in diameter. Cut out a circle of white felt that is slightly smaller than the green circle. Then cut out another green circle that is slightly smaller than the white one. 

Set the large green circle and the white circle aside. 

Fold the smaller light green circle in half, then cut along the fold. Cut each half into 5 triangles. They don't need to be identical in size - they aren't in nature! Snip the edges of each triangle so they are rounded. Space them evenly on the white circle, trimming if necessary until they resemble the segments of a lime. 

Use a light green thread and a very short running stitch to sew the lime segments to the white circle. Start at the tip of one segment, work around it until you reach the tip again, then move over to the next segment. 

When all the segments are attached, use white thread and the same short running stitch to attach the white circle to the large green circle.

6/24/20

The Official deRosier City Chicken Recipe

After writing The Tale of Cindy and the City Chicken back in October 2018, I've continued to seek out recipes, combine them, and tinker. After several tasty but less-than-perfect iterations, I now have a recipe for city chicken that makes me happy. 


The Official deRosier City Chicken


Ingredients:

  • boneless pork loin, trimmed and cut into 2" chunks
  • 3/4 c. flour, seasoned with Morton Nature's Seasonings
  • 1 egg and 2 T. milk, whisked
  • 2/3 sleeve crushed Saltine crackers (about 26 crackers)
  • oil for frying
  • wooden skewers


Steps: 


Cut each skewer in half. Thread 2-3 cubes of pork on each. Roll the skewers in seasoned flour, pressing to adhere. Dip each skewer into the egg/milk mixture, then into the crackers. Press the crackers firmly so they stick.


Heat a few tablespoons of oil in a skillet at medium high. Fry the skewers in the pan, turning to brown all sides. 


Transfer the browned skewers to a rimmed non-stick baking sheet. Bake the skewers at 350°F for 10 minutes or until the internal temperature reaches 145°.

Meanwhile, add seasoned flour and some butter to the pan drippings. When the flour is cooked, whisk in enough chicken broth to make a pan sauce.


I'm so happy to be able to add this to the list of our favorite recipes!

6/23/20

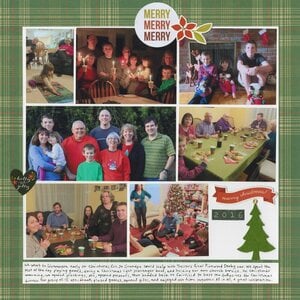
Christmas 2016

Another long-overdue layout into the album! 

Christmas 2016 (affiliate link)

Until my parents moved out of state in 2018, our tradition was to spend Christmas Eve and morning with my family, then Christmas day with Steve's family. I combined photos from both events on a single layout with the photos roughly in chronological order (left to right, top to bottom). I managed to include at least one photo of twenty of the twenty-one people (sorry Uncle Bill). Other than that omission, I'm happy with how the layout turned out. 

6/22/20

Rice Krispie Treat Cactus

Summer is officially here! It's a great time to give this fun edible cactus craft a try. Affiliate links below. 


Rice Krispie Treat Cactus


Materials: 


Steps: 


Use a sharp knife to cut a rice krispie treat into three vertical strips. Then cut one of the strips in half horizontally. 


Attach one of the small pieces to the top of the middle strip, then bend the remaining two pieces to form the cactus arms. Round the edges of each piece, then make sure they fit together smoothly. Put the pieces on parchment paper, then coat them with green Candy Melts.  


Melt together eight yellow Candy Melts and one light cocoa. Spread this on the graham cracker. 

When the cactus pieces have set up, use green Candy Melts to 'glue' the pieces together. Let them set up.


Use a sharp knife to trim the bottom of the cactus so that it is completely flat. Use green Candy Melts to attach it to the graham cracker. 

Put an unwrapped pink Starburst in parchment paper and flatten it with a rolling pin.


Cut the flattened Starburst into thin strips. Roll a strip to make the center of a flower, then roll a second strip around the center. Bend the edges out slightly to make petals. One Starburst will make three flowers. Attach the flowers to the cactus with green Candy Melts. 


It's as yummy as it is cute! Any suggestions of what I should make next? I have a bunch of ideas, but I do take requests. 

6/19/20

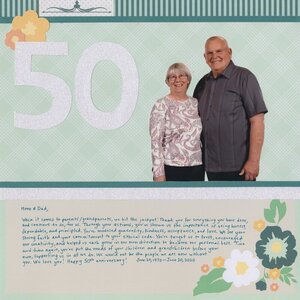
Happy 50th Anniversary!

Tomorrow, 6/20/20, is my parents' 50th anniversary. We were supposed to celebrate with them on a cruise along the California coast. But the cruise was canceled and instead we're wishing them the best from afar.

I made this layout as a gift for them. The photo is actually from last year's Europe trip.

50th Anniversary (affiliate link)

See that empty spot at the bottom beneath my journaling? It's supposed to have our signatures. I'd planned bring it, the pen, a frame, and bubble wrap along on the cruise, have my sister's family add their signatures to ours, and then we'd frame it and present it to our parents. I'd even thought to have my sister leave room in a suitcase to take it back to Idaho in case my parents didn't have space for something they weren't expecting. Sigh.

Anyway, happy 50th anniversary to you, Mom and Dad. We love you and wish we could be there.

6/18/20

Scout Rank Backgrounds for Virtual Troop Meetings on Zoom

Trevor's Scout troop has conducted their weekly meeting virtually on Zoom every Wednesday since March 18. They had weekend backyard camping events in April and May, participated in merit badge classes, and held games days. It's been far from ideal and everyone misses being able to get together in person, but the leaders (both adult and Scout) are both doing their best to keep the troop active.

About half of the Scouts use virtual backgrounds during our meetings. Trevor usually uses a photo from last year's trip to Monaco. Others use equally random pictures. I decided to make virtual backgrounds for each Scout that highlights his rank. Not only will this help our newest Scouts know what rank each person holds, but I'm hoping that it will motivate everyone to work toward their next rank. We were not able to hold our usual Spring Court of Honor as scheduled, which means rank advancements haven't been formally recognized since the Winter Court of Honor. I'd love to see a large number of our Scouts rank up before our Summer Court of Honor in August. We're committed to holding it one way or the other, even if we have to get really creative to do it safely.

Anyway, here are the virtual backgrounds. There are seven ranks in Scouting, starting with Scout. The patch shows the BSA fleur-de-lis.


Next, a Scout earns Tenderfoot. An eagle is added to the fleur-de-lis.


The third rank is Second Class. The patch features the Boy Scout Motto: Be Prepared. 


The fourth rank is First Class. The patch combines the previous elements into one to show that the Scout has learned the skills of all four ranks. A Scout is considered a fully-trained outdoorsman once he has earned First Class. 


The fifth rank is Star. The patch shows the First Class symbol placed over a star. This is Trevor's current rank. He has been with the troop since March of 2017, to give you an idea of how long it takes an active Scout to rank up. (Look how tiny he was back on his first day as a Boy Scout three+ years ago!)


The sixth rank is Life. The patch has the First Class symbol placed over a heart. The requirements to earn Life are all about leadership within the troop, service to the community, and earning merit badges. Fun fact: Steve, my dad, and Steve's dad all reached the rank of Life back in their respective Boy Scout days. 


The final rank in Scouting is Eagle. I'm guessing most of you have heard of it. It's a big deal. 


Of course, a Scout troop can't operate without dedicated adult volunteers, including the Scoutmaster and his Assistant Scoutmasters....


... and the Troop Committee Chair (Steve) and Committee Members (me, and seven others)


I made the virtual backgrounds using PicMonkey. So far, they're a hit with the Scouts. 

6/17/20

Our Favorite Recipes

I just finished a huge project: indexing 10 years' worth of recipes I've shared on my blog. Now they're all in one place and much easier for you (and me) to find. Click on the graphic below to see them:


There are two things I noticed in looking back through all my recipes:

1) My favorite things to cook are soups, breads, and desserts. 

2) My photographic skills have gotten so much better over the last ten years. While I still have HUGE room for improvement, there's a dramatic difference between photos I took before and after completing my first food photography class. The next time I make some of those favorite recipes, I'm going to make a point to photograph them and replace the current lousy images. 

6/16/20

Punched Circle Paper Quilt

I used to think that I wanted to make a quilt. I distinctly remember finishing grad school in 2001 and thinking that I'd make a quilt in my new-found spare time. As it turned out, I found plenty of other things to fill my time after grad school (including meeting and eventually marrying Steve). After 19 years, no quilt. Never say never, but I don't see myself making a quilt 'someday' anymore. 

Why? Primarily because I don't really enjoy sewing and I'm not very good at it. (Chicken or egg? I don't like sewing, so I don't practice, or I'm not good at it, so I don't like it?) Back when I pictured myself making a quilt, I was actually dreaming of DESIGNING a quilt, not sewing one. I wanted to pick out cute fabrics and rearrange the cut pieces into appealing blocks. I didn't want to do the actual cutting, piecing, quilting, or binding. 

I was about to clean up the scraps after making my lemon card and got distracted by putting the scraps together into interesting color combinations. I grabbed two circles punches and the next thing I knew, I had the start of a paper quilt. 

Trevor and I made paper quilt squares years ago, and more recently we painted barn squares on chipboard. I loved making both of them. This was just as fun. It would make an awesome group project. Affiliate links below. 


Punched Circle Paper Quilt


Materials: 


Steps:


Start by creating the base for your first quilt square. I'd suggest 8" squares, but you do whatever size you want. As you can see, mine aren't actually squares. I used a piece of paper I'd originally intended to use as a card base, then cut the rest to the same size. In retrospect, I should have done squares. You'll have more options for rotating squares than rectangles when it's time to arrange them.

Punch several 2.5" circles and arrange them on the square base. You can cut partial circles (for corners and edges) by putting the cardstock only partway into the punch. Or, you can use whole circles and trim the excess off after you've adhere them.  


Punch 2" circles in a contrasting color and adhere them to the larger circles. When you finish one square (or in my case, rectangle), make another!


I made six blocks. Then I played with different arrangements:


Then I experimented with a different background color. 


I decided this was my favorite:


I might go back and add more to this paper quilt, or I might abandon it and restart with proper squares. Or, I might go a different direction entirely with my next quilt-inspired project!

6/15/20

Rice Krispie Treat Pool Table

My latest Rice Krispie Treat + Candy Melt creation is a pool table. I had a lot of fun figuring out how to make it. I'm particularly pleased with how the cue stick turned out. Can you guess how I made it? Read on to find out! Affiliate links below. 


Rice Krispie Treat Pool Table


Materials: 


Steps: 


Unwrap two rice krispie treats (or cut two rectangles if you made your own RKTs). Use a rolling pin to flatten one of them. 


Place the flattened RKT on parchment paper, then cover it with green Candy Melts. I spooned it over the top, then used an offset spatula to smooth it out. Let the candy set. 

Spread a puddle of melted Dark Cocoa Candy Melts onto the parchment paper, then dip the edges of the green RKT into the puddle. 


Cover the unflattened RKT with Dark Cocoa Candy Melts. 


Break a piece of spaghetti in half, then roll it in the puddle of Dark Cocoa Candy Melts. Dip the tip of one end into powdered sugar.

When the candy has set, you're ready to assemble your pool table. Use a glob of melted Dark Cocoa to attach the tabletop to the base. Then dip each Sugar Pearl into a tiny bit of melted Green and place it on the table. Lean the cue stick against the table.


* While searching for this link, I discovered that Wilton has flavored Sugar Pearls! I found Orange Sherbet, Bubblegum, and Green Apple. I cannot wait to my hands on some! I also found pineapple- and flamingo-shaped sprinkles that are totally adorable. Ooh, and airplanes. So many fun choices!