Pages

10/30/20

Halloween Photo Scavenger Hunt

Our county health department has strongly recommended against traditional trick-or-treating, so we won't be hosting friends, going door to door, or passing out candy. One thing we will be doing: a photo scavenger hunt.  


PicMonkey has added a ton of cool graphics to their site, so I challenged myself to spell HALLOWEEN using those graphics in creative ways. Designing this was so much fun! If the scavenger hunt itself is half the fun as making the printable, I'll be thrilled!

While making this, I played around with a bunch of other new features. The instant background remover - *swoon*. I already loved PicMonkey, but it just gets better and better all the time. Hardly a day goes by that I don't use it lately.

Happy Halloween!

10/29/20

Hidden Money Birthday Card

My nephew, Timothy, turns 20 today. He is not in prison. It's a good thing he isn't, or I would not have been able to mail this card to him.  


I've learned through friends who are cardmakers that any cards you send to a prisoner can't have layers. This card has a lot of layers. Layers that are perfect for hiding things. 

When Timothy opens this card, he will find that single dollar bill inside. I've been giving Timothy money gifts for years, so I am counting on the fact that he will know that there is more money hidden somewhere in the card. After all, I've given him gifts with money hidden inside of things like a can of pineapple and a real (seemingly intact) egg. He's always a little suspicious when I give him a gift. I live for him to smirk, raise a single eyebrow, and mutter "clever" in my direction when he opens it. (Note to self: Make a scrapbook layout with Timothy smirk-opening my gifts.) Affiliate links below. 

---------

Hidden Money Birthday Card


Materials:


Steps:


Cut a card base from the patterned paper. Fold it in half. Then cut out the layers: a rectangle of white cardstock that is slightly smaller than the card base; an orange rectangle to hold the cake; a yellow rectangle slightly larger than the orange rectangle, and three strips of green cardstock. Cut a candle flame from the yellow scraps. 


Fold one of the bills in half lengthwise, then roll it as tightly as possible. Wrap one green cardstock strip around it, then glue the end in place to make the candle. 


Wrap it tightly with a rubber band so that it doesn't come apart before the glue dries. Then start assembling your layers. The white cardstock is slightly larger than a bill, so I didn't have to fold that one. I just put glue along the outer edges of the white cardstock (keeping the glue far away from the money) and then attached it to the polka dot background. 


I folded a bill to fit between the white and yellow layers. 


There's another bill between the yellow and the orange layers. 


Here are all the places money is hiding:


I understand why prisoners can't receive cards with layers. In addition to money, you could hide all sorts of escape plans, maps, and assorted contraband in there. Would you have suspected this card was hiding so much cash? 


Happy birthday, Timothy! We wish we could celebrate with you in person. Enjoy your day and may 20 be your best year so far.

10/28/20

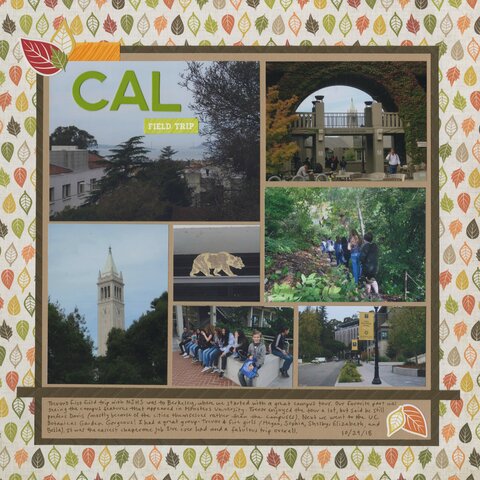
Cal Field Trip

Back when in-person school was a thing, I chaperoned Trevor's field trips with the National Junior Honor Society. This was actually the first NJHS field trip I chaperoned, but I scrapped the UC Davis visit (go Aggies!) before it. 

We started with a guided tour of the Cal campus. While I'd been to campus 6 or 7 times before, I'd never taken a guided tour. Trevor had been by the campus on the way to other attractions in Berkeley, but this was the first time he'd walked through campus. We both thoroughly enjoyed the tour, particularly when the guide pointed out the various campus features that appear in Monsters University. For the second part of the field trip, we went to the University of California Botanical Garden. Our family had been there two years earlier as part of Steve's 40th birthday celebration and we loved it just as much the second time. 

Cal Field Trip (affiliate link)

I made this page for the This is Halloween Challenge at Victoria Marie Designs. The challenge was to make a page featuring Halloween or fall-themed elements. I wouldn't ordinarily use leaf papers and embellishments for a page about a school trip, but it worked out so well. After all, the trip was in October and we visited a tree-filled campus and a botanical garden! I'm very happy with it and am glad the challenge inspired me to scrap with fall colors instead of going with my first instinct, which was using the university's brand palette

10/27/20

Virtual Spirit Week '20

Trevor started his freshman year with distance learning, and we've recently learned that our district will continue with distance learning through at least mid-January. Fortunately, the principal, teachers, and upperclassmen at ECHS have done a great job helping the 9th graders adjust to their new school and get to know each other. In September, they planned a virtual Spirit Week. Each student submitted a picture of themselves that fit the theme of each day, then you could watch the daily slideshow and see everyone who participated. It was a lot of fun. 

Virtual Spirit Week '20 (affiliate link)

I have to share the story about Friday, which was Class Colors Day. Back when I was in high school (in the Dark Ages, obviously), we had school colors, not class colors. (Black and gold - go Matadors!) I asked Steve, and they didn't have class colors either. 

It turns out that ECHS has class colors for a similar reason as why their mascot is Pegasus. Just like they have two mascots combined into one, they have two schools' worth of school colors. So instead of school colors, they have class colors. Freshman are white and sophomores blue (the Solano Community College colors), and juniors are green and seniors are black (the Rodriguez High colors). They're arranged in that order because they will officially graduate from Rodriguez High.
This layout was inspired by the Victoria Marie "Witches Brew Stash Bash Challenge." The assignment was to reach deep into your scrapbook stash and 'brew' a layout with older products. Everything on this layout, with the exception of the cardstock, is something I've had for at least a few years. The oldest item is probably the alphabet/number stickers I used for the days of the week and the year. They came off a used sticker sheet a friend gave me about 5 years ago, and they were old then! The letters weren't all the same color, so I used a dark green Sharpie to unify them. I used "r" for Thursday for two reasons: first, it's what my university used and I've been following that convention for 30 years now; and second, there was only one "t" on the sticker sheet and no "h" to make "th." 

10/26/20

Dia de los Muertos Collage (and Virtual Make-Up)

While I don't celebrate Dia de los Muertos, I love the meaning and the beauty of the holiday. In my never-ending quest to better understand others' traditions, I've been doing more research into Dia de los Muertos and its rich history. I learned there are seven main colors: 

  • black, a symbol of death
  • white, representing hope and purity, and the belief that each soul gets a clean slate after death
  • yellow, representing the light that guides the departed
  • orange, representing the sun, the source of light
  • pink, a color of joy and celebration
  • purple, the color of suffering and mourning
  • red, the color of Jesus' blood

I used those seven colors to make a collage, using construction paper, scissors, and punches.  


I started by cutting a basic skull, vertebrae, and clavicles from white construction paper, then cut the eye sockets, nose, mouth, and hair from black paper. I punched out a bunch of circles and flowers in different sizes, and cut a few other shapes by hand. Then I just started layering and gluing until I was happy with the end result. It was really fun to just let myself play. 

Speaking of playing, PicMonkey has a neat feature that lets you apply virtual make-up to yourself for Dia de los Muertos, so I gave it a try. I'm not a fan of real make-up, but it was fun applying it digitally. 


I also recently learned about Pan de Muerto (Bread of the Dead) and plan to make some on November 2. Having never tasted it before, I'm not sure what recipe to follow, so if you celebrate Dia de los Muertos and can steer me in the right direction, I'd appreciate it. Otherwise, I'm just going to pick a recipe that looks promising and hope for the best!


10/23/20

Art History and Trevor's Memento Mori

Trevor is taking a college Art History class this semester (along with five high school classes). It's a 3-unit class that "explores the history of Western Art through a critical analysis of Renaissance art through Post-Modern Art. Students ... examine the connection between art and culture, and evaluate the historic, religious, and political influences on the artistic choices of diverse men and women of art history from the 15th century to today."

I love art (obviously), but have never taken an art history class. With Trevor doing distance learning, I realized it would be really easy for me to sit in on the lectures and learn the material. With Trevor's blessing, I am doing just that. The professor is outstanding and we both absolutely love the class.

I'm not enrolled in the class, so I am not doing the written assignments. Trevor has not showed me his work, nor will he let me see what his classmates have submitted (everyone posts their art analyses to a common message board). Once we finish listening to the lectures, he waits until I leave the room to do the homework. 

The one exception to that was for his most recent assignment, which was creating and photographing a memento mori. A memento mori is a still life intended to remind the viewer of the fragility of life and of their own mortality (the name from Latin meaning "remember you must die."). They often feature symbols like skulls, clocks, fresh fruit (that will soon rot), and extinguished candles. 

For this assignment, Trevor needed my help. Not only did he want to use my black dropcloth and some of my stuff, but he would need my help actually taking the photo (as it's impossible to hold up a black reflector to the side, extinguish a candle in the back, and push a shutter button at the front at the same time).

This is Trevor's memento mori. See if you can spot the symbols he included.


Obviously, there are extinguished candles. He chose to keep two lit to show that a little life remains. He included fresh fruit (all we had on hand was a banana because our produce box pickup was the following day), as well as the pumpkin and the dried corn. Those represent fall, the last season until we head into winter (a symbol of death). The chess game is almost over, another sign that death is near. All the dice are oriented with the 4 facing up (in some Asian cultures, the word for four sounds similar to the word for death). The foreign coins are a reminder that 'you can't take it with you;'' above them, a stopped watch.

I am dying (ha!) to see what his classmates' photos look like and to find out how they responded to Trevor's. Hopefully once the grading is done, he'll let me see. In the meantime, I'll continue to enjoy the lectures... and everything else, as life is fleeting and I want to learn, do, try, and share as much as I can in this life. 

10/22/20

Candy Melt Witches

After making my peanut butter graham cracker owls, I was playing around with the leftover candy eyes and candy corn and realized they'd make awesome witches. My witches are green, because I was born after 1939. Fun fact: People who grew up before 1939 grew up seeing witches portrayed with red or orange skin. Affiliate links below. 


Candy Melt Witches


Materials: 


Steps: 


Put a sheet of parchment paper onto your work surface. Prepare the Candy Melts according to the package directions, then spoon a blob of melted candy onto the parchment. Drag the spoon through it to create a chin. 

Place a piece of candy corn in the middle of the face for the witch's nose. Drizzle additional melted candy over the top. Put the eyes in place, then choose two black jimmies as eyebrows. Push additional jimmies up against the edges of the still-melted candy for hair. Finally, add a sugar pearl wart on the witch's nose. 


Let the candy set for approximately 15 minutes, then peel it from the parchment paper. Every witch is going to turn out a bit different, which is half the fun!


I'd intended these for Halloween, but they would also be fun for a Wizard of Oz themed party. Turn the finished witches upside down, put a lollipop stick on each, then 'glue' the sticks in place with more melted candy for a super fun Witch-on-a-Stick treat. Wouldn't they look cute alongside this famous quintet? (Answer: Yes.)


*Same problem as with the owls. It appears the Wilton candy eyeballs printed with the eyelashes are discontinued. Make your own by drawing eyelashes onto the candy eyeballs I've linked above using a black edible marker

10/21/20

The Last Day of 8th Grade

Nobody likes Dolores Umbridge, but the Umbridge Rules Sketch Challenge was one of my very favorites from the Yer a Wizard Online Virtual Crop. I always love a good sketch challenge! Here's what I made:

Last Day of 8th Grade (affiliate link)

And here is the sketch:


As you can see, I did some flipping and rotating, but all the elements are there. I'm particularly happy with the circles. I dug out some ancient vellum and it gave me just the look I wanted. I'm going to hang onto this sketch, as I can totally see using it again. 

10/20/20

Same Height? Not Quite! - Scrapbook Crop with Victoria Marie

This layout isn't quite the usual Cindy page. After all, there are 4 different patterned papers, die cuts, a punched border, and (gasp!) enamel dots. Only a single photo. And no journaling!

Same height? Not quite! (affiliate link)

I participated in the Yer a Wizard Online Virtual Crop with Victoria Marie Designs and made this page for one of the many challenges. I'll get to that in a second, but first some details about the crop. The theme was Harry Potter / Halloween and it was a blast! There were five live 2+ hour Zoom events over the course of the weekend (a Friday night welcome party, two on Saturday, and two on Sunday), each with plenty of scrapping and chatting. We were encouraged to wear our Harry Potter stuff on Friday and one of the Saturday events was a costume party. There was tons of inspiration and plenty of enabling (for those who don't speak Scrapbook, enabling is when one crafter tells another about a fabulous product that is a must-have). There were 11 challenges with prizes and 4 giveaways. All this for $7.99 - quite a bargain! Victoria Marie online crops occur monthly, so I'll definitely be joining another. Not monthly, because that is more of a time commitment than I want to make, but a few times a year for sure. 

Anyway, I made this layout for the Potions Class Ingredient Challenge. We were challenged to use the following ingredients to create a layout: 3 patterned papers, die cuts, chipboard, enamel dots, and a dimensional element. We were allowed to substitute as necessary. I used a border punch instead of an additional dimensional element, since the chipboard and the enamel dots already had enough dimension to make me twitchy.

I was exceptionally prolific during the crop, which is a great feeling. I'll be sharing all the other layouts I made over the next few weeks, intermixed with other projects I want to share.

10/19/20

Candy Corn Black-eyed Susan Edible Flowers

Candy corn seems to be a polarizing treat - people either love it or they hate it. I'm one of the rare people in the middle. I like it, but not enough to buy it over a different sugary treat. No matter your stand on candy corn, I think you'll agree that it is beautiful when you turn it into flowers. Specifically, Black-eyed Susans.  


Candy Corn Black-eyed Susan Edible Flowers


Materials: 


Steps: 


Place a piece of parchment paper on your workspace. Follow the instructions to melt the yellow Candy Melts. Place a small dollop (about the size of a nickel) of yellow candy on the parchment paper, then arrange seven pieces of candy corn to make the petals. Repeat until you have the desired number of flowers. Let the candy set for 15 minutes. 


Pour the jimmies onto a cutting board and chop them into small bits, the way you would mince garlic. 

Melt the cocoa Candy Melts according to the package instructions. Dip a piece of candy corn into the melted candy and then press it to the center. Remove the piece, then sprinkle the wet candy with the minced jimmies. 


Let the candy harden for 15 minutes and your beautiful Black-eyed Susans are ready to serve!


Fun fact: The Black-eyed Susan is the state flower of Maryland. I'm going to be on the lookout for them the next time we visit the Old Line State!

10/16/20

Legoland 2015 and Keeping Track of Stories to Tell

After having the photos on my desk for five years, I finally scrapped Steve and Trevor's 2015 trip to Legoland. They went while I attended the Craft and Hobby Association Mega Show in Anaheim. Why did I wait so long to make this layout? Well, on top of these reasons, I've been searching for my LEGO scrapbook materials. I'm convinced that I have LEGO paper and stickers somewhere, but I've torn the house apart and they are not here. I must have dream-bought them. I did find some Star Wars LEGO stickers amongst Trevor's art supplies, so I used those for this super simple page. 

Legoland 2015 (affiliate link)

I'm really glad to get this layout in the album. It's been sitting at the top of my list of stories to scrap for far too long. See? There it is, right at the top:


I use this list along with my post-it trick to make scrapping out of chronological order work for me. Basically, any time something happens that I want to scrapbook, I add it to the bottom of my list. Every so often, I transfer those topics to post-it notes for the album. That's when I determine whether an event gets one page or two. I indicate the 2-pagers in parentheses in the notebook. When I order photos, I circle the topic. I can see at a glance what topics are ready to scrap, if they're 1- or 2-pagers, and where they fit in the album, as well as what photos I still need to have printed. When I complete a layout and share it here, I draw a line through that item. 

When the list gets too messy (which happens every few months), I recopy it. 


As you can see, our trip through the Panama Canal in 2017 is now the oldest story not-yet-scrapped. It's a 2-pager and the pictures are printed. But that doesn't mean it will be the next thing I scrap. It all depends on my mood. There are a few recent events I'm itching to scrap, so those might be first. Either way, I'll make all the pages eventually.

10/15/20

Peanut Butter Graham Cracker Owls

 Meet the Owlan family. 


Here are Mr. and Mrs. Owlan with her sister, Owlicia Owlexander. 


Can you tell I had the best time making these? Because I totally did. They were a hit with my family and you should definitely make some. Affiliate links below. 


Peanut Butter Graham Cracker Owls


Ingredients:


Steps: 


To make Owlice, use a knife to spread peanut butter onto a graham cracker. Add two eyes and a candy corn beak. Follow the package directions to melt the Candy Melts, then use that to add the forehead and wings. 


Owlejando is basically the opposite. Start with the cocoa candy melts, add the facial features, then use peanut butter to make the forehead and wings.

To make Owlicia, I spread the peanut butter smoothly, then used a toothpick to draw in the forehead, wings, and tail feathers. 

The owlets (Owlison and Owlex) are made with half a graham cracker each. The easiest way to get them to split cleanly is to use a sharp chef's knife and press down along the score line with equal pressure along the whole knife. Spread peanut butter on each, then pounce the knife up and down repeatedly against the peanut butter to create their fluffy feather texture. Add the eyes and candy corn beaks.   

*I wasn't able to find the Wilton candy eyeballs printed with the eyelashes that I used anywhere online.  I've had them for awhile and it looks like they might be discontinued. You can make your own version by drawing eyelashes onto the candy eyeballs I've linked above with a black edible marker

10/14/20

Boo! Eyeball Art

Sometimes, the inspiration for one of my projects comes from a previous craft. When I shared the Boo Halloween mobile, it struck me that the double O's of BOO would make awesome eyeballs. From that idea, I made this:


Boo! Eyeball Art


Materials:


Steps:


Cut two white circles for the eyeballs. Draw wiggly red capillaries on them. Cut a pair of smaller green circles for the irises and even smaller circles for the pupils. Glue the eyes together.

Cut a letter B from green paper. Instead of cutting out the counters from the green, cut them in black and glue them on top of the B. Cut a black witch's hat and glue it to the top of the B. 

Make an exclamation point with a brown broom handle and yellow bristles. Cut the bristles almost all the way to the top. 

Glue everything to purple background paper. 

---------

I did a search on Amazon for "candy eyeballs" and the search yielded all sorts of interesting things. Lots of fun Halloween possibilities!

10/13/20

World Card Making Day: Watercolor Cards

I don't consider myself a cardmaker, which is weird because I make every single card that I send. But I don't have dedicated cardmaking supplies, don't know the different card size dimensions by heart (99.9% of the cards I make are A2), and haven't tried most of the complicated card folds. I don't use stamps often, don't have a die-cut machine, and rarely emboss anything. So while I am definitely a card maker, I'm not a cardmaker.

Anyway, all this to say that I not only participated in World Card Making Day 2020, but completed the WCMD Colour Challenge at Scrapbook and Cards Today. The challenge was to use analogous colors (or colours - the challenge host is American and the magazine is Canadian, so you see both spellings pop up) and this fun watercolor technique. I used different color palettes to make four different cards.

These two cards are very similar. I drew light pencil lines on watercolor paper, painted in the bands of color, used Sharpies to write the sentiments, darkened the lines and added subtle patterns to the painted areas with colored pencils, mounted the card with coordinating cardstock, and decorated with sequins. 

I started this next card the same way, but I didn't use colored pencils or sequins. I simply added a line of dots with the same bronze Sharpie I used for writing the sentiment. 


For this card, I drew the pencil lines coming out of a central point (which is now covered with the star). I made a gradient of 12 colors from three basics in my beloved Koi Watercolor Field Sketch Set by Sakura (affiliate link). I used a gold Sharpie to add the sentiment and color the lines and die-cut star. 


These cards aren't masterpieces and definitely keep me in the category of card maker rather than cardmaker. But that's ok. The goal was to try a new technique, complete a challenge, and have fun, so mission accomplished. 


10/12/20

Wizard's Workshop Watercolor

Kids have the best imaginations. This fun project challenges them to think what a wizard would keep on a bookshelf. A pile of bones? A skull under glass? Lots of spell books? Potions and a magic wand? A jar of eyeballs? Perhaps all that and more, or something completely different! Affiliate links below. 


Wizard's Workshop Watercolor


Materials:


Steps:


Use a ruler to draw a bookshelf on the watercolor paper. You can make it as tall/short and wide/narrow as you want, with as many shelves as you'd like. I used the ruler to draw the floor boards and books, then did everything else freehand. 

Fill the shelves with whatever you think would be in a wizard's workshop, sketching lightly with a pencil. When you are done sketching, trace over everything with a Sharpie. (I used brown.) Do not use a water-based marker!


This was my first time trying out Sharpie pens and I loved them! If you've never tried Sharpie pens, they are different from the Sharpie markers you've used a hundred times. The fine tip is just the right size for detailed drawing, and the ink doesn't bleed or soak through paper. The ink dries immediately and doesn't smear when you brush your hand over it (perfect for us lefties!). And Sharpie pens are acid-free, so you can use them on scrapbook pages, too. 


After you've traced over everything, erase the pencil lines. Then use watercolors to bring it to life. I started with the bookcase and floor, then did the broom, then the cauldron. 


Next was the books, bottles, jars, and wand. After that, the walls. The last thing I did was to fill in the back of the bookshelf.

By the way, I used my beloved travel watercolor set for this project, even though I only traveled from my upstairs craft room to the downstairs living room to paint. I originally bought it exclusively for travel, but I love it so much that I got rid of my other watercolors and just use this. In looking for the link, I discovered there is a 48-color set. Now I'm totally tempted. Because twice as many colors is probably twice as awesome, right?

        
(Dear Santa, I've been good.)


I had so much fun creating this! If you or your kids paint a wizard's workshop, email a photo to me or leave a link in the comments. I'd love to see what other people dream up!

10/9/20

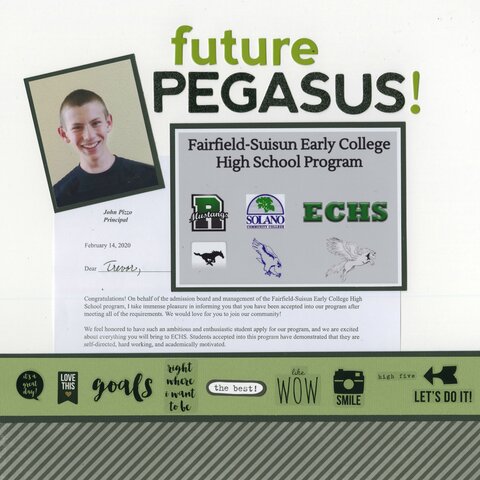
Future Pegasus

Trevor is a member of the freshman class of Early College High School. This innovative program takes place entirely on the local community college campus. The students take the standard high school classes, as well as at least one college class each semester. ECHS is a perfect fit for Trevor and we've been hoping and praying for years that he would be admitted. We were all so excited and happy for him when his acceptance letter arrived in February. I used the letter as the journaling in this layout. 

Future Pegasus (affiliate link)
The ECHS mascot is the Pegasus, explained visually in the main photo (actually a slide from the presentation we attended for prospective students). ECHS students are technically enrolled at Rodriguez High School (the Mustangs), even though they won't necessarily ever set foot on campus. Their classes are all at Solano Community College* (the Falcons). When you combine Mustang and Falcon, obviously you end up with Pegasus. I love that.
*At least they will be, once we beat this pandemic. 

10/8/20

Crayon Melt Skull

Crafting with the warming tray is so much fun that you can't stop with just one project! I filled a paper with purples, blues, and greens to make a background for a paper skull. 


To make the background paper, I used the same technique as with the iguana. Plug in the warming tray, put a piece of paper on top, peel the crayons, place them on their sides, and glide them across the paper. I layered five different colors on top of each other. 

Here you can see how the same finished paper looks sitting on the table and held up to the window. 


To make the skull, I folded a piece of copy paper in half and cut out the general shape of a skull, including the eye sockets, nose, and mouth. When I was happy with it, I used it as a tracer on a second piece of paper. After cutting out the final version of the skull, I used the paper scraps to make teeth, which I glued behind the skull. Then I glued the skull to the background paper. 

There is no end to the things you can do with a warming tray!

10/7/20

Popcorn Cake

When I was a kid, my friends knew that when they came to my birthday party, they'd be served a money cake. My friend Rachael had a similarly-distinctive cake at her birthday parties: her mom always served a popcorn cake. Mrs. Sato made her version of a popcorn cake in a bundt pan. It had colorful mini gumdrops throughout. She served it in thick wedges we ate with our hands, like a popcorn ball. It was delicious. 

I've been thinking about that popcorn cake recently. I've never been served a popcorn cake by anyone but Mrs. Sato, and Steve and Trevor had never had one. I'm not sure of her recipe, but it was basically rice krispie treats with popcorn instead of cereal, so I started from there and did some experimenting. I didn't have gumdrops on hand, but I had M&M's, so I made a chocolate version and added a drizzle of ganache and sprinkles to my popcorn cake. 

While the ganache looks pretty and tastes great, I honestly think the cake doesn't need it. Give it a try and tell me if you think the chocolate adds anything, or if the plain cake is the way to go. 


Popcorn Cake


12 c. popcorn
1-2 c. candy (M&M's, gumdrops, etc)
16 oz. marshmallows 
3/4 c. butter, divided


You will need approximately 12 cups of popcorn to make a cake. If you use microwave popcorn, this is 2 bags. Carefully pick out any unpopped kernels. Pour the popcorn into a springform tube pan. It should fill the pan completely. You may need to add more popcorn. 


Transfer the popcorn to a large bowl. Check again for any unpopped kernels (they like to hide). 

Generously grease the pan with 1/4 c. butter, making sure to cover every surface, including the tube. This will seem like a lot of butter. That is ok. Put any extra butter into a saucepan, along with the remaining 1/2 c. butter. Melt the butter and the marshmallows together over medium low heat, stirring frequently. Remove the marshmallow mix from the stove and pour it over the popcorn. Stir completely until all the popcorn is coated with marshmallows. Stir in the candy. 

Cover your hand with a piece of plastic wrap, then press the popcorn into the buttered tube pan. 


Let it sit for 10 minutes, then release the spring and invert the cake onto a cake stand. Let it cool completely.


This is the way Rachael's mom did (just imagine those M&M's are gumdrops). Feel free to serve it like this, or add the ganache, sprinkles, and candles.  


This cake brought me right back to Rachael's June birthday parties in the 1970's. Good times.