Pages

12/31/20

New Year's Eve Cupcakes

I hadn't intended to return to blogging this soon, but I wanted to share the cupcakes I made for New Year's Eve using some fun items I received as Christmas gifts. Aren't they festive?! 


Among the gifts from my parents, I received this silicone number mold, treat sticks, and an 18-pack of LorAnn flavors (affiliate links here and throughout the post). I couldn't wait to try them out, and New Year's Eve seemed like as good a reason as any. 

I started by sprinkling a thin layer of sanding sugar into the mold. I used red and yellow. Since I'd never done this before, I started with just two numbers to see if it worked. (Spoiler: Yes!)


I prepped a bowl of white Candy Melts, then stirred in about 5 drops of LorAnn cherry. I spooned the melted candy into the mold, then added the sticks and rolled them to make sure they were coated on both sides. I let the candy sit for 10 minutes, then popped the numbers out of the mold. They had a bit of excess that I needed to trim off, but that was super easy to do with a sharp knife.  


I ate the trimmings, delighted that the cherry flavor was perfect. I can't wait to try the rest of my oils! My mom picked out some great flavors, very similar to what I would have chosen for myself. (If you have friends who bake, this makes a GREAT gift!) 

I made the other two numbers, frosted some cupcakes, then poked the lollipop sticks into the center. I added some gold sprinkles on top, letting them spill off onto the tray. So festive!


You can use the same idea for a graduation party, a birthday, or even a housewarming gift (with the address on the cupcakes). So many possibilities!

I hope you all have a safe New Year's Eve celebration tonight, whatever that may entail. It's going to be a quiet night at home for the three of us, with good food, games, and plenty of cupcakes.

12/25/20

Christmas Card 2020

Merry Christmas from the deRosiers! 


I will be taking a short blogging break and will return on January 1. 
I wish each of you good health, joy, and love now and throughout the new year. 

12/24/20

The Best of 2020

Each year in December, I look back on the projects I made that year and pick my favorites. With the crazy year we've had, I think it is especially important now. With that, here are my picks for the Best of 2020. First up, my top kids crafts.


While 2019's crafts were very diverse, I've apparently been obsessed with birds in 2020. A surprising number of the kids crafts I made this past year were birds and they represent 40% of my favorites. I've also done a lot of edible crafts.... and a decent number of those were birds, too! 

Next up, my favorite layouts from 2020. As usual, my pages cover the 3T's (Trevor, Trouble, and Travel) and feature a lot of grids.


I love looking back at these, full of so many great memories.

12/23/20

A New Batch of Roundups

When I'm not working on My Creative Life, I'm busy running Fun Family Crafts. Here are the latest batch of kids' craft roundups, starting with Hot Cocoa Crafts and RecipesI had a lot of fun putting this one together. One of my projects is in the graphic below. Can you spot it? 


We have over 100 Santa crafts at Fun Family Crafts. A few of those are mine, but only one is in the roundup. Do you see it? 


I love this adorable collection of colorful, googly-eyed turkey crafts


I didn't think of clocks as being seasonal until I started working at Fun Family Crafts. Clock crafts tend to get a lot of traffic this time of year because of their connection with New Year's Eve.  


Finally, cow crafts. I only used six projects in the graphic, despite the fact that we have way more than that on the site. A lot of the cow crafts on Fun Family Crafts are photographed as part of a group with other farm animals and couldn't easily be cropped to show just the cow. I think the 6-project graphic is still effective. 


As always, I made all the graphics using PicMonkey.   

12/22/20

Recycled Lid Snow Globe Ornament

I blog about kids' crafts, which means I'm contractually obligated to save all cardboard tubes, empty containers, and plastic lids. You never know when they'll come in handy. Such was the case for this cute snow globe ornament. The clear plastic lid I used was originally on a container of mixed nuts.


Now that humble lid has a place on our Christmas tree. Affiliate links below. 


---------


Recycled Lid Snow Globe Ornament


Materials:


Steps: 


Put the plastic lid onto a piece of cardstock, then carefully trace around the outside of the lid. Draw a picture on the cardstock circle. (I used pens for the snowman and the trees, and colored pencil for the sky.) Cut out the circle. 

Cut a piece of cord to match the circumference of the plastic lid. Cut Then cut a trapezoid out of felt for the base of the snow globe. 

Pour some Diamond Dust into the lid, then cover the rim with Supertite. Place the drawing upside down onto the rim and press all the way around the edges to make sure it is completely sealed. Let the glue dry before moving your ornament.


Glue the cord around the circumference of the rim, placing it right on the edge where the lid and the drawing meet. This will help ensure that the Diamond Dust cannot escape. Glue the felt base to the back of the drawing. Cut a short piece of cord and glue it behind the top of the ornament to use as a hanger. 

Give your ornament a shake to create a snowy scene, just like a normal snow globe. Enjoy!

12/21/20

Edible Advent Wreath

As a professional craft blogger, my job is to design creative projects and then write tutorials to teach you how to make them. Ideally, each project should make my readers want to drop everything and immediately start crafting. For that reason, seasonality is huge. If I publish an adorable Halloween costume on November 1 or a great idea for valentines on February 15, chances are very poor that anyone will drop everything to make them. Just like you'll never see a magazine with Thanksgiving recipes in the December issue, I have the most success when I share projects at least a month ahead of when I expect people would want to make them.

And yet, today I'm sharing an edible Advent wreath. Advent started on November 29. Yesterday was the fourth (and final) Sunday of Advent. Advent ends in in just a few days. By all counts, this is a terrible time to be sharing an Advent idea. 


And yet, the reality of my life as a craft blogger is that what I share IS my life. I'm sharing an Advent wreath because our family celebrates Advent. Yesterday was the fourth Sunday of Advent, so all four candles are lit on my edible wreath. In an ideal world, I would have dreamed up this project two months ago then promoted it in early November. But that's not what happened. 

Thankfully, the projects I share here will live on here, on Pinterest, in Google Images, and elsewhere. So even though I'm late to the game this time, I'm hoping this tutorial will inspire someone in 2021 and beyond. And maybe someone in 2020; after all, Advent doesn't end until Christmas begins. 

---------

Edible Advent Wreath


Materials:


Steps:


Pour approximately 2 cups of flake cereal into bowl. Pick out anything that isn't a flake (such as raisins, or in the case of the cereal I used, dried strawberries)

Prepare the green Candy Melts according to the package directions. I used about 15 wafers. Pour the melted candy over the cereal, stirring until it is completely coated. Spoon it onto a piece of parchment paper, forming the shape of a wreath. Let the candy set for 2 minutes, then apply the round red sprinkles to make the berries. Set the wreath aside to set completely. 

Prepare the blue (or purple - your choice) Candy Melts according to the package directions. I used 4 wafers. Pour the melted candy onto a piece of parchment paper, then roll the Pocky in it to coat. I recommend making extras, but remember to keep at least one Pocky the original pink. 

Prepare the yellow Candy Melts according to the package directions. I used 2 wafers. Drop a tiny puddle of melted candy onto a piece of parchment paper, then drag your scribe tool (or a toothpick) through it to make a candle flame. You'll only need four, but I recommend making extras so you can choose the best ones. 


When everything is completely set, use your scribe tool to make holes where the candles will go. Then use a sharp knife to trim your Pocky candles to the desired length. (I trimmed off the uncoated area you see in the photo below.) You can also use the knife to shave off any puddling on the Pocky candles.


Choose your four best flames and peel them off the parchment paper. Remelt the remaining yellow candy. Add a small dollop of candy to the back of each flame, then attach them to the Pocky candles. When the candles are secure, remelt the extra green candy and put a dollop on each hole, then put the candle in place. 


Happy Advent, everyone!

12/18/20

Hidden Money Santa Gift

'Tis the season for figuring out the next money gift for my nephew, Timothy! I was doing some experimenting and came up with this cardboard tube Santa. 


This isn't what I'm giving Timothy, because I couldn't bring myself to spend $15+ shipping him a box that contains a cardboard tube. I'd rather spend 55 cents to mail him something flat and equally creative. I'll share that after he's had a chance to open it. Next December when I'm desperate for another idea, I'm probably going to be kicking myself for sharing this, but hopefully one of you needs this now!


Hidden Money Santa Gift


Materials:

  • money
  • cardboard tube
  • craft knife
  • red craft paint 
  • black Sharpie
  • gold cardstock
  • red felt
  • cotton ball
  • craft glue

Steps:


Hold the money up against a bright window with a piece of scratch paper over the top. Trace around the face. Cut the face out of the scratch paper, then use that to trace the face onto the cardboard tube. 

Use the craft knife to cut the face opening from the cardboard tube. Paint the tube red. I painted both the inside and the outside of the tube to give it a more finished look. 

Use the Sharpie to draw a belt. Cut out a small square from the gold cardstock, then color the center portion black to make the belt buckle. Glue it in place.  

Cut a triangular hat. Pull apart a cotton ball, using one portion to make the pom pom at the top of the hat, a second piece for the hat's trim, and the remainder for Santa's hair and beard. Glue everything in place. 

Finally, roll the money and slide it into the tube so that the president's face lines up with the opening. It will stay in place, but you can add a piece of scotch tape for extra security if you wish. 


12/17/20

I LOVE 'Color My Cookie'.... and You Will Too

Literally every single day, I get unsolicited emails from marketing agencies, manufacturer representatives, and random business owners asking me to promote products here at My Creative Life. Most of the time, the product is completely outside my niche (dog food, health supplements, self-help books, etc). I turn all of those down. 

About 10% are requests about products that I would actually use, but that it wouldn't make sense to promote here on my blog. For example, I wear deodorant, put gas in my car, and use cough drops when my throat hurts. But they have nothing to do with crafts, cooking, educational travel, or everyday creativity, so in my mind they don't belong here. Sure, I could totally stretch and claim that a certain cough drop is so effective that I bounce right back, put on deodorant, and drive my gassed-up car to the craft store to make all the projects you see here, but posts like that totally turn me off. So I always decline. 

Every so often, a request comes that seems like a perfect fit for my blog. I request a sample, but that doesn't necessarily mean it will appear on My Creative Life. I only blog about it if I like it and think my readers will too. That was the case for Color My Cookie. I'm confident that you will love it as much as I do! 


Color My Cookie is a genius concept. Each kit is themed and includes six pre-baked cookies covered in smooth white icing, which you can decorate with the included "paint palette" (a seventh cookie with edible watercolors). The kit also includes pre-filled piping bags and sprinkles. In other words, the kits contain everything you need to decorate delicious cookies that look professional, without a mess or hassle. And it's so much fun! 

I chose the Christmas Morning kit. It came with two ornament cookies, two tree cookies, two candy cookies, the palette cookie, two bags of icing, two paintbrushes, a bag of sprinkles, cups for water, and a QR code that linked to a helpful decorating video.


Just like with regular watercolors, dip your paintbrush in water and then pick up 'paint' from the palette. Then apply it to the smooth, white surface of the cookie. The pre-drawn outlines act as barriers, keeping the colors just where you want them. If you want to add sprinkles, add them while the paint is still wet and they will stick. 


I tried out the piping bags next. The frosting was the perfect consistency for outlining, which meant it was a little too thick for the flooding I tried to do on the tree. But it worked well for the pink squiggle I put on the ornament, which in retrospect looks like intestines. Oops!


As with anything, with practice comes improvement. I like my second set of cookies better than the first. 


I had SO much fun decorating my cookies! But there was one final step before I could recommend them publicly here on the blog, and that was tasting them. I'm happy to report that they were absolutely delicious! Not just good, but some of the best shortbread I've ever had. They tasted perfectly fresh, despite being shipped from Texas to California, then sitting in their box on my table for two days until I decorated them. 

Color My Cookie offers a nice variety of kit themes, including holiday options like the one I chose, as well as year-round options. They even have a monthly subscription! (I am soooo tempted!) Give Color My Cookie a try. I know you'll love it! Finding a gem like this and being able to share it with you makes slogging through all those messages so worth it.

12/16/20

Snowman Light Bulb Craft

I love snowmen. Other than rabbit crafts, I have made more snowman crafts over the years than any other topic. There are snowmen covering just about every surface in our house during the month of December, but there's always room for one more. 


My latest snowman started out as a light bulb in the master bathroom. When it burned out, I painted it white, then painted on an orange nose and black buttons, eyes, and a smile. I decided to dress my snowman with yarn. Here is the tutorial for the little yarn hat. To make the scarf, I braided three pieces of yarn, tied a knot on each end, then unraveled the ends of the yarn right up to the knots. Then I tied the scarf around his neck and trimmed the ends to the length I wanted. 

So cute and so easy!


12/15/20

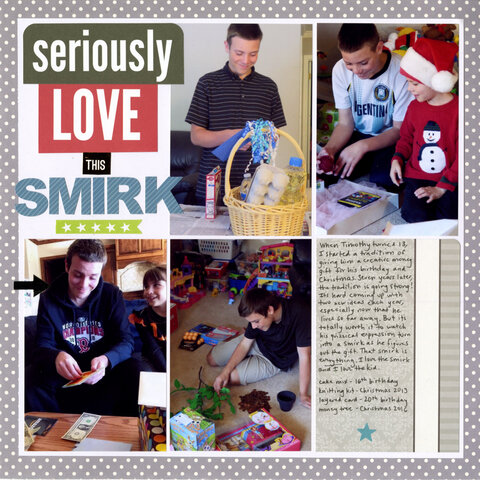
Seriously Love This Smirk

For the past seven years, I've been giving my nephew creative money gifts for his birthday and Christmas. I love the challenge of coming up with ideas that are clever enough to make Timothy smirk when he figures them out. For the first 16 years of his life, I was there for all his birthdays and Christmases to see his smirk in person, but now that they live out of state, I have to rely on my sister and my mom to take photos. They know I live to see that smirk. 

The photo on the bottom left is from this year's birthday. Timothy is smirking because he was not fooled by the single dollar bill I'd tucked into the card and has discovered the money hidden under each layer of the card

Seriously Love This Smirk (affiliate link)

The other photos on the page are from his birthday in 2016 (top left), Christmas 2013 (top right), and Christmas 2016 (bottom right). Fun fact: Trevor is the same age in the top right photo (age 7 in 2013) as Allison is in the bottom left (age 7 in 2020). There is so much I love about this layout.  

12/14/20

Christmas Tree Mint Cheesecake Mousse

Are you a fan of creamy cheesecake? How does rich, fluffy mousse sound? Perhaps some cool mint? I love all three, so I put them together into one amazing dessert. (If I do say so myself. Which I do. It's really, really good.) And because it's winter, I put served my cheesecake mousse in Christmas tree creme brulee dishes. My dishes are about 15 years old, so I couldn't find an exact match, but here are some similar tree-shaped dishes that should work. Or, try this really cute set of tree dishes (affiliate links here and throughout the post). 


Mint Cheesecake Mousse


Ingredients:


Steps: 


Whip the cream until soft peaks form. Add 1/4 c. powdered sugar and whip until stiff peaks form. Set the whipped cream aside. 

In a separate bowl, whip the cream cheese until light and fluffy, approximately 2 minutes on the highest speed. Add the remaining 1/2 c. of powdered sugar and the mint extract. 

Remove 1/4 c. of the cream cheese mixture and put it into a small bowl. Stir in the cocoa powder, a teaspoon at a time, until the mixture has the consistency of a truffle. Set it aside. 

Return to the mixture of cream cheese, powdered sugar, and mint extract. Add the food color, a small amount at a time, until you get a shade of green that is slightly darker than you want the final color to be. I like to stick a toothpick into the gel, then swirl the toothpick through the mixture until it stops giving off color. Then use a clean toothpick to repeat the process. It usually takes me 2-3 toothpicks' worth to get the shade I want. 

Gently fold the whipped cream into the green mixture. Scoop it into the dishes, then fill in the trunk area with the truffle mix. 


Add a star to the top of each, then add as many sprinkles as you'd like. 


You can serve them immediately, but they're even better after they chill for a few hours. This recipe makes six servings. 


Trust me - this mint cheesecake mousse is DELICIOUS.