Merry Christmas from the deRosiers!
12/17/21
Merry Christmas 2021!
 Cindy deRosier has a masters in Education and taught 4th and 5th grade for 11 years. She uses that experience to blog about crafts and family-friendly educational travel. She spent many years as the Editor of Fun Family Crafts, a website with over 12,000 kid-friendly craft tutorials. Cindy is the co-author of "What Would Jesus Patent?", does freelance writing and designing, loves jigsaw puzzles, is an avid scrapbooker, and has been to all 50 states.
12/16/21
The Best of 2021

 Cindy deRosier has a masters in Education and taught 4th and 5th grade for 11 years. She uses that experience to blog about crafts and family-friendly educational travel. She spent many years as the Editor of Fun Family Crafts, a website with over 12,000 kid-friendly craft tutorials. Cindy is the co-author of "What Would Jesus Patent?", does freelance writing and designing, loves jigsaw puzzles, is an avid scrapbooker, and has been to all 50 states.
12/15/21
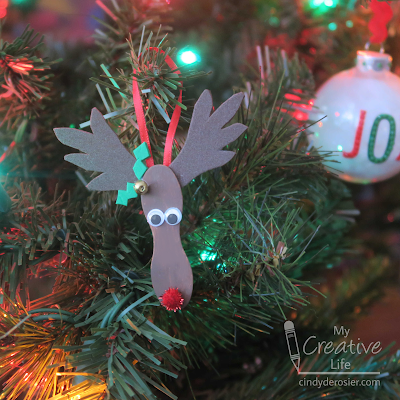
Paddle Spoon Reindeer Ornament
Paddle Spoon Reindeer Ornament
Materials:
- paddle spoon (or, as I like to call it, mini wavy craft stick)
- Folk Art brown paint
- craft foam (brown and green)
- microtip scissors
- craft glue
- sparkly red mini pom pom
- googly eyes
- tiny bell
- ribbon
Steps:
 Cindy deRosier has a masters in Education and taught 4th and 5th grade for 11 years. She uses that experience to blog about crafts and family-friendly educational travel. She spent many years as the Editor of Fun Family Crafts, a website with over 12,000 kid-friendly craft tutorials. Cindy is the co-author of "What Would Jesus Patent?", does freelance writing and designing, loves jigsaw puzzles, is an avid scrapbooker, and has been to all 50 states.
12/14/21
A Batch of Holiday Cards
 Cindy deRosier has a masters in Education and taught 4th and 5th grade for 11 years. She uses that experience to blog about crafts and family-friendly educational travel. She spent many years as the Editor of Fun Family Crafts, a website with over 12,000 kid-friendly craft tutorials. Cindy is the co-author of "What Would Jesus Patent?", does freelance writing and designing, loves jigsaw puzzles, is an avid scrapbooker, and has been to all 50 states.
12/13/21
Nativity Drawing
Nativity Drawing
Materials:
Steps:
 Cindy deRosier has a masters in Education and taught 4th and 5th grade for 11 years. She uses that experience to blog about crafts and family-friendly educational travel. She spent many years as the Editor of Fun Family Crafts, a website with over 12,000 kid-friendly craft tutorials. Cindy is the co-author of "What Would Jesus Patent?", does freelance writing and designing, loves jigsaw puzzles, is an avid scrapbooker, and has been to all 50 states.
12/10/21
Colored Pencil Magazine
I was delighted when my hard copy showed up just a few days after I placed my order. I’d expected to have to wait weeks. After I finished reading that magazine, I read the October one digitally.
Overall, I was very happy with both. The artwork was gorgeous and inspiring. There was a heavy emphasis on technique that I liked. The articles were interesting and well-written (though the copy editor in me saw a few typos that shouldn’t have made it to print). The October issue had a fantasy/magic theme, which is not my thing. While I still enjoyed the issue and read it cover-to-cover (twice), I definitely preferred the November issue.
My favorite article from everything in both issues was a feature on the artwork of Catherine Scartaccini. Her teeny drawings are absolutely incredible, and the article about how (and why) she makes them was so interesting. Honestly, it's worth it to buy the November 2021 issue just for that article. Bonus that there are so many other interesting things in there!
So, would I recommend Colored Pencil Magazine? Yes, without hesitation! I will almost certainly be buying more issues in the future.
 Cindy deRosier has a masters in Education and taught 4th and 5th grade for 11 years. She uses that experience to blog about crafts and family-friendly educational travel. She spent many years as the Editor of Fun Family Crafts, a website with over 12,000 kid-friendly craft tutorials. Cindy is the co-author of "What Would Jesus Patent?", does freelance writing and designing, loves jigsaw puzzles, is an avid scrapbooker, and has been to all 50 states.
12/9/21
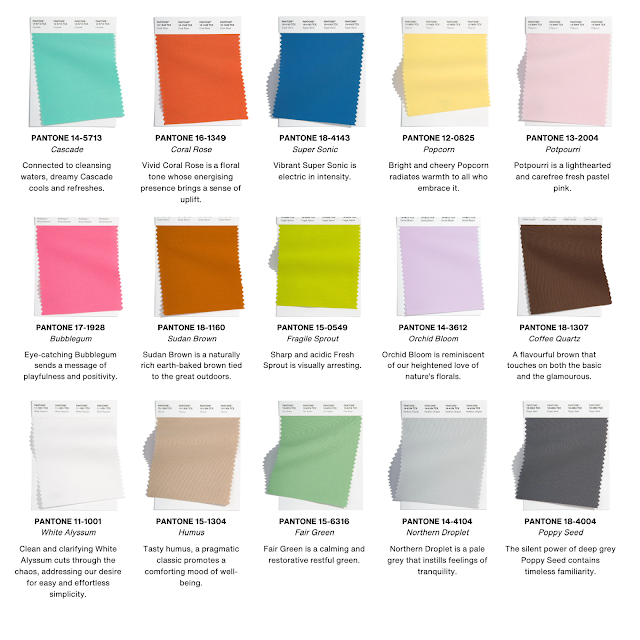
Pantone Color of the Year 2022
 Cindy deRosier has a masters in Education and taught 4th and 5th grade for 11 years. She uses that experience to blog about crafts and family-friendly educational travel. She spent many years as the Editor of Fun Family Crafts, a website with over 12,000 kid-friendly craft tutorials. Cindy is the co-author of "What Would Jesus Patent?", does freelance writing and designing, loves jigsaw puzzles, is an avid scrapbooker, and has been to all 50 states.
12/8/21
Gingerbread Tags for Baked Goods
 Cindy deRosier has a masters in Education and taught 4th and 5th grade for 11 years. She uses that experience to blog about crafts and family-friendly educational travel. She spent many years as the Editor of Fun Family Crafts, a website with over 12,000 kid-friendly craft tutorials. Cindy is the co-author of "What Would Jesus Patent?", does freelance writing and designing, loves jigsaw puzzles, is an avid scrapbooker, and has been to all 50 states.
12/7/21
Gingerbread Muffins
Gingerbread Muffins
¾ c molasses 1tsp baking powder
½ c milk ½ tsp baking soda
1 egg ½ tsp ground cinnamon
1 tsp freshly grated ginger ¼ tsp ground allspice
½ c brown sugar ½ tsp ground cloves
2 ½ c flour
Glaze:
1 c powdered sugar
2 T milk
½ tsp vanilla extract
 Cindy deRosier has a masters in Education and taught 4th and 5th grade for 11 years. She uses that experience to blog about crafts and family-friendly educational travel. She spent many years as the Editor of Fun Family Crafts, a website with over 12,000 kid-friendly craft tutorials. Cindy is the co-author of "What Would Jesus Patent?", does freelance writing and designing, loves jigsaw puzzles, is an avid scrapbooker, and has been to all 50 states.
12/6/21
Pantone Color of the Year 2022
 Cindy deRosier has a masters in Education and taught 4th and 5th grade for 11 years. She uses that experience to blog about crafts and family-friendly educational travel. She spent many years as the Editor of Fun Family Crafts, a website with over 12,000 kid-friendly craft tutorials. Cindy is the co-author of "What Would Jesus Patent?", does freelance writing and designing, loves jigsaw puzzles, is an avid scrapbooker, and has been to all 50 states.
12/3/21
CHA to AFCI to NAMTA
With my CHA membership came a lot of fantastic opportunities. Over the years, I've worked with a bunch of companies I love (these are my current affiliate partners), taken on many freelance writing and designing assignments, served as a brand ambassador, spoken at conferences, seen my projects published in books, and met some of my best friends. I can trace just about everything that has happened in my crafting career back to my CHA membership and the steps I took to qualify.
For a variety of reasons, AFCI struggled. It was obvious to most of us that it was only a matter of time before AFCI would cease to exist. So it was no surprise in August when AFCI members were notified that we would be voting to merge with NAMTA (the International Art Materials Association). The merger became official last month, with NAMTA absorbing AFCI. My AFCI membership, due to expire at the end of this month, rolled over into a NAMTA membership.
 Cindy deRosier has a masters in Education and taught 4th and 5th grade for 11 years. She uses that experience to blog about crafts and family-friendly educational travel. She spent many years as the Editor of Fun Family Crafts, a website with over 12,000 kid-friendly craft tutorials. Cindy is the co-author of "What Would Jesus Patent?", does freelance writing and designing, loves jigsaw puzzles, is an avid scrapbooker, and has been to all 50 states.
12/2/21
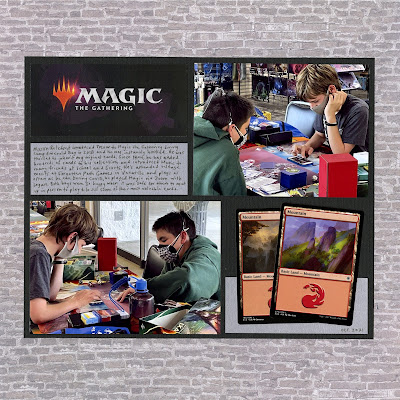
Magic the Gathering
 Cindy deRosier has a masters in Education and taught 4th and 5th grade for 11 years. She uses that experience to blog about crafts and family-friendly educational travel. She spent many years as the Editor of Fun Family Crafts, a website with over 12,000 kid-friendly craft tutorials. Cindy is the co-author of "What Would Jesus Patent?", does freelance writing and designing, loves jigsaw puzzles, is an avid scrapbooker, and has been to all 50 states.
12/1/21
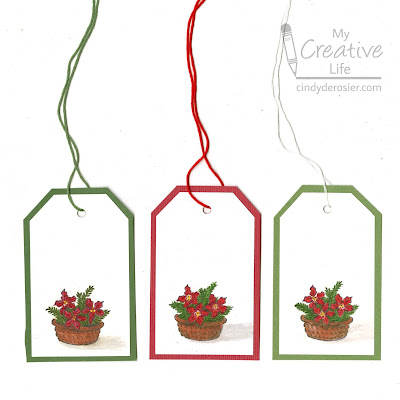
Poinsettia Gift Tags
- cardstock (white, red, green)
- paper trimmer
- poinsettia stamp (mine is from a 1999 Stampin' Up set, but I like this one from Photo Play)
- Staz-On ink
- colored pencils (I used my Prismacolors)
- tape runner
- Crop-a-dile
- embroidery floss
Steps:
 Cindy deRosier has a masters in Education and taught 4th and 5th grade for 11 years. She uses that experience to blog about crafts and family-friendly educational travel. She spent many years as the Editor of Fun Family Crafts, a website with over 12,000 kid-friendly craft tutorials. Cindy is the co-author of "What Would Jesus Patent?", does freelance writing and designing, loves jigsaw puzzles, is an avid scrapbooker, and has been to all 50 states.


