Happy holidays from the deRosier family!
12/16/22
Merry Christmas 2022!
Labels:
Boy Scouts,
Christmas,
Steve,
Trevor
 Cindy deRosier has a masters in Education and taught 4th and 5th grade for 11 years. She uses that experience to blog about crafts and family-friendly educational travel. She spent many years as the Editor of Fun Family Crafts, a website with over 12,000 kid-friendly craft tutorials. Cindy is the co-author of "What Would Jesus Patent?", does freelance writing and designing, loves jigsaw puzzles, is an avid scrapbooker, and has been to all 50 states.
12/15/22
Presidents Day Craft: Presidential Seal and Oath of Office
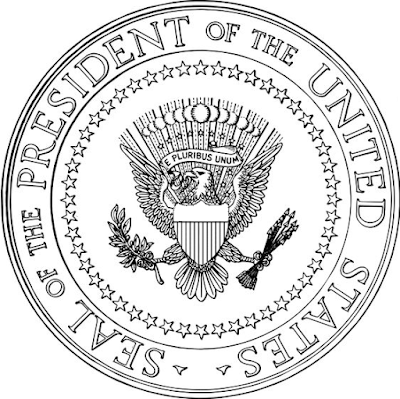
For the tenth and final question in my craft series based on crowd-sourced responses, I asked my friends to name an under-rated holiday. To choose what to make, I looked at which of the holidays mentioned is most in need of a classroom craft and I decided on Presidents Day (no apostrophe). Yes, plenty of Presidents Day crafts exist already, but they are overwhelmingly about Washington and Lincoln and almost exclusively target early elementary age. I wanted something for upper elementary that focuses on all presidents, not just the two best-known. I decided to create a coloring page of the Presidential Seal, paired with information about the Seal and the Presidential Oath of Office on the reverse.
I started with this image from the State Department and made a few digital tweaks (specifically to the shield) to turn it into a coloring page.
The folks from Ohuhu just sent me their new Kaala series dual-tip alcohol markers to try out, so that's what I used for coloring. I've been wanting to try Ohuhu for a long time because I've heard great things. And now I know that everything I've heard is true! I love these markers. The Kaala series has 150 colors (168 pens) in four different sets (Basic Tones, Illustration Tones, Skin Tones, and Landscape Tones). The color range is beautiful, although I only used 8 for this project. Seven are listed below, plus I used a cool grey to shade the E PLURIBUS UNUM banner.
After coloring, I created a second printable for the reverse. I added some information about the Presidential Seal, then left space for students to write the Presidential Oath of Office.
Here's how it looks filled in:
After students have colored the front and written on the back, they can turn them into a mobile. Cut out both parts and sandwich them together with a little bit of glue. Punch a hole and add a piece of yarn to hang the mobile.

I loved trying out the Kaala markers and can't wait to use all of the colors. And that isn't all that Ohuhu sent me! Expect to see a lot of projects using Ohuhu products in 2023!
Labels:
coloring page,
Crafts for Kids,
mobile,
Ohuhu,
patriotic,
president,
printable
 Cindy deRosier has a masters in Education and taught 4th and 5th grade for 11 years. She uses that experience to blog about crafts and family-friendly educational travel. She spent many years as the Editor of Fun Family Crafts, a website with over 12,000 kid-friendly craft tutorials. Cindy is the co-author of "What Would Jesus Patent?", does freelance writing and designing, loves jigsaw puzzles, is an avid scrapbooker, and has been to all 50 states.
12/14/22
Shrinky Dinks Mouse Ears Keychain
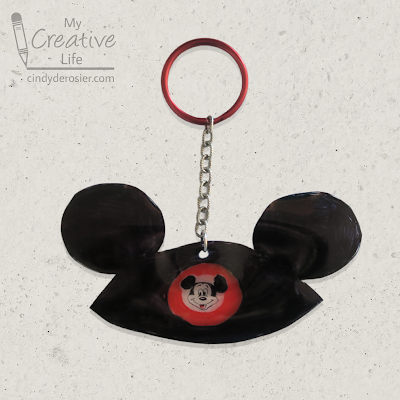
Today I'm sharing the ninth craft in my series based on crowd-sourced responses to ten questions. This time, I asked my friends to "Name something Disney." Mickey Mouse was the top voter getter by far, but one person said Mouse Ears. I used that to inspire a keychain made with Shrinky Dinks. It turns out that shrinking a large design like this leads to a lot more curling and distortion than a smaller piece. In retrospect, I would have made my keychain smaller, both to make it easier to shrink and less prone to distortion, and better for carrying around. Affiliate links below.
Shrinky Dinks Mouse Ears Keychain
Materials:
Steps:
Using the reference image as a guide, draw a pair of Mouseketeer ears on the shrink plastic. I recommend sketching it on a piece of plain paper first, then putting the plastic on top of that and tracing with the Sharpies. You do not need to color it perfectly; the colors will intensify and the pen marks will fill in when it shrinks.
Cut out the ears using microtip scissors, then punch a hole at the top.
Follow the instructions on the package to shrink the plastic. Let it cool completely.
Put a jump ring through the hole you punched, then add more jump rings to make a chain. When you have enough, connect the last jump ring to the key ring.
Obviously, you can use this technique to make anything into a keychain. I'm already thinking of all the other shapes I could make!
Labels:
Crafts for Kids,
Disney,
hat,
keychain,
Mickey Mouse
 Cindy deRosier has a masters in Education and taught 4th and 5th grade for 11 years. She uses that experience to blog about crafts and family-friendly educational travel. She spent many years as the Editor of Fun Family Crafts, a website with over 12,000 kid-friendly craft tutorials. Cindy is the co-author of "What Would Jesus Patent?", does freelance writing and designing, loves jigsaw puzzles, is an avid scrapbooker, and has been to all 50 states.
12/13/22
Rabbit of Unusual Size
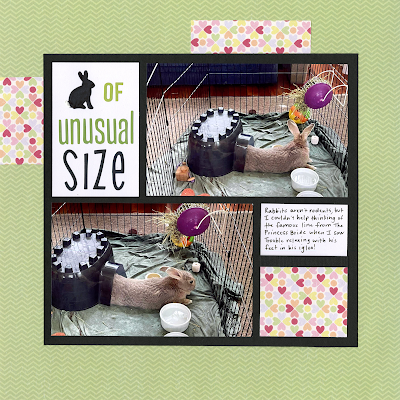
The way Trouble was sitting with his back legs in his igloo made him look like the longest rabbit of all time. I immediately thought of the classic Rodents Of Unusual Size. I made a minor tweak and the title of this layout became Rabbit Of Unusual Size.
Rabbit of Unusual Size (affiliate link)
The rabbit die-cut in the title was from one of my friend Jennifer's dies. Not only did I use it here, but I added them to two other pages I've recently made about rabbits. Did you notice them? I colored them each a little differently. There are more, so they'll definitely make an appearance on future rabbit-themed pages.
 Cindy deRosier has a masters in Education and taught 4th and 5th grade for 11 years. She uses that experience to blog about crafts and family-friendly educational travel. She spent many years as the Editor of Fun Family Crafts, a website with over 12,000 kid-friendly craft tutorials. Cindy is the co-author of "What Would Jesus Patent?", does freelance writing and designing, loves jigsaw puzzles, is an avid scrapbooker, and has been to all 50 states.
12/12/22
Statue of Liberty at Sunset Painting
Today's project is the eighth craft in my series based on crowd-sourced responses to ten questions. This time I asked my friends to name a US landmark. Mt. Rushmore was the most frequent answer, but I shared a Mt. Rushmore craft idea last year. So I went with the second most popular answer, the Statue of Liberty.
I started by thinking back to my visits to the Statue of Liberty. I first visited New York City and the Statue in 1989, when I was 17. In the spring of 2001, a fellow teacher and I took students to Washington DC and New York City, which included a visit to Lady Liberty. My most recent time seeing the Statue was in 2014, when we sailed into NYC at sunrise. While each visit was fantastic, I realized I've seen the Statue at dawn and in the daylight, but never at sunset. That was the inspiration for my project.
Statue of Liberty at Sunset Painting
Materials:
- watercolor paper
- acrylic paint
- photo of the Statue of Liberty
- pencil
Steps:
Use a large brush to wet the watercolor paper, then add horizontal streaks of blues, purples, oranges, and pinks to make a sunset. There's no right or wrong. Continue until you're happy, then set it aside to dry.
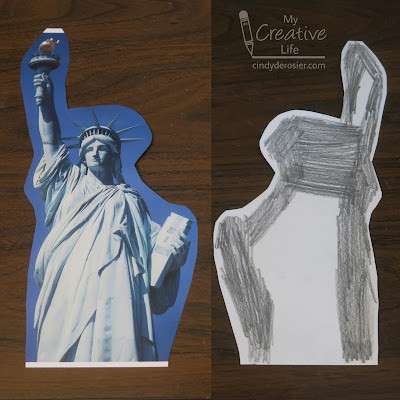
Print out a photo of the Statue of Liberty, then trim away the background. Turn it over and scribble on the back with an ordinary pencil. You'll be using this to transfer the image to the paper, so you only need to color the edges, as shown below.
Tape the edges of the watercolor paper to the desk to keep it from moving, then use paperclips to secure the image to the paper.
Trace along the outline of the Statue with a pencil, pressing firmly. Lift a corner to make sure the line is transferring well.
When you've traced the entire outline, remove the paperclips and set the image aside. Fill in the traced area with black paint.
I really enjoyed this project. It makes me wish I were still teaching 5th graders specifically so we could do this project and I could display a whole bulletin board's worth of these.
Labels:
Crafts for Kids,
Folk Art,
paint,
patriotic,
Statue of Liberty,
sunset
 Cindy deRosier has a masters in Education and taught 4th and 5th grade for 11 years. She uses that experience to blog about crafts and family-friendly educational travel. She spent many years as the Editor of Fun Family Crafts, a website with over 12,000 kid-friendly craft tutorials. Cindy is the co-author of "What Would Jesus Patent?", does freelance writing and designing, loves jigsaw puzzles, is an avid scrapbooker, and has been to all 50 states.
12/9/22
Recycled Cardboard Box Penguin
This penguin project is the seventh craft in my series based on crowd-sourced responses to ten questions. Can you guess what the question was?
Here's a hint:
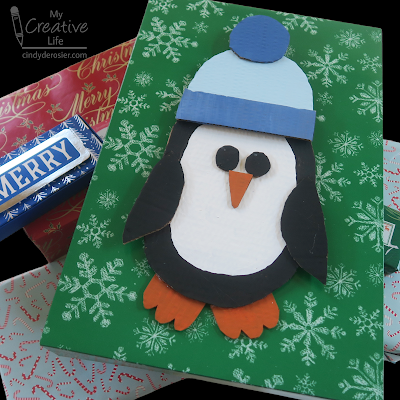
I asked, "Name something you recycle." I chose the answer of cardboard boxes as the inspiration for my craft. And, in fact, that specific box pictured above helped guide my thinking. When I saw 'made with less material' printed on it, I guessed (correctly!) that it would be easy enough to cut into shapes with scissors. Standard cardboard is best cut with a utility knife, which is great for straight edges, but not for cutting out small, circular items. I designed today's penguin to test how difficult it would be to cut rounded shapes from this thinner-than-usual corrugated cardboard.
I painted all the pieces with acrylic paint and let them dry. Incidentally, I thought it was really interesting how this thinner cardboard reacted to the paint. Look at the slightly lumpy texture. That didn't change when the paint dried.
Before using the hot glue gun to assemble everything, I started by figuring out what my base layer would be. It's not the body - the feet are tucked behind the body. If I glued the feet to the body and then the hat and facial features on top of the body, the finished project wouldn't lay flat. I would need to prop up the gaps caused by the thickness of the cardboard.
So I cut a piece of cardboard (marked by the black arrow below) that was slightly narrower than the penguin's body and positioned it so that it left room for the feet yet extended beyond the head. I glued it in place, then cut a second rectangle (blue arrow) to fill the gap created between the base and the hat.
Here's how my penguin looked after I glued the rest of the pieces in place.
And here's how it looked after I glued it to a robe-sized gift box. I plan to tuck a gift tag under his wing.
I love that I repurposed the cardboard box that the gift came in to decorate the gift box I used to wrap it! The recipient can use the box again, giving the cardboard box an even longer life.
Labels:
animal,
bird,
cardboard,
Christmas,
Crafts for Kids,
Folk Art,
paint,
penguin,
recycle,
winter
 Cindy deRosier has a masters in Education and taught 4th and 5th grade for 11 years. She uses that experience to blog about crafts and family-friendly educational travel. She spent many years as the Editor of Fun Family Crafts, a website with over 12,000 kid-friendly craft tutorials. Cindy is the co-author of "What Would Jesus Patent?", does freelance writing and designing, loves jigsaw puzzles, is an avid scrapbooker, and has been to all 50 states.
12/8/22
Paper-Pieced Sloth Card
I love sloths. I've seen them at zoos, of course, but I've also seen them in the wild in Costa Rica. They're awesome and the subject of my sixth project in my series based on crowd-sourced responses to ten questions.
Sloth tied with kangaroo and giraffe for "Name an interesting animal." Giraffe crafts are common; we have a bunch on Fun Family Crafts, four of which are mine. We don't have any sloth or kangaroo crafts, so I checked other places. I found that kangaroo crafts are easier to find than sloth crafts, so I went with the sloth.
Materials:
- cardstock or construction paper (white, blue, green, black, tans and browns)
- scissors
- glue
Steps:
I started by making a white card base, then set it aside. I cut blue cardstock to make the card front, then went through my scraps to find green for the leaves and different browns and creams for the sloth and the branch.
I picked a medium brown rectangle and cut two thin rectangles off the long side for the arms. I rounded off one end of the remaining piece to make the sloth's head. Then I chose a darker brown and cut a branch. I cut out some green leaves, then tackled the sloth's claws (3 on each arm).
I used these National Geographic photos (specifically #4) for my reference. Following the photo, I cut a cream-colored face, then comma-shaped eye markings, a nose, and a mouth from dark brown. I added black eyes.
Once everything was cut, it was time to assemble. I glued all the face pieces in place, then used a white gel pen to add tiny catchlights to the eyes. I glued the face to the body, then moved the body out of the way so that I could glue the tree, arms, and claws. Then I added the body. I trimmed off the excess that hung off the edges, then folded the leaves in half to give them dimension and glued them to the branch. Finally, I glued the card front to the base.

I haven't added a sentiment to my card yet, but there are lots of possibilities. Send a "Hang in there" card to someone who is struggling, or a "Sorry I was so slow..." card for a belated birthday. Anyone would appreciate "Keep Smiling." For someone who is working toward a goal, remind them that "Great things take time."
Labels:
animal,
card,
construction paper,
Crafts for Kids,
mammal,
sloth
 Cindy deRosier has a masters in Education and taught 4th and 5th grade for 11 years. She uses that experience to blog about crafts and family-friendly educational travel. She spent many years as the Editor of Fun Family Crafts, a website with over 12,000 kid-friendly craft tutorials. Cindy is the co-author of "What Would Jesus Patent?", does freelance writing and designing, loves jigsaw puzzles, is an avid scrapbooker, and has been to all 50 states.
12/7/22
Halloween 2022
I already shared this year's Halloween costume, where Steve and I dressed up as a "Spaghetti Western." Here's the scrapbook page from our Halloween festivities.
Halloween 2022 (affiliate link)
I paired a photo of Steve and me in our costumes with a group picture of the six of us around the fire pit, roasting marshmallows. I added three pieces of patterned paper (2 color blocks and the green sliver), grounded it with a border sticker, then decorated with more stickers. Everything on the page is from the same collection except for the number stickers. It's rare that I do that; as simple as they are, most of my pages have at least four manufacturers represented. This really simple page from 2011 (!) has ten manufacturers. I should try that challenge again and see how many I can use.
 Cindy deRosier has a masters in Education and taught 4th and 5th grade for 11 years. She uses that experience to blog about crafts and family-friendly educational travel. She spent many years as the Editor of Fun Family Crafts, a website with over 12,000 kid-friendly craft tutorials. Cindy is the co-author of "What Would Jesus Patent?", does freelance writing and designing, loves jigsaw puzzles, is an avid scrapbooker, and has been to all 50 states.
12/6/22
Candy Cane Magazine Mosaic
Today's project is the fifth in my series based on crowd-sourced responses to ten questions. This one asked respondents to name something kids like. The top answer was candy, which is what I chose to inspire my project. Just like with yesterday's Picasso, I put a holiday spin on this craft. There are no shortage of candy cane crafts at Fun Family Crafts, plenty of which are mine, but a candy cane was perfect for some mosaic techniques I wanted to try.
I just finished reading an excellent book, Paper Collage Workshop, by Samuel Price (affiliate link here and below). True to its name, this book feels very much like a workshop, leading the reader through the absolute basics first before progressing to increasingly difficult skills and projects. Check out the detail in this dog portrait. Wow.
All of the projects toward the back of the book are way (WAY!) beyond my level, but that's fine. I picked up a lot of tips and tricks from Price that I used on my simple candy cane. And I am inspired to eventually try more advanced projects.
Candy Cane Magazine Mosaic
Materials:
- mixed media paper
- markers
- magazines
- scissors
- Mod Podge
- paintbrush
Steps:
Draw a candy cane on the paper. Color in the red stripes, then outline the candy cane with green. No need to be perfect. This will all be covered. And, at least in my case, it still won't be perfect. But no matter!
Now look through the magazine and pull out sections with red. You may get lucky and find a gardening magazine about tomatoes, as I did. If not, check ads. Lots of then have red since it's attention-grabbing. Cut out the red stripes to fit the shapes, then glue them in place. This is a bit tedious, but again, there's no need for perfection. Here's how mine looked at this point:
Fill in the background with green. Again, the gardening magazine was great for this; I found a two-page spread that was almost entirely solid green. After I cut out the text and photos, I had a great amount of green to use. I started with cutting pieces to butt up against the candy cane to define its edges and cover my white and red mistakes. Then I just worked my way outward with random squares.
Labels:
Book Review,
Christmas,
Crafts for Kids,
magazine,
mosaic
 Cindy deRosier has a masters in Education and taught 4th and 5th grade for 11 years. She uses that experience to blog about crafts and family-friendly educational travel. She spent many years as the Editor of Fun Family Crafts, a website with over 12,000 kid-friendly craft tutorials. Cindy is the co-author of "What Would Jesus Patent?", does freelance writing and designing, loves jigsaw puzzles, is an avid scrapbooker, and has been to all 50 states.
12/5/22
How to Draw Santa, Inspired by Picasso
Today's project is the fourth in my series based on crowd-sourced responses to ten questions. For this one, I asked my friends to name a famous artist. The top answers were Van Gogh, Monet, and Picasso. We already have 10 kid-friendly crafts inspired by Van Gogh at Fun Family Crafts, but only one each that is Picasso-inspired and Monet-inspired. I chose Picasso and put a fun holiday twist on it.
Santa Painting, Inspired by Picasso
Materials:
- paper
- colored pencils
- Sharpie
- acrylic paint
Steps:
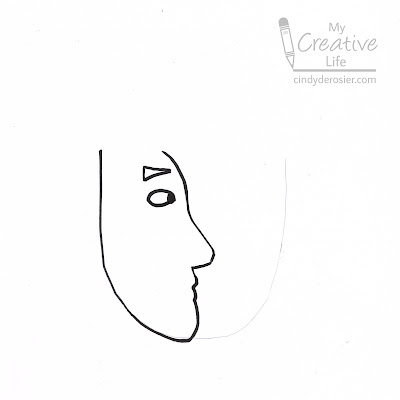
Lightly draw a U with a pencil in the center of the paper. On the left side of the U, draw a side view of a person looking to the right. Trace over your drawing with a Sharpie.
On the right side of the U, draw a face that is looking forward. Trace it with Sharpie.
Draw a second U just outside the border of the first U. This is Santa's beard. Then add the trim of his hat on top of his head. Draw the hat and the pom pom. Finally, give Santa some shoulders. I forgot to scan my paper at this point, but I think you'll be able to get the gist from the completed picture.

Now, paint. I started with the face, choosing two cool blues and a pale pink. Then I painted the red hat and suit. Then I painted three swaths of color in the background: green on the right, a blue-grey on the top, and black on the left.
When all the paint was dry, I traced over the black lines with a Sharpie, then used colored pencil to add the grid on the green and the lines and dots on the black.
It's a very simplified interpretation of Picasso's style. It's also a simplified version of Santa! I thought about including his mustache and making his beard shaggier, but after looking at a lot of Picasso's work, neither fit the style. Since the prompt was Picasso and not Santa, I went with the less hairy version of St. Nick. I like it.
Labels:
Christmas,
Crafts for Kids,
Folk Art,
Inspired By,
paint,
Picasso,
Santa
 Cindy deRosier has a masters in Education and taught 4th and 5th grade for 11 years. She uses that experience to blog about crafts and family-friendly educational travel. She spent many years as the Editor of Fun Family Crafts, a website with over 12,000 kid-friendly craft tutorials. Cindy is the co-author of "What Would Jesus Patent?", does freelance writing and designing, loves jigsaw puzzles, is an avid scrapbooker, and has been to all 50 states.
12/1/22
Pantone Color of the Year 2023
Last year, Pantone didn't reveal their 2022 Color of the Year until December 9, so I was caught off guard when the 2023 COTY was announced today, December 1. Say hello to Viva Magenta, "an unconventional shade for an unconventional time."
Pantone also announced a partnership with Motorola, who debuted the Edge 30 Fusion in Viva Magenta. They encourage everyone to "Explore the Magentaverse."
My thoughts on Viva Magenta? Meh. Don't love it, don't hate it. We haven't had a red since 2007's Chili Pepper, so we're due. Frankly, as long as they don't repeat the 2016 and 2021 nonsense a third time, I won't complain no matter what the color is.
What are your thoughts about Viva Magenta? Let me know in the comments.
Labels:
Pantone
 Cindy deRosier has a masters in Education and taught 4th and 5th grade for 11 years. She uses that experience to blog about crafts and family-friendly educational travel. She spent many years as the Editor of Fun Family Crafts, a website with over 12,000 kid-friendly craft tutorials. Cindy is the co-author of "What Would Jesus Patent?", does freelance writing and designing, loves jigsaw puzzles, is an avid scrapbooker, and has been to all 50 states.
Goodnight Moon Craft
Today's project is the third in my series based on crowd-sourced responses to ten questions. For this one, I asked my friends to name a popular children's book. Goodnight Moon (affiliate link here and below) was the top answer by far.
In designing this craft, I wanted to make something that was interesting and recognizable from Goodnight Moon, yet not so challenging that the only children who could make it had already outgrown the book. There are a lot of ways to adapt this to make it easier or more challenging to match the abilities of the child(ren) making it. For example, adults can pre-punch the shapes if little hands aren't big or strong enough to punch. You can switch out the tape for paper (although kids LOVE playing with tape). You can skip the stripes on the yellow curtains, or draw them more as scribbles.
---------
Goodnight Moon Craft
Materials:
Steps:
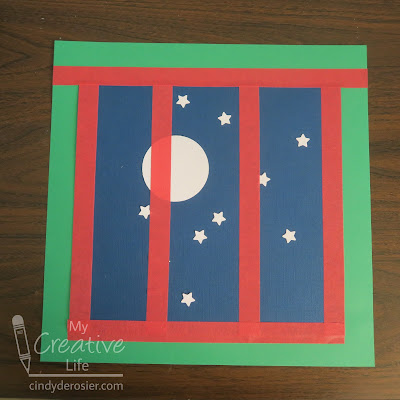
Cut the blue cardstock to approximately 10" square. Punch out one white moon and as many white stars as you'd like.
Glue the moon to the blue paper, slightly left of center. It should not be too close to the left edge where the curtain will go. Glue the stars randomly where you want. Again, anything too far to the left will be covered.
Add four vertical strips of tape to the blue cardstock: one on the left side, one on the right side, and two evenly spaced between them. Tuck the edges of the tape behind the blue cardstock.
Put glue on the back of the blue cardstock and center it on the green cardstock. Add a piece of tape across the top of the blue paper for the curtain rod. It should extend off the edges of the green cardstock. Tuck the edges of tape behind the paper.
Cut a rectangle of yellow cardstock that is approximately 11" long. Cut a second piece of yellow that is shaped like a large wedge of pie. These two pieces will be the curtains. Place them on your craft to see if you like their size and adjust as necessary. Then draw narrow green lines on the curtains. It's easiest to use a fine-line pen and a ruler for the rectangle and to freehand the wedge.
Glue the curtains in place. That's all there is to it!
Not only would this be a fun craft to do WITH kids, it would be great to do FOR kids. Pop this into a frame to hang in the nursery. Or create a smaller version to use as a card. There are lots of possibilities.
Labels:
book,
construction paper,
Crafts for Kids,
Goodnight Moon,
literature,
moon,
star
 Cindy deRosier has a masters in Education and taught 4th and 5th grade for 11 years. She uses that experience to blog about crafts and family-friendly educational travel. She spent many years as the Editor of Fun Family Crafts, a website with over 12,000 kid-friendly craft tutorials. Cindy is the co-author of "What Would Jesus Patent?", does freelance writing and designing, loves jigsaw puzzles, is an avid scrapbooker, and has been to all 50 states.
Subscribe to:
Posts (Atom)


