10/31/24

Radiation: The Scrapbook Layout, Treatment Info, and Final Bill

I had external beam radiation therapy for breast cancer between August 5-23, 2024. Each day, I drove to the Cancer Center in the next city over, put on my hospital bracelet, let myself into the locker room, changed into a gown, and then waited to be called for treatment. Sometimes fellow patients were in the locker room and we would talk; I loved getting to meet other women going through the same thing. About a third of the time I was alone in the locker room. On those days, I would read the messages previous patients had posted on the bulletin board, or flip through the cards a group of local high school students had made, all of which offered encouragement to those of us going through treatment. Treatments took 10 minutes, then it was back to the locker room, where I put on my street clothes and tucked my hospital bracelet in my purse. Then I went home, where I hydrated, moisturized, and rested before resuming my day. 

While the radiation treatments themselves weren't bad, they left me fatigued and with swollen, red, and raw skin in the treated area. I had to start using the seatbelt pillows that I'd thought I wouldn't need again after I recovered from surgery. I went through two tubes of calendula cream. (That's an affiliate link because you should get some if you don't already have it on hand. In addition to treating radiation burns, it is great for treating cuts, scrapes, and sunburns.) But the money I spent on calendula cream was offset by the money I didn't spend on deodorant, as I wasn't allowed to use it throughout treatment. (In August, in California.)

This is the scrapbook page I made to document my experience with radiation. 

Radiation (affiliate link)

As you can see, I used photos of my seatbelt pillows, calendula cream, and no deodorant as embellishments for my page. I handwrite my journaling 99.5% of the time, but for this layout I typed it in order to squeeze in as much of the story as possible. I earned three points for the Scrappin' Banshees: one point each for 3+ photos, a title, and washi tape. I originally had metallic paper on the page to earn the 4th point, but I didn't like the shine for this topic. 

I recently received a summary of my radiation treatment. I started with a CT scan and initial consultation with my radiation oncologist. She prescribed: Rt. Breast Volume 4005 267, 3D Conformal photon 15x, photon 6x, once daily. So my daily dose of radiation was 267 cGy and my total was 4005 cGy. I saw the oncologist three times during treatment. Care to guess the total cost for this treatment?

My out-of-pocket cost was zero. No copays, no deductable, nothing at all for the entire radiation treatment. My insurance paid the negotiated rate of $11,037. Without insurance, it would have been $66,142.08. Crazy. My heart breaks for patients who end up with massive medical debt. Cancer is hard enough to deal with physically and emotionally without financial disaster on top of it. 

10/30/24

Celebrate 20

Steve and I usually celebrate our anniversary with a weekend getaway to a cute city within few hours of home. We do a lot of walking and exploring, and we eat lots of good food. We really look forward to these adventures. 

We would have loved to do a similar trip for our 20th anniversary, but the calendar was absolutely packed. Instead of traveling and spending a night or two in a hotel, it made more sense to plan something much closer to home. We had been wanting to do the Art Walk and eat at Thomas Keller's Per Se in nearby Yountville, so we decided that's how we'd celebrate 20 happy years. It was a sensible choice and, as it turns out, a fortuitous one. Exactly one week before our anniversary, I was diagnosed with breast cancer. If we'd made reservations to go away, we would have had to cancel them anyway. On the day of our anniversary, I had a peri-operative appointment, a two-hour online class about breast cancer rehabilitation and post-surgical physical therapy, and received five different calls from Kaiser. 

After all that, it was absolutely wonderful to head to Yountville with Steve and put cancer on hold for a few hours. The weather was perfect for the Art Walk and the food at Per Se was amazing. We had such a good time together. 

Celebrate 20 (affiliate link)

This is the first layout I made for the final game of the 2024 BYSS World Series. I earned a home run for the Scrappin' Banshees, one point each for using 3+ photos, a title, washi tape, and metallic paper, which is what I used for the punched hearts. 


I put all of the layouts I make chronologically into albums, with the exception of anniversary pages. Because I made a dedicated wedding album in 2004, it made sense to me in 2005 to make a dedicated anniversary album. I see the logic, but now I'm thinking that I wish our anniversary pages were interspersed with the rest of our lives instead of being separate. Whatever is going on in our lives (or in the world, in the case of COVID) has impacted our anniversary plans. That said, I am not going to be reorganizing 20 years' worth of albums in order to make this change. I'd rather spend the time documenting more memories. 

10/29/24

Trivia-Themed Money Gift Using Printable Gift Card

Today is my nephew Timothy's 24th birthday (!) so that means it's time to share my latest money gift idea. It is essentially a trivia challenge that starts with a printable gift card. It took me about 40 minutes to make, but you can spend more or less time depending on how much you want to challenge your recipient. It's a great option for someone who lives far away, as there are no shipping costs and no mailing time required. 

This is what Timothy received via email: 


He has already solved it and redeemed his gift card, so if you feel like figuring out the answer, go for it. The answer is below, so if you do want to solve it, do it before reading on. The full answer is at the bottom of the post. 


---------


Trivia-Themed Money Gift Using Printable Gift Card


Start by buying a printable gift card, sent to your own email address. I used Amazon, but any gift card that you can redeem online will work. Do not buy an eGift card. Those come with a link, not a code. 


Within a few minutes, you'll receive your card. You don't need to print it. Just pay attention to the code. For Amazon, the format is XXXX-XXXXXX-XXXX. 

Now it's time to get started. Open up a new document. Take a screenshot of the printable gift card so that your recipient knows where to redeem it (see the Amazon smile below the 'Happy Birthday' graphic?) and put the image at the top of the document. Then type the instructions, then spaces and hyphens to match the format of the gift code. Now you're ready to write the questions. 

The first 2 digits of Timothy's code were G8, so I typed "What is G8" into Google to see what came up. First was a Wikipedia article about the Group of 8 (G8) and next was an article about the Pontiac G8. Timothy is very interested in geography, so the first topic was a great choice for him. I read the article and carefully constructed a question that could only be answered with the letter-number combination of G8. 


You don't need to give clues in 2-digit sections like I did, nor do your clues need to be so challenging. For a young child, I might give the following clues to generate the same answer, G8:

                    1. What is the 7th letter of the alphabet?
                    2. How many sides does an octagon have?

You could use math equations, state abbreviations, sports players' jersey numbers, or literally anything else when designing your questions. Just be sure that there is only one possible answer. I had to be very careful how I wrote question 5-6 since there are multiple events in the Olympics with a letter-number name.  

Speaking of K4, I was really frustrated that the code had K4 twice. It was hard enough writing one question for that particular combination! But the next pair, KM, couldn't be easier. If you have two letters in a row, that's the perfect chance to ask a question about a famous person with those initials. 

I was hoping that UM or AW were chemical symbols that I'd forgotten about since that would have been a fun clue, but alas, no. I think my question for UM is the weakest of the bunch. I do like the one I came up with for AW though, since it fits in with Timothy's interest in geography and travel. 

Happy birthday, Timothy! Two more months to figure out a money gift for Christmas. Yikes. 

--------


Answer: G8C3-K4K4KM-UMAW


10/28/24

An Alphabetical List of Countries Visited

I have no plans to visit all the countries of the world, but I thought it would be fun to see how close I've come to visiting a country that starts with each letter of the alphabet. Because there is some controversy about whether certain entities are countries, I'm using the United Nations list of Member States as my source. I'm also including their two Permanent Non-Member Observer States on my list of countries. There are no countries that start with W (Western Sahara is considered a Non-Self-Governing Territory) or X, so the maximum score is 24. Let's see how I do! 


A
Bahamas, Barbados, Belgium, Belize
Canada, Colombia, Costa Rica
Denmark
Estonia
Finland, France
Germany
H
Italy
J
K
L
Mexico, Monaco
Netherlands, Norway
O
Panama, Portugal
Q
R
Saint Lucia, Spain, Sweden
T
United Kingdom, United States
Vatican City
Y
Z


So my score is 13/24. I'm sad that it isn't 14/24; Luxembourg was supposed to be on that list. Someday. Or maybe I'll visit one of the 8 other L-countries eventually. 

Unless I missed one, my number of countries (as defined by the UN) is 25. Yet, my Visited Countries Map shows 34. That map includes entities like Aruba (Constituent Country) and Gibraltar (British Overseas Territory). I think Aruba is the only one that would make a difference to my alphabetical list.

What is your score out of 24? Let me know in the comments!

10/25/24

Senior Sunset

I made a page about Trevor's Senior Sunrise for the 2023 BYSS World Series while playing for the Scrappin' Banshees, so it's only appropriate that I made the Senior Sunset page for this year's competition! Trevor didn't take any photos during the event (sigh), so the only pictures I had to work with were the group photo the principal shared, plus the picture I took of Trevor when I picked him up. And a third photo. Did you spot it? During Senior Awards, Trevor was named "Most Likely to Save the Planet" so I took a picture of his trophy, fussy cut it, and used it as an embellishment.  


This layout scored a grand slam for the Banshees: one point for using 2+ patterned papers, one point for the arrow (on the group photo), one point for the outdoor element (moon and trees paper), one point fo the journaling, and an extra two points for the sticker borders along the top and bottom. 

Between this layout and yesterday's, I contributed 10 points to the Banshees. Unfortunately, it wasn't enough to win the game. We're now tied at one game each for the Banshees and Twisted Scissors. This weekend's game will determine the Series winner. Go, Banshees!

10/24/24

Land (check!) Water (check!) Sky (check!)

Back in May, Trevor's Scout troop did a weekend campout (land) that included canoeing (water) and a flight in a private plane (sky). The Scouts were divided into two groups: one went out in the canoes while the other went up in the air. Then they switched, so everyone got to do both activities. Trevor already had his Aviation merit badge (it was the first merit badge he ever earned); the Scouts who didn't were able to complete all the requirements for the badge. 

I used 8 photos on this page - seven in the grid, plus a photo of the plane in the sky as an embellishment in the upper right. 

Land - Water - Sky (affiliate link)

This was the first layout I made for Game 2 of the 2024 BYSS World Series


I used 2+ sentences of journaling, two arrows (the 'Nature' and 'Fresh Air' stickers), three patterned papers, and an outdoor themed element (cloud die-cut). That's a total of four points for my team, the Scrappin' Banshees. Go, Banshees! 

10/23/24

Davis, California: Art in Public Places

In 1973, the city of Davis, California started the Art in Public Places Program. For 51 years (and counting), the City has allocated 1% of all public funds for Capital Improvement Projects to go toward art. The result is a city packed with sculpture, murals, tile work, paintings, and other beautiful features in the public areas. 


Trevor has been living in Davis since we moved him into the dorms on September 17. He loves UC Davis and is thriving. In addition to his classwork, he's volunteering at the California Raptor Center (where he did his Eagle Project and part of his Senior Project), has joined multiple clubs, and is spending a lot of time with his new friends. Fortunately for us, he made time in his schedule to meet us for lunch one day in downtown Davis. 

But before we met him up with him, we walked around downtown specifically to see the art. 


Steve and I both went to college in Davis and have spent a lot of time there over the decades, but this was the first time we used the City's public art pocket map to guide our stroll. 


We saw a good amount of the public art within a few blocks of downtown, but that is only part of the nearly 200 pieces of public art within city limits. It's impressive. 


Davis is a really special city and well worth a visit if you haven't been. 

10/22/24

Alabama State Cookies: Introducing the Yellowhammer

In 2016, our family visited New Mexico and tried their official State Cookie for the first time. When I wrote the blog post about our trip, I included this: 
"Note to self: Petition California's legislature to adopt an official State Cookie. I'm not sure what it should be, just that we should have one too."
 
It took two years, but in 2018 we set about inventing the California Cookie. Trevor and I, plus three of his friends, had a really great competition, picked a winning cookie, and wrote to the legislature. Unfortunately, our efforts to make it official were not successful, but it was really fun. 

While Trevor and his friends were not able to enter the annals of history through the invention of a State Cookie, an Alabama 4th grader named Mary Claire Cook did. Her cookie, called the Yellowhammer, is a pecan and oat sandwich cookie filled with honey and peanut butter. It's a great representation of the state, as peanuts are the State Legume of Alabama and pecans are its State Nut. Alabama is nicknamed the Yellowhammer State, after the state bird

When the Yellowhammer was adopted in June 2023, Alabama became the third state (after New Mexico and Massachusetts) with an official State Cookie.  


The Yellowhammer is a hefty cookie... and quite delicious. 


The filling is outstanding. 


This is the official recipe for Yellowhammer Cookies. Enjoy!


---------


Yellowhammer Cookies
Yield: 24 cookies

COOKIES:

  • 3 1/2 cups all-purpose flour
  • 2 teaspoons baking soda
  • 1/4 teaspoon baking powder
  • 1 teaspoon salt
  • 1 1/2 cups butter, melted and slightly cooled
  • 2 cups brown sugar
  • 2 teaspoons vanilla extract
  • 2 eggs
  • 4 1/2 cups quick-cooking oats
  • 24 pecan halves

FILLING:

  • 1 cup peanut butter
  • 2 tablespoons honey
  • 1 cup powdered sugar
  • 1/2 cup melted butter

BAKING AND ASSEMBLY:

  1. In a bowl, stir together flour, baking powder, baking soda and salt.
  2. In a separate bowl, using a hand or stand mixer, beat together butter, brown sugar, vanilla, and eggs. Add flour mixture and stir well.
  3. Add oats and continue beating until well mixed.
  4. Cover and refrigerate dough for two hours.
  5. Preheat oven to 350 degrees F.
  6. Form dough into 48 1-1/2 inch balls and flatten. Arrange on a parchment paper-lined baking sheet. Place a pecan half on 24 of the cookies, which will become the top of the finished treat.
  7. Bake for 10-12 minutes or until set.
  8. Make the filling: Mix peanut butter, honey, butter and powdered sugar and beat to combine, about three minutes.
  9. Spread filling between two cookies, topping with the pecan-topped halves and sandwich together.

10/21/24

50 State Quarters: Coloring Pages Using Crayola Crayons

I've finished four more 50 State Quarter coloring pages: Vermont, Maryland, South Dakota, and Florida. I went back to basics, as these are all done with Crayola crayons.


There's something relaxing and fun about coloring with crayons (good quality crayons, that is), but crayons are not the best choice for these specific coloring pages. It is really difficult to get into the small spaces, particularly the letters. Crayons don't blend well, so I struggled with trying to use the limited colors I have to create textures and shadows.  

Curious to see how other art materials have behaved on these coloring pages? So far, I've used: 
 It's been so interesting trying out different materials. I have some clear favorites, but I'm going to wait until I finish all 50 coloring pages before ranking my choices. It feels like I've been working on this for a long time (because I have) and I'm not even halfway through!

10/18/24

10 Fun Facts about Brayden

This is the fourth project I made for Game 1 of the 2024 BYSS World Series. I scored a triple for my team, the Scrappin' Banshees: 1 point each for using stickers (on the title), chipboard (the branch), and a journaling card. 


I'm really happy with this page, with one exception: I wish the green margins were even. I cut the yellow paper down too soon, planning to go in a different direction. Originally, I was going to use the yellow as the background and piece scraps on top. Once I decided that the green would be the background, I cut down the yellow. I shouldn't have cut so much. I thought about piecing things back together and hiding the seam, but ultimately just accepted the uneven margins. Like I said, I like everything else about the page. 

I'm happy to report that the 15 points I earned for the Banshees helped contribute to our victory in Game 1 over Twisted Scissors. Two more games to go!

10/17/24

Two Cards, Same Five Elements

My godchild Andrei just graduated from Pacific Coast Horseshoeing School, following an intensive 8-week session. It's a good thing I make all my own cards, because good luck finding a "Congrats on Becoming a Farrier!" card at a store. I don't imagine there are a lot of general graduation cards for sale in October, let alone one with a horseshoe on it. 

Here's what I made for Andrei, using the only paper I could find with a horseshoe that didn't have a leprechaun as well. I had to hide a bunch of print that didn't make sense for my card, which is why my sentiment block is so large. 

Yea! You're a Farrier! (affiliate link)

Cards (and other small papercraft projects) are allowed during the BYSS World Series, but you have to make two to count as one project. So I made a birthday card that I'll be sending in a few weeks. 


Together, the two cards count as one grand slam (6 points). Each has 3+ stickers, a cut-apart card, a chipboard element, enamel dots, and an embossed border. It's interesting to me how the two cards share the same five elements, yet look completely different. 

10/16/24

Licensed Driver

This is a rare layout of mine without a title or journaling. I'm calling it Licensed Driver, but that doesn't appear anywhere on the page. The only journaling I included is the date and "Trevor passed!!" I think the embellishments and the photo itself make it clear that Trevor got his driver's license without me having to specifically state that.   

Licensed Driver (affiliate link)

This was the second page I made for Game 1 of the BYSS World Series. I used three stickers and a journaling card, but none of the other challenge items. I love the layout as it is and didn't want to add anything else just for the sake of a few points in a game that has literally no actual impact on anything. Sorry Banshees. I'll make it up with my next project. 

10/15/24

Brave Boy Brayden

Brayden has been a member of our household since September 30, 2023 and a member of our family since April 30, 2024. He's a delightful bun and I'm so glad he's ours. For this layout, I used photos from his 6th day with us, when he bravely ventured onto the (very scary) hardwood floor. He was clearly afraid at first and was slipping all over the place with each attempt. (Rabbits don't have paw pads - just thick fur on the bottom of their feet.) Brayden tried over and over to master it, until finally he was confident. 
 
Brave Boy Brayden (affiliate link)

I made this layout for Game 1 of the 2024 Bash Your Scrapbook Stash World Series. Once again, I'm playing for the Scrappin' Banshees. Goooo, Banshees!


For Game 1, you earn a home run (4 points) for your team by using: three stickers; a chipboard element; six enamel dots, sequins, or bling; and a Project Life, cut-apart, or journaling card. You can earn a grand slam (2 extra points, for a total of 6) by using a stencil, embossing technique, or die cut masking. 

I didn't go for the grand slam, but this layout did earn four points for the Banshees. I'm particularly pleased with the use of the journaling card. You probably can't tell from the scan, but it's travel-themed and printed with words like roam, explore, and voyage... perfect for a bunny who is bravely venturing beyond his cage in an unfamiliar place. Good job, Brayden! Such a brave boy. 

10/14/24

Sketchbook Revival 2024: Collage + Drawing

Here's my final project from Sketchbook Revival 2024. The mug on the left was done with collage first and then drawing, while the mug on the right was drawing first and then collage. 


This workshop was taught by Julie Fei-Fan Balzer. You may remember other artwork I've made inspired by her unique style


This was an outstanding session, my second favorite from the entire 30+ lineup for Sketchbook Revival. (My favorite was Lucie Duclous' Modern Collage Bouquet. Out of everything, two collage classes were my favorites? Interesting!) Doing the two mug projects back-to-back, I learned that I greatly prefer to collage first and draw second. I totally would have guessed it would be the other way around. 

I watched the rest of the sessions without creating along. 


The second-to-last session was an introduction to Crayon Collection. What a wonderful organization! I love this amazing resource of crayon-based art projects for kids


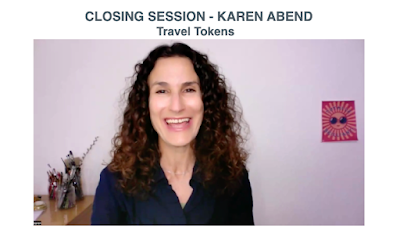
The final session was by Karen Abend, organizer and host of Sketchbook Revival. After watching her host and create along during the 32 previous sessions, it was a lot of fun to see her teach her own. 


I had so much fun with Sketchbook Revival 2024 and learned a lot. I will definitely be on the lookout for next year's event. 

10/11/24

Sketchbook Revival 2024: Cut-Out Couture

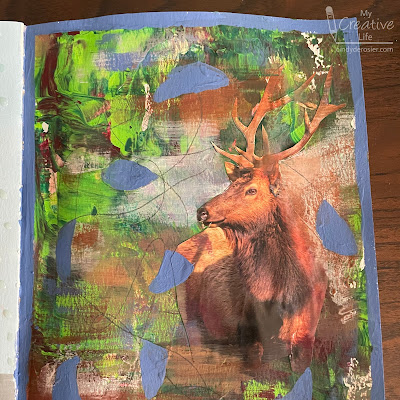
The best part about a workshop like Sketchbook Revival is how far it can take you out of your comfort zone. Nothing about this project, which I made for the class called Cut-Out Couture, is typical Cindy. At all. 


I'm not sure how I feel about my finished piece, but no matter. It was really fun to make and I learned some new things along the way. 


Instructor Allison Wells started with a page in a completed gratitude journal, turned it upside down, cut out a model from a fashion magazine, and glued it to the journal. Then she added paints and scribbles and more paint and other marks before finally adding printed text on top. 

I started with a completed page that I didn't like in my sketchbook, squirted paint randomly on top, and dragged a scrap piece of cardstock through it in different directions until the page was mostly covered. Like the instructor, I left bits of the original showing through. 


She cut her image of a woman from a fashion magazine; my image of an elk came from the California Visitors Guide. When my background was dry, I glued the elk in place, then did some dry brushing to blend it in. I scribbled on the page, then colored in some of the found shapes with the same blue I used for a border. 


Time for marks! I used a Posca pen and colored pencils to add some details, then glued my text in place. It also came from the California Visitors Guide. There is indeed so much to love here in California, including our abundant wildlife. 


I was really tempted to do the next project, which was filling a page with watercolor rectangles. Instructor Wendy Solganik shared a cool tip, which is to put a little bit of the previous color you used into a well and mix it with the next color to ensure a cohesive palette. 


I watched the next 8 sessions without creating along. 


Even when I don't make the project, I learn a lot from just watching the instructors. I've been having so much fun with Sketchbook Revival!