Showing posts with label Delaware. Show all posts

9/11/24

Crayon Melt State Fruits: Pear, Peach, Strawberry, Watermelon, and Tomato

It's been almost four years since I've pulled out the warming tray to do a crayon melt project. I'm surprised it's been that long, since it's one of my favorite techniques. I love the painterly effect it gives on these, each of which is an official state fruit.  


Pears are the state fruit of Oregon. 


Peaches are the state fruit of Alabama, Georgia and South Carolina. (Technically, peaches are Alabama's state tree fruit.)


Strawberries are the state fruit of Delaware, Louisiana, North Carolina (technically, the state red berry), and Oklahoma.


Tomatoes are the state fruit of Arkansas, Ohio, and Tennessee.


OK, I lied. Watermelon is not a state fruit. It is the state vegetable of Oklahoma. If you think a tomato should be considered a vegetable and watermelon a fruit, don't take it up with me. Botanically, tomatoes are fruit and so are watermelons, but Oklahoma has valid arguments for considering watermelon a vegetable


I didn't make crayon melts of all of the state fruits. Others include oranges, apples, huckleberries, blackberries, plums, blueberries, grapes, cranberries, chokecherries, grapefruit, cherries, and pawpaws. Feel free to make those, or anything else, using the technique below. The materials list includes affiliate links. 

---------


Crayon Melt State Fruits


Materials:


Steps:


Plug in the warming tray. and put a sheet of paper on top. Scraps are perfectly ok. Use crayons to color in the fruits you'll be making. You can blend and layer colors as much as you want. 


I recommend removing the wrappers from the crayons and laying them on their sides for faster, more even coverage. When you do that, you're going to get wax that transfers to the crayon, but that's not a problem. Here you can see that I put the white crayon into an area I'd colored dark green, which blended and transferred to the crayon. To clean it off, just color on a clean area of paper. 


You have two choices when adding details to your project. For the watermelon seeds, I just dotted black crayon directly onto the hot red wax. Since the black shows up really well on red, this is a good option. 


If I'd tried to add the yellow strawberry seeds on top of the red wax while it was hot, they would have blended in too much. Instead, I removed the strawberry, let it cool completely, cut out my shape, then returned it to the warming tray for just long enough to warm up. Then I was able dot on little bits of yellow. 


Don't forget to color the stems and leaves that you'll be using on your fruits. When you've colored everything, unplug the warming tray and let the wax set. Then cut out the shapes using scissors. Glue the leaves and stems to the appropriate fruit. Have fun!

9/10/24

50 State Quarters: Coloring Pages Using Flair Pens

I just finished two more coloring pages featuring the 50 State Quarters. I've previously shared the first four (Nevada, New Jersey, Oregon, and Wisconsin) that I colored with Ohuhu markers and the next four (Connecticut, Idaho, Missouri, and Montana) where I used inks as a base and layered colored pencil on top. Can you guess what I used for the Indiana and Delaware coloring pages? 


If you guessed Flair pens, I'm impressed! (Affiliate link here and below.) Specifically, I used this 12-pack of 0.7 mm tip pens. 


I printed the images as 7" circles, which is a ridiculous amount of surface area to fill with a fine tip pen. If I'd colored them in using just the 0.7 mm pens, I would have: 
  • run out of ink partway through and had to buy more pens
  • wrecked my hand
  • lost my mind
Instead, I took advantage of a fun characteristic of Flair pens: they are water-based. By using a moist brush, you can drag the pigment beyond the place where you colored. Look at the tires below. For each tire, I colored part of it solid black, then drew horizontal lines on the remainder. Then I used my brush to blend them out. You can see the difference between the ones I've moistened (left) and the ones I haven't (right). 


Compare the blue outline of Indiana above with the finished project. See the way I dragged the blue in toward the center? I did the same thing with the black outline around the entire design. I really like the effect. And this technique lets you add color to large areas and still save your pen, hand, and sanity. 


A few precautions before you try coloring pages with Flair pens and water. First, print or copy the image onto watercolor paper for the best results. I did a trial run using printer paper and, as expected, it was a disaster. I ended up using Neenah Bristol Vellum because it was the best option that works in my printer. It didn't allow for as much blending as a watercolor paper would, but it didn't fall apart like the printer paper. 

Second, expect to have a lot of drying time. You can't apply Flair pens over moist areas, plus if you moisten two adjacent colors at once, the colors will run. Instead, work on one section at a time and then wait for it to dry before going on to the next area. I worked on both Indiana and Delaware simultaneously so that one could dry while I was working on the other. 
 
To cover a large space with visible texture (like the grass on the Delaware quarter), you can draw lots of little lines. I wasn't consistent in blending it out, but it doesn't bother me that the grass looks inconsistent. What does bother me are the lines on the horse. The 12-pack of Flair pens doesn't have a brown, so I had to use the black pen in different ways on the horse, the tack, and the boot. I suppose I could have used the purple and embraced a horse of a different color


I'm looking forward to coloring my next batch of State Quarters using a different method. I've printed out the designs; now I just need to pick my next medium and get started!

11/22/23

Our Most Short-Changed States

When you attempt to visit all 50 states, there are bound to be some states that get short-changed. In our family, Maine tops that list. We have spent only a single day in Maine. It was a great day, full of neat experiences, but there's obviously a lot of things we missed. Just like anywhere, you could spend months and not see everything. I'd love to return to Maine and see some of what we've missed. Just look at the beauty of the Pine Tree State.
 

Delaware is our second most short-changed state. We spent a full day in Delaware in October 2017 and had a lot of fun, but there's a lot we didn't see. It's a small state (the second smallest) and we drove through about half of it, but didn't visit the more touristy area in the south. Someday! Look at all that the First State has to offer.


When planning our June 2023 New England trip, I really wanted to spend two days in Connecticut. But the timing just didn't work out with what days of the week certain things in other states were available, and I had to cut it down to a single day. Thus, Connecticut is our third most short-changed state. We packed in a lot of really fun things, but we'll be back to see more of the Constitution State - tentatively in the fall of 2026!


Our July 2019 trip to Missouri and Kansas was split into 6 days in Missouri and one day in Kansas. This was more a reflection of how easy it was for us to get to and from Missouri than it was to Kansas. We were able to take a nonstop flight to St. Louis from Sacramento, then another nonstop flight from Kansas City to Boise to visit my family. Flying in or out of any city in Kansas would have involved layovers. Not only would it have taken a lot longer, but the flights were more expensive. So Kansas became a day trip from Missouri. Here's some of what we saw, and some of what we missed, in the Sunflower State.  


Of our most short-changed states, the one that makes me the saddest is Wyoming. We had to cancel a 2020 family reunion in Yellowstone and Grand Teton because of the pandemic. That was so disappointing. We had been to Wyoming already, but had only spent one day visiting in June 2015. So Wyoming comes in at #5 on our most short-changed state. 


Our family has spent the least amount of time in Maine, Delaware, Connecticut, Kansas, and Wyoming, in that order. But there are two other states that need an asterisk:
  • Virginia: This is the only state we have not visited as a family of three. However, we've each been there separately (another stop during Trevor's school trip) and spent a decent amount of time. 

Any thoughts on don't-miss places to go when we eventually make it back to our most short-changed states? Let me know in the comments!

10/18/21

Coloring State Butterflies

Fun fact: 48 of the 50 states have an official state insect. (The two that don't are Iowa and Michigan.) Some states have named more than one state insect, where others have multiple categories of insects. For example, Alabama has a state insect, a state agricultural insect, and a state butterfly. (Oddly, their state insect is a butterfly, but they named a different butterfly as their state butterfly.) Delaware has a state bug, a state butterfly, and a state macroinvertebrate. Tennessee has the most, having designated two official state insects, a state agricultural insect, and a state butterfly.  

It's the butterflies that I'm focusing on today. 

There are 29 states with either a state butterfly or state insect that's a butterfly. Seven are monarchs, and one is a Mullerian mimic to a monarch. I've made a couple of monarch crafts fairly recently, so I wanted to focus on some of the other state butterflies. And, of course, I've been working obsessively with colored pencils lately, so that's what I used. 

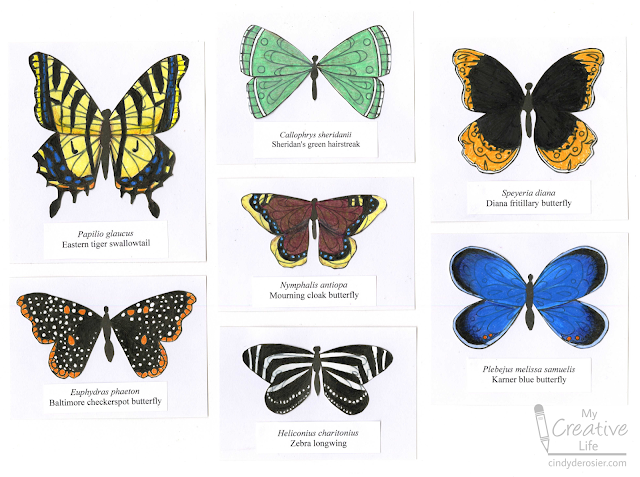
Here are the seven butterflies I made, representing: Alabama, Delaware, Georgia, North Carolina, South Carolina, and Virginia (Eastern tiger swallowtail); Arkansas (Diana fritillary butterfly); Florida (Zebra longwing); Maryland (Batimore checkerspot butterfly); Montana (Mourning cloak butterfly); New Hampshire (Karner blue butterfly); and Wyoming (Sheridan's green hairstreak). 


In retrospect, I made things WAY harder for myself than necessary. Rather than drawing the butterflies myself, or printing out line drawings, I used a black pen to alter an existing coloring page from a Leisure Arts coloring book (affiliate link). I went through all the state butterflies and the seven drawings on the coloring page to decide which images would work for which butterflies. Then I started blacking in the changes. It was very tedious and took much (MUCH) longer than drawing them would have. Not to mention, I was left with lines from the original designs that didn't belong. Nevertheless, I pushed on. 

Here you can see that I've begun altering the butterfly on the bottom right of the page. I'd originally started to change it into an Oregon swallowtail (which is why you see "Oregon" written above it) but I ended up making the similar Eastern tiger swallowtail. You can see in my notes that I planned to turn the butterfly directly above the sentiment into "Arkansas or Colorado." I went with Arkansas' Diana fritillary butterfly. 


Here are each of the butterflies fully colored, along with my notes. You can also see a few places where I swatched my colored pencils. 


The next step was fussy-cutting all the butterflies. That took awhile, too. 


Finally, I mounted each butterfly on white cardstock and added a typed label with the scientific name and the common name. I love the way the butterflies all look together. 


This was a challenging project that taught me a lot. Someday I might redo these (drawing them by hand instead of starting with lines that shouldn't be there) and adding in the remaining state butterflies. But it's not going to be anytime soon. I'm officially taking a butterfly break. 

4/16/21

Ladybug Magnifying Glass Craft

Ladybugs are awesome. Even if they weren't as pretty as they are, they'd be awesome simply because they eat aphids. I've been fighting my annual backyard battle with aphids for the past two weeks and am thrilled when I find a ladybug who has joined me in the fight. Or, from its perspective, the buffet. 

There are already a gazillion ladybug crafts out there, but few portray ladybugs realistically, which was my goal with this craft. Affiliate links below. 


Ladybug Magnifying Glass Craft


Materials:


Steps:


Punch a 2" circle from black cardstock to make the base of the magnifying glass. Cut a long narrow rectangle for the handle. 

Cut a blue background into your desired size. (Mine is approximately 4" x 6".) Punch a 1.5" circle from the scraps. 

Punch a 1.5" circle from the green cardstock, then snip off the top and bottom. Cut the scraps into blades of grass. 


Cut three ladybug shapes from red cardstock. One should be about the same width as the green partial circle above, and the other two should be much smaller. 

Use a reference photo to draw the black details onto the ladybugs, using a Sharpie. Then add the white details with the gel pen. 


Now it's time to assemble. Glue the grass to the bottom of your background paper, making sure there's a long blade in the center. Then add the magnifying glass and handle. I tucked the magnifying glass under a few blades of grass and over some others. 


Center the blue circle onto the magnifying glass and glue it in place. 


Add the partial green circle, orienting it so that it looks like a magnified blade of grass. Glue the largest ladybug onto it, then drag its six legs. Glue the other two ladybugs to blades of grass that aren't being magnified. 


I had a lot of fun putting this together. Yea, ladybugs!

3/1/21

Our State Beverage

The title of this post might be a bit misleading, if you interpreted "our" to mean California. While we Californians have many state symbols of which to be proud, we do not have a state beverage. This puts us in the minority, as 28 of the 50 states have named an official state beverage. Of those 28, there are 20 states which have designated milk as their state beverage. 

I discovered this while researching North Dakota in an attempt to finally fulfill my 2019 goal of creating at least two kid-friendly crafts inspired by each of the fifty states. North Dakota elevated milk to state symbol status in 1983, so I made a milk craft. 


This craft is equally suitable for those of you in Arkansas, Delaware, Kentucky, Louisiana, Maryland, Minnesota, Mississippi, Nebraska, New York, North Carolina, Oklahoma, Oregon, Pennsylvania, South Carolina, South Dakota, Tennessee, Vermont, Virginia, and Wisconsin. 

And with the completion of this craft, I'm thrilled to announce that I have now officially met my goal of two crafts per state! In fact, I just counted up the state-inspired tutorials and discovered I have an average of 4.3 crafts per state, with Hawaii (14), Louisiana (11), and Alaska (8) having the most. Affiliate links below. 

---------

Our State Beverage: Milk


Materials: 


Steps: 

Fill a clear glass with milk and observe it from the side. Notice how the milk has a slight curve at the surface? This is called a meniscus. To make your milk craft look dimensional, you'll be mimicking the curve of the meniscus when you cut out the cardstock and vellum. 

Use the vellum to cut out a glass with a concave top that is similar to that of your actual glass of milk. Then cut out a piece of vellum that matches that same curve on the top and the bottom, as shown below. I cut my pieces freehand, but it is much easier to cut a template and trace it to get a consistent curve. 

Next, cut white cardstock to make a column of milk that is slightly smaller than the vellum glass. It doesn't need to have a concave top (but it can). Cut out the top piece, trying to match the curves of the vellum. (Again, a template would help. Mine aren't as even as they could/should be.)


Use your finger to run a tiny bit of glue along the convex edge of the larger vellum piece, then adhere the smaller piece, making sure the overlap is both even and as small as possible. Now glue the larger piece of white cardstock to the vellum and the smaller piece of white cardstock on top of that. Glue the glass of milk to the background paper, taking care to put the glue only in places where the cardstock overlaps the vellum so that the glue is hidden. 

Use the pen to title your background paper. Then write the text:
Milk is packed with nutrients, including: protein (which builds muscle); calcium, vitamin D, and phosphorus (important for strong bones); riboflavin, B-12, niacin, and panthothenic acid (crucial for energy and brain function); and vitamin A (which benefits vision, internal organs, and the immune system). 

---------

You might be wondering about the other state beverages. Ohio was actually the first to designate a state beverage back in 1965, when it bestowed the honor on tomato juice. 


Follow the same directions as making the milk project, but substitute red cardstock for white. For the text, write: 
Tomato juice is a great source of nutrients, such as vitamin C, B vitamins, and potassium. It's an excellent source of antioxidants, including lycopene, thought to reduce inflammation and lower the risk of heart disease and some cancers. 

---------

Floridians, your state beverage is orange juice - no surprise there! It became official in 1967, the second state to name an official beverage. 


Again, follow the same directions, replacing the white cardstock with orange. For the text, write: 
Orange juice isn't just delicious! It's packed with important nutrients, including vitamin C, folate, and potassium. It's high in antioxidants. Orange juice may prevent kidney stones, decrease inflammation, and improve heart health!
---------

Massachusetts was the third state to designate an official state beverage, honoring cranberry juice. I love cranberry juice!


Follow the same directions as above, substituting a dark red for the white cardstock. For the text, write: 
Cranberry juice is a great source of vitamin C, vitamin E, and other antioxidants. It may help with digestion, reduce inflammation, and prevent bacterial growth in the stomach and urinary tract. Plus, it is absolutely delicious! 
---------

Arizonans, it's your turn! You've had a state beverage, lemonade, since 2019. 


Substitute yellow cardstock for the white in the directions above. For the text, write:
There's nothing quite as refreshing as a glass of ice cold lemonade on a hot summer day. With just three simple ingredients, it's easy to make a delicious glass to enjoy!

---------

The most detail-oriented among you may have noticed that I've accounted for 24 of the 28 states with state beverages. I left out Alabama, as they selected an alcoholic beverage, which is not the best choice for a kids' craft. As for the others, I'll probably make an apple cider craft for New Hampshire eventually, but I think that belongs in a mug, not represented in vellum. I've never had Maine's Moxie nor Rhode Island's coffee milk. For the record, four of the states who named milk as their state beverage also have a second state drink. Check out the full list of state beverages - it's very interesting!

6/4/18

Delaware

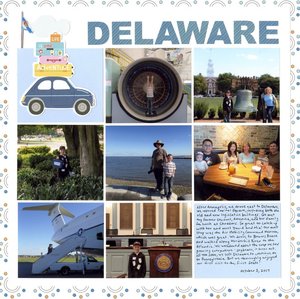
I'm determined to scrap our epic East Coast trip from last October before our upcoming epic Midwest trip this summer. I've already shared New Jersey. Today, Delaware. Of the four states we visited, we spent the least time in Delaware and thus did the fewest things. Despite that, it was still a challenge to limit myself to just 7 photos representing all the fun places we went. Actually, there are 8 photos, if you count the state flag that I fussy-cut and added at the top left!

Delaware (affiliate link)

I love how the page turned out. I'm giving myself six weeks to finish up pages for Maryland and Pennsylvania, the two states where we spent the most time and covered the broadest range of activities. Narrowing down those photos is going to be a major challenge. Wish me luck!

12/5/17

Exploring Delaware Through Little Passports

Our family thoroughly enjoyed our trip to Delaware in October. How fun to see some of the same things as we did a virtual exploration of the First State through Little Passports! And, as always, we learned a lot of things we didn't already know. I'm constantly amazed that, despite teaching about the 50 states and grading 32 state reports a year for 11 years, I still learn something new from Little Passports every single time!

We started our study of Delaware by building a catapult, inspired by the World Championship Punkin Chunkin competition held near Bridgeville. We did a logic puzzle to learn fun facts about the state insect, the ladybug. Did you know there are approximately 5000 species of ladybugs? And that they can play dead when in danger? I didn't! Delaware's state marine animal is a horseshoe crab. A rebus activity taught us all about these 'living fossils' that haven't changed much during their 500 million year history. Fascinating!

Trevor made the recipe, Chicken and Slippery Dumplings, for dinner. 


It was SO good! And it was easy to make. 


We'll definitely be including this one in our regular dinner rotation. Yum!


The next day, we finished up the rest of the Delaware activities. We solved a math-based puzzle to learn about the mile-long NASCAR racetrack in Dover called the 'Monster Mile.' Next was an activity about the 13 original colonies and Delaware's pride in being the first to sign the Constitution. This was familiar to Trevor because I taught it to his 5th grade class last year. We read about famous events in Delaware's history and followed grain through the Oliver Evans Mill, invented in 1784 as the first automated flour mill. We followed the step-by-step instructions to draw a C-5A Galaxy plane, which we saw in person during our visit to the Air Mobility Command Museum! We did a cross-out activity to decode Delaware's state motto. 

Finally, we did a neat art project, inspired by the beautiful beaches of Delaware. Their project was called Sand Art Bottles, but we used a different material. Can you tell what it is?


Sugar Sprinkles Art Bottles


Materials:

  • small transparent bottle or jar with lid
  • sugar sprinkles in various colors
  • funnel

Steps:


Wash and thoroughly dry the container. Place the funnel in the container and pour a layer of sugar sprinkles in. Repeat with another color, tilting the funnel to create variation.


Keep adding layers. There's no right or wrong!


When the container is full, remove the funnel and add the cap. Admire your work for as long as you want, then use it to decorate cookies or cupcakes! It's lots of fun to see what colors fall first as you pour or shake the sprinkles onto a treat. 

Thanks to Little Passports for another fun and educational virtual voyage!

11/24/17

50 States Album Update: MD, DE, PA

We visited three new-to-Trevor states last month, so there are three new pages in his 50 States Album. He put a lot of thought into which pictures to use to represent his visits to each state, as well as how to summarize what we did. 


This brings Trevor's state count to 22! You can see the updated map of where we've been as well as the rest of the pages in his 50 State Album on my US Travel page. You'll also find links to travel recommendations, crafts, science experiments, and more inspired by each of the states.

1/30/15

Twisteezwire Critters

I was browsing the Twisteezwire website while writing up my review of their Mask Kit when their Puzzle Piece Bug tutorial caught my eye. I'm always on the lookout for fun crafts using puzzle pieces! (You may recall the ridiculous situation with a puzzle purchase awhile back that resulted in me having a large stash of useless puzzle pieces.) I showed the tutorial to Trevor and he was totally onboard with the idea of making puzzle piece Twisteezwire bugs. 

We each started by choosing a puzzle piece and a Twisteezwire. We followed the steps to make three sets of legs to create a basic insect. We continued with the antenna. Then we used Glue Dots to attach googly eyes. With the basic technique mastered, we were able to use our own creativity to make some totally cute (if I do say so myself!) critters. Introducing....
  

Dot, the Ladybug
(by Cindy)


To make Dot, you need a red puzzle piece, 3 Twisteezwires (red, black, and white), six red beads, two googly eyes, glue dots, six black sequins, glue, and wax paper. Make a basic bug with the puzzle piece, red legs, and black antenna. Slide a bead about 1/2 inch up each leg and twist to secure. Add eyes. Create wings by looping the white wire, sliding it through a set of legs on the underside of Dot, then forming another loop. Tear two small pieces of wax paper that are slightly larger than the loops. Put glue on the back of the loops, then attach the wax paper. Let the glue dry completely, then trim the excess wax paper away from the loops. Glue the sequins to Dot's back.


Buggy, the Bug
(by Trevor)


To make Buggy, you need an orange puzzle piece, two Twisteezwires (green and orange), six orange buttons, two googly eyes, and glue dots. Make a basic bug with oversize antenna. Thread each leg through the button holes, then twist to secure. Add eyes.


Chesapeake, the Blue Crab
(by Cindy)


To make Chesapeake, you need a neutral-colored puzzle piece, Twisteezwire (blue and black), eight blue beads, two black beads, glue dots and googly eyes. Start by making a basic bug. Add a bead to each of the middle and back legs, twisting to secure. Add two beads each to the front two legs to form claws. Cut a small length of black wire for the eye stalks and attach like you would antenna. Glue googly eyes in place.


Spinner, the Spider
(by Trevor)


To make Spinner, you need a neutral puzzle piece, tan Twisteezwire, a large black pom pom, a medium black pom pom, glue, glue dots, and googly eyes. Begin by cutting the tan Twisteezwire into fourths, not thirds like usual. Attach the first three sets of legs as usual, and add the final set of legs opposite the third set, using the same technique. Bend up the end of each leg slightly to allow Spinner to balance. Glue the large pom pom onto the back of the puzzle piece and the medium pom pom onto the front. Use glue dots to attach the googly eyes to the face.

........

What do you think? Any favorites? Trevor is already talking about the next set of critters we're going to make!