Showing posts with label Florida. Show all posts

10/21/24

50 State Quarters: Coloring Pages Using Crayola Crayons

I've finished four more 50 State Quarter coloring pages: Vermont, Maryland, South Dakota, and Florida. I went back to basics, as these are all done with Crayola crayons.


There's something relaxing and fun about coloring with crayons (good quality crayons, that is), but crayons are not the best choice for these specific coloring pages. It is really difficult to get into the small spaces, particularly the letters. Crayons don't blend well, so I struggled with trying to use the limited colors I have to create textures and shadows.  

Curious to see how other art materials have behaved on these coloring pages? So far, I've used: 
 It's been so interesting trying out different materials. I have some clear favorites, but I'm going to wait until I finish all 50 coloring pages before ranking my choices. It feels like I've been working on this for a long time (because I have) and I'm not even halfway through!

4/13/22

More Nests: Northern Mockingbird, Western Meadowlark, and Baltimore Oriole

I liked the American Robin nest craft so much I made three more! To make your own, follow the directions for the robin nest, with the following small modifications. 

---------

You will need a 13/16" template for the eggs of the Northern Mockingbird. Paint them a very pale greenish to bluish grey. When the paint is dry, use a stiff brush to pounce a bit of cinnamon colored paint on the eggs. The blotches should be very light at the pointy end and heavier on the rounded end.  

The Northern Mockingbird is the state bird of Arkansas, Florida, Mississippi, Tennessee, and Texas. 
 

---------


You will need a 1-3/16" template for the eggs of the Western Meadowlark. Paint them a creamy off-white. When the paint is dry, put brown paint on a stiff brush, then run your thumb across the bristles to splatter the brown paint onto the eggs. (Do this somewhere that brown paint splatters won't matter.) The splatters should be a bit heavier toward the rounded end. 

The Western Meadowlark is the state bird of Kansas, Montana, Nebraska, North Dakota, Oregon, and Wyoming. 


---------


You will need a 5/8" template for the eggs of the Baltimore Oriole. Paint the eggs a very pale grey. When the paint is dry, use a sharp brown colored pencil to draw squiggles onto the eggs as shown. The squiggly lines are more concentrated toward the rounded end. 

The Baltimore Oriole is the state bird of Maryland. 


---------

While doing my research on state birds, I came across an awesome shop that sells State Pride t-shirts that feature birds (affiliate link). That link goes to my state bird, the California Quail. I chose random states for each of the four birds' nests I made to feature below; if you don't see your state, follow this link to check yours out!


10/18/21

Coloring State Butterflies

Fun fact: 48 of the 50 states have an official state insect. (The two that don't are Iowa and Michigan.) Some states have named more than one state insect, where others have multiple categories of insects. For example, Alabama has a state insect, a state agricultural insect, and a state butterfly. (Oddly, their state insect is a butterfly, but they named a different butterfly as their state butterfly.) Delaware has a state bug, a state butterfly, and a state macroinvertebrate. Tennessee has the most, having designated two official state insects, a state agricultural insect, and a state butterfly.  

It's the butterflies that I'm focusing on today. 

There are 29 states with either a state butterfly or state insect that's a butterfly. Seven are monarchs, and one is a Mullerian mimic to a monarch. I've made a couple of monarch crafts fairly recently, so I wanted to focus on some of the other state butterflies. And, of course, I've been working obsessively with colored pencils lately, so that's what I used. 

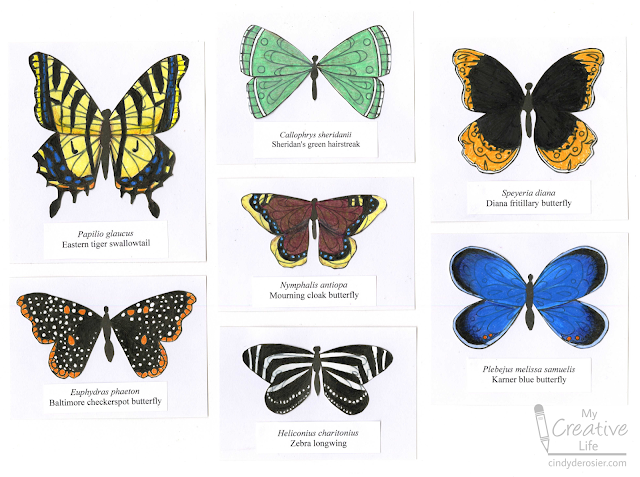
Here are the seven butterflies I made, representing: Alabama, Delaware, Georgia, North Carolina, South Carolina, and Virginia (Eastern tiger swallowtail); Arkansas (Diana fritillary butterfly); Florida (Zebra longwing); Maryland (Batimore checkerspot butterfly); Montana (Mourning cloak butterfly); New Hampshire (Karner blue butterfly); and Wyoming (Sheridan's green hairstreak). 


In retrospect, I made things WAY harder for myself than necessary. Rather than drawing the butterflies myself, or printing out line drawings, I used a black pen to alter an existing coloring page from a Leisure Arts coloring book (affiliate link). I went through all the state butterflies and the seven drawings on the coloring page to decide which images would work for which butterflies. Then I started blacking in the changes. It was very tedious and took much (MUCH) longer than drawing them would have. Not to mention, I was left with lines from the original designs that didn't belong. Nevertheless, I pushed on. 

Here you can see that I've begun altering the butterfly on the bottom right of the page. I'd originally started to change it into an Oregon swallowtail (which is why you see "Oregon" written above it) but I ended up making the similar Eastern tiger swallowtail. You can see in my notes that I planned to turn the butterfly directly above the sentiment into "Arkansas or Colorado." I went with Arkansas' Diana fritillary butterfly. 


Here are each of the butterflies fully colored, along with my notes. You can also see a few places where I swatched my colored pencils. 


The next step was fussy-cutting all the butterflies. That took awhile, too. 


Finally, I mounted each butterfly on white cardstock and added a typed label with the scientific name and the common name. I love the way the butterflies all look together. 


This was a challenging project that taught me a lot. Someday I might redo these (drawing them by hand instead of starting with lines that shouldn't be there) and adding in the remaining state butterflies. But it's not going to be anytime soon. I'm officially taking a butterfly break. 

3/9/20

Palmetto Fork Painting

Until I did the Farmhouse Pumpkins, I'd never painted with a knife. To paint this palmetto, I used a fork. That was another first. 


Before I share the tutorial, an explanation. One of my (ridiculously over-ambitious) goals for 2019 was to design new crafts so there were at least two on my site inspired by each of the 50 states. I made progress, but didn't achieve the goal, so I am continuing to work on it. After sharing my tissue paper cardinal craft, I made a chart with all the states in alphabetical order, went through each of my 50 states pages and counted how many craft suggestions I had for each state, then marked off each state with at least two. 


That left me with 18 states. Of those, 17 states have one craft already and only Montana has none. I did some research to see if there were any interesting state trees, flowers, or birds that inspired me to create. Indeed there were. I started with the palmetto, the state tree of both South Carolina and Florida. 

I had the idea to use a fork to paint my palmetto leaves after looking at South Carolina's state flag. Make your own to see how fun fork painting actually is. You'll need paper, Folk Art acrylic paint, and a plastic fork. And a paintbrush for the rest of the painting.

---------


Palmetto Fork Painting


Use the brush to paint a tree trunk in a medium brown. Add a darker brown shadow on the right side of the trunk. With one tine of the fork, add bootjacks onto the trunk - medium brown on the left and dark brown on the right. 

Make a puddle of medium green paint on your palette and dip the fork into it. Stamp the fork onto the paper, turning to make fronds in all directions. 


Use a lighter shade of green to add highlights primarily to the left side of the fronds. With a darker green, add shadows to the right side of the fronds. 


Return to the paintbrush. Water down a light blue and use horizontal strokes to paint the sky. Use a watered down medium brown to make the ground. 


10/18/19

Greater-Than Less-Than Craft Stick Alligator

Chances are, you were taught which way the greater-than and less-than symbols face by imagining them like an alligator's mouth. The hungry alligator wants to eat the larger number, so his mouth should open that direction. This craft stick alligator, complete with moveable jaws, is great fun to pair with a greater-than less-than math lesson. Affiliate links below.


Greater-Than Less-Than Craft Stick Alligator


Materials:


Steps:


Drill holes in the craft sticks. I used my beloved Craft Drill; in a classroom setting, I'd probably pre-drill the holes. Or, I'd have a parent monitor a drilling station. 

Paint the sticks and the brad green. Set them aside to dry. 

Use scissors or a punch to cut a green circle. Then cut two rows of white teeth. 


When the paint is dry, use the brad to connect the two craft sticks. The brad should be tight, but no so tight that you can't open and close the jaws easily. 

Cut the green circle into two uneven parts. The larger will be the eye and the smaller is the nose. 


Glue both green pieces into place. Add the googly eye, then use the black pen to draw nostrils on the nose. Glue the teeth in place.  


Use the alligator to help you solve greater-than and less-than projects, or make it as part of a reptile study. The alligator is the State Reptile of Florida, Louisiana, and Mississippi, so if you live there, that's another good reason to try this craft! 


10/21/16

Exploring Florida with Little Passports

Time to share another of our adventures learning about the US through Little Passports! This time, it's Florida.

We jumped right into the science experiment first. This State Journal had three easy experiments based on the three laws of motion. It tied in perfectly with the activity on the previous page about the Kennedy Space Center. The first experiment proves the First Law of Motion, that objects at rest stay at rest unless acted on by an outside force. By raising one end of a piece of cardboard, the tennis ball that had previously been still began to move because of the force of gravity.


To understand the Second Law of Motion, flick a basketball and a tennis ball with the same amount of force. You'll see that the acceleration (movement) of an object is determined by the mass of the object and the force applied to it.  


To prove the Third Law of Motion, thread a straw on a piece of string and then tie it between two high-backed chairs. Blow up a balloon and pinch its end, then tape one side to the straw. When the air is released, the force pushes against the balloon, causing it to move in the opposite direction. For every action, there is an equal and opposite reaction!


You may have noticed that we've been doing quite a bit of science for Little Passports: the disappearing eggshell experiment, the homemade catapult, the water glass xylophone, and all of the science experiments from each State Journal. That's because Little Passports is publicizing their new Science Expeditions Subscription (affiliate link). It looks incredible. I haven't seen it in person yet, but if it's anything like the quality of other Little Passports materials, which I'm sure it is, I guarantee you'll love it!

After completing the Florida-inspired science, we moved on to the rest of the activities. We counted fish on the Deep Sea Fishing page and learned about Florida's beaches. We read about Florida's history and learned about food chains in the Everglades. Trevor did the manatee dot-to-dot. We learned about famous Floridians and Trevor tried pronouncing all the words on the 'Hablas Español?' page. My Spanish is VERY rusty, but I did know all the words. 

Next, we followed the directions to weave baskets inspired by the Seminole tribe.


The basket turned out great, and so did the rocket model!


To conclude his Florida adventures, Trevor made us Cuban Sandwiches for dinner. Bread, mustard, pickles, ham and cheese...


... pressed, buttered and fried. 


Absolutely delicious! 


Another really fun adventure with Little Passports! 

1/29/15

Little Passports 50 States Album - Update

Aunt Teri renewed Trevor's subscription to Little Passports for Christmas (hurray!). I'd already decided that if she didn't, we would. It's so much fun. Trevor loves it. Me too. He's had the subscription for just over a year now, which means he's about halfway through the 50 states (2 states per month). The Florida packet arrived recently, which meant he was able to complete another page in his 50 States Album!


During our epic Canada and New England trip last fall, Trevor visited four states for the first time (Maine, Massachusetts, New York and New Jersey), bringing the total number of states he's visited to 11. Not bad for 8 years old! Of the four new states, he's received the Little Passports kit for three of them so far. As you can see, he is doing his own journaling now.


We're planning a summer visit to see friends that will take us to two more states. Both are states Trevor has already learned about through Little Passports, so he is especially excited. Stay tuned!


1/20/14

Draw Along with Trevor

The other day, Trevor came home from school all excited to teach me a drawing project he learned. He did such a good job teaching me that I asked him to do it again for the camera.  


Grab a black pen and a sheet of white paper and draw along with Trevor!


Pretty neat, huh? I've seen a number of this style of draw along, but I don't think I'd seen that actual one before. Trevor thinks it's the best thing ever. I tried to convince him that Fred and Bob should be touching the forest path so that they're not just hanging in mid-air afterward and instead look like teeth, but that's not the way the teacher showed him. In Trevor's mind, the teacher is ALWAYS right. There are pros and cons to that.

Here is one that Trevor drew and colored in. It's hanging on our art wall.


I should encourage Trevor to make up a rabbit draw along ... we're already starting to brainstorm projects for this year's Bunny Week and that would be a fun addition.