Showing posts with label Project Penguin. Show all posts

12/11/15

Project Penguin #10: Perler Bead Winter Art

Hello! Trevor again. Welcome back to the last day of Project Penguin! Today we are making Perler bead winter art. I made a penguin who is dressed as Santa.


My mom made a bunny wearing a scarf.


Materials: Perler bead supplies, an iron

Come up with your own idea to make a Perler bead project that has something to do with winter. Then iron it. Make sure you have an adult to help you if you need it. Photograph it and link it below for a chance to win!

Thanks for playing along with Project Penguin. Remember, you have until January 3 to submit all of your Project Penguin crafts. I will have another post announcing the prize winners on January 4, so make sure you enter. I will have a random winner and a winner that I have chosen. Good luck!


12/10/15

Project Penguin #9: Midnight Snow Scene

Hello! Welcome back to Project Penguin! Trevor again. Today we are making midnight snow scenes.


Materials: black construction paper, white crayon

Today's project is super easy. All you need to do is draw on the black paper with the white crayon! You could draw a Christmas tree, a full moon, a snowman, a North Pole sign, presents, a cabin, a sleigh or reindeer. Those are the things that we made, but you can make whatever you want.

My art is at the top. This is my mom's:


Now it's your turn! Make a midnight snow scene or something inspired by it by January 3 for a chance to win.


12/9/15

Project Penguin #8: Quilled Holly Gift Tags

Hello! This is Trevor again! Welcome back to Project Penguin. Today we are making quilled holly gift tags! 


Materials: strips of red and green copy paper (construction paper and cardstock are too thick), glue, quilling tool (or a toothpick works, too!), white cardstock, pen


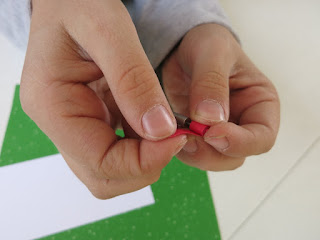
Use the quilling tool (or toothpick) to quill the red paper into a tight circle. 


Add glue to the end and attach it. Hold it for about 10 seconds, then slide it off the quilling tool.


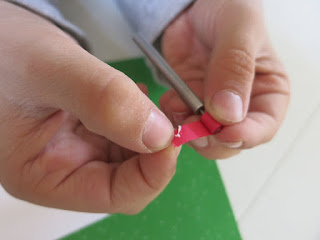
Make two more tight circles. These are the berries for the holly. Put a green strip of paper on the quilling tool and quill it, but don't hold as tightly as you did for the red. 

 
Release the circle before you glue it together. Add glue to the end and press it together. Hold for 10 seconds. Use your hand to pinch together the center of the circle.


While still pinching, use your other hand to squeeze one side and push it toward the middle. Repeat with the other side.


It should a little bit like this:
 
Write 'to' and 'from' on the white cardstock. Glue the holly and the berries onto the cardstock and it is done! Mine is at the top of the post. Here's another look from a different angle.

This is my mom's. You can make yours vertical (like mine) or horizontal (like my mom's). 


You can punch a hole to add or a string or just tape it on a gift. 

Now it's your turn! Make a quilled holly gift tag like mine or inspired by mine and link it below by January 3 for a chance to win.


12/8/15

Project Penguin #7 : Candy Cane Soft Pretzels

Hello! This is Trevor again. Today for Project Penguin we are making candy cane soft pretzels!


I invited a friend over and we made it together. Here we are kneading the dough.


Now, we are dividing the dough.


Here we are shaping the dough.


When all the dough was shaped, we used food coloring mixed with egg to paint the stripes on the candy cane.


Here are all the pretzels, ready for the oven!


Here's the recipe so you can make your own.


Soft Pretzels


                                                1 pkg yeast                           1.5 tsp. sugar
                                                1.5 c. water                          4 c. flour
                                                3/4 tsp. salt                          1 egg
                                                red food color

Heat water to approximately 110˚F and add yeast. Stir until dissolved. Add salt, sugar, and flour, then stir to combine. Knead until the dough is smooth and elastic (approximately 10 minutes). Divide the dough into 24 equal pieces. Roll each piece into a pencil-shaped roll, approximately 12 inches long. Split the roll in half, then twist the two pieces together. Place the pretzel on an ungreased pan, curving the top to form the crook of the candy cane. Beat the egg, then add a small amount of red food color. When the egg is the shade you want, use a food-safe paintbrush to paint the egg on every other stripe of the candy cane. Sprinkle lightly with salt (optional). Bake at 400˚F for 12 to 15 minutes.

----------

Now it's your turn! Make candy cane soft pretzels or something inspired by them for a chance to win. Take a photo and link it below by January 3.

12/7/15

Project Penguin #6: Stuffed Christmas Tree

Hello! This is Trevor again. Welcome back to Project Penguin! Today we will be making a stuffed Christmas tree.


Materials: green felt cut in the shape of trees (2), green thread, needle, fiberfill (or you can use cotton balls), star, Stickles (or sequins or whatever else you want to use to decorate)


1. Sew the tree together using a whip stitch. Start at the area where the trunk and tree meet, then sew all the way around the top to where the other area of where the trunk and tree meet. Do not sew the trunk together!


2. Stuff the tree with fiberfill. Sew the trunk together once you have a good amount of fiberfill in your tree.

3. Now decorate your tree with a star and Stickles or anything else you'd like to use. 


That's my tree above. This one below is my mom's. Before step 1, she sewed lines of gold thread on the front tree. 
 
Now it's your turn! Create a stuffed Christmas tree or something inspired by this for a chance to win. Take a photo, then link it below by January 3. 


12/4/15

Project Penguin #5: Hot Cocoa Art

Hello! This is Trevor again. Welcome back to Project Penguin. Today we will be making a hot cocoa craft.


Materials: paper, scissors, glue, snowflake stickers, felt, cotton balls

1. Cut out these shapes. You can use any color for the mug and handle, but the cocoa should be brown.

 
2. Choose a background. You need a background and a foreground. I chose that my foreground would be a wooden table. Glue the foreground on top of the background. Move the mug until about half of it is off the foreground. Glue.

 
3. Cut a snowflake sticker in half. Unstick it and attach it onto the mug.

 
4. Make marshmallows out of felt and glue them onto the cocoa. Pull a wisp out of a cotton ball to look like steam. Glue them in place.

Mine is at the top. This is my mom's:


Now it's your turn! Make a hot cocoa craft or something inspired by my hot cocoa craft for a chance to win. Take a picture, then link it below before January 3.


12/3/15

Project Penguin #4: Sticker-Resist Card

Hello! This is Trevor again with Project Penguin. Today we will be making sticker art. 


Materials: drawing paper, stickers, stamp, ink

1. Choose a message. Put the stickers that you need onto your shirt. Then peel them off and place them on the paper. We do that so that the stickers will come off the paper easier. 

2. Stamp the paper with your chosen stamp. Go over all of the letters and try to cover everywhere.


3. Peel off the letters. 


4. You can stop here, like I did at the top, or you can add more decoration like my mom did. She outlined her message to make it more clear, added berries to her stamp using Stickles, and put a background on it and made it into a card.

 
Now it's your turn! Make something like my sticker art or something inspired by it for a chance to win. Take a photo and link it below. You have until Sunday, January 3 at noon Pacific.  


12/2/15

Project Penguin #3 : Snowman Lunch

Hello! Welcome back to Project Penguin. This is Trevor. Today we will be making a tasty snowman lunch.


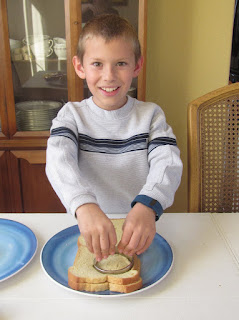
First, make a sandwich or two. Use circular cookie cutters to cut a large, medium, and small circle out of the bread.


Use food like raisins for eyes and buttons, pretzels for arms and fruit strips for the scarf.

 
 Here's what it looks like:
 
 Tasty!


Mom got to eat the crust.
 
Now it's your turn. Make a tasty snowman or something inspired by my snowman for a chance to win. Take a picture, put it in an online gallery, then link below. You have until January 3 to enter.


12/1/15

Project Penguin #2: Our Mascot, Pengy

Hello and welcome back! This is Trevor. Today we will be making our Project Penguin mascot, Pengy!


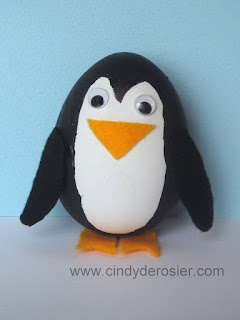
Materials: wood or plastic egg (or a real egg!), black paint, glue, felt (black and orange), scissors, googly eyes

Step 1: Paint your penguin black, like this:


Step 2: Glue googly eyes to the eye areas. 

Step 3: Cut out orange felt in the shape of a triangle and glue that in place as a beak. Cut out two black ovals. Glue just the tops to make the flippers. Cut out orange feet that look like duck feet and glue them on the bottom.

Now it's your turn! Make Pengy or your own mascot inspired by Pengy. You have until January 3 to enter.


11/30/15

Project Penguin #1: Christmas Tree Name Art

Hello! This is Trevor. In August, some of you participated in Project CAT (Crafting in August with Trevor), a summer craft challenge for kids. I'm back for a winter version! It's called Project Penguin. It is a crafting challenge for kids that starts today. I will give you ten challenges between November 30 and December 11. Then you have until Sunday, January 3 to make that craft or something inspired by my craft. Then post it as a picture on the blog. There will be two winners. I will choose one winner and one winner will be random. Both will get prizes.

Our first project is Christmas Tree Name Art.


Materials: paper, pencil, crayons

Step 1: Fold your paper in half lengthwise. 

Step 2: Write your name in cursive using a pencil, with each letter slightly smaller than the one before it. If you have a letter that drops down, like the Y in Cindy, make the tail go to the right. Trace the pencil line with green crayon. Press down hard.


Step 3: Fold the paper back in half and scratch to transfer the crayon to the other side. It will be light. If you can't see it, go back and add more green crayon to your name, then press again. 


Step 4: Trace your transferred name with green crayon.


Step 5: Make your name thicker. 


Step 6: Turn your paper so that the first letter of your name is at the bottom and the last letter is at the top. It should look like a tree!


Step 7: Decorate it with a star and lights. Color the trunk brown. This is my mom's. Mine is at the top.


Now it's your turn! Make Name Art like my project or inspired by my project. Then take a picture of your project and link it below. You have until Sunday, January 3 at noon Pacific. 
---

A note to parents from Cindy: In order to submit the photo, you need to upload it to somewhere you can link. I recommend creating a free Flikr account for your child's artwork.