Showing posts with label lid. Show all posts

8/28/23

Plastic Lid Flower, Made with Apple Barrel Paint Pens

 I've been playing with the new Apple Barrel paint pens!


I'm a Plaid Ambassador, which means I get to try out all sorts of new goodies from one of my favorite companies ever! Affiliate links here and throughout the post. 

I received two sets of Apple Barrel fine-tip paint pens (the Basic colors and the Neon set). According to the package, they're intended for use on fabric, wood, paper, glass, rock, metal, and much more. I decided to swatch my colors on three surfaces: newspaper, a plastic lid, and aluminum foil. The colors were beautiful on all the surfaces and the coverage was excellent. 


Here are some swatches with the neon colors. Fabulous!


After I took that photo, I ran my finger across all of the swatches to see how well they dried on each surface. I'm happy to report that they were all perfect! No smearing, nothing. 

But that was with a few minutes of drying time. What would happen if I made dots in quick succession, allowed no drying time, and then rubbed my finger through them? This: 


By the time I made the 8th dot (purple), the first five dots were completely dry and did not smear when I rubbed them. Impressive! Green, which was the 6th dot, was dry on the outside but not in the inside in just the time it took for me to make blue and purple dots. Not bad at all! I didn't expect the paint to set as quickly as it did. 

Time to move on to my project. I grabbed a random plastic lid (because craft bloggers hoard plastic lids in their craft rooms) and taped the lid over this pattern by Bella Savoy. And then I started dotting. 


Dot, dot, dot, dot... I had intended to fill in the whole design, but changed my mind and stopped at this point. Such a cute flower!


I flipped the lid over and colored the back of the flower and leaves with a white paint pen. This really helped the colors pop. Then I colored around the outline with sky blue. I used microtip scissors to cut out the shape, leaving me with this: 


Not bad for a plastic lid! I love trash-to-treasure projects like this. And I love the Apple Barrel Paint Pens. I used them for a second project right away; I'll share that tomorrow.

6/26/23

What to Do with Dried Acrylic Paint - Make a Coaster!

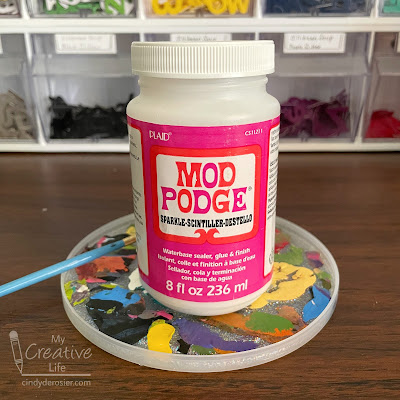
This is a coaster that lives in the craft room. I use it for normal coaster purposes (i.e. drinks), but also as a place to set a paint or glue bottle, a paintbrush, or other messy items. Affiliate links below. 


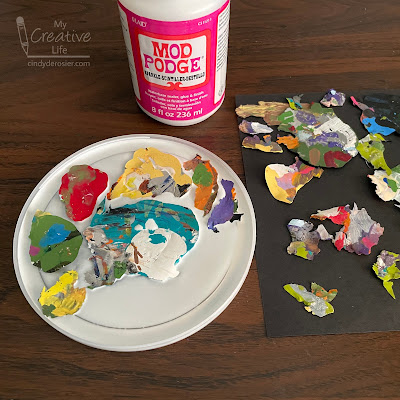
When it gets full, I don't wash it. I peel it. After the paint dries completely, it peels off in colorful chunks. It's extremely satisfying to see the pretty colors on the underside. 


To make my coaster, I took an old plastic lid (off an oatmeal container) and filled it with a generous layer of Mod Podge Sparkle. I started arranging my paint bits in the Mod Podge. 


This is how it looked when I'd filled it in completely. Well, almost completely. I wanted the sparkly Mod Podge to show between the paint pieces. 


It took two full days to dry in a warm room before it was ready to use. I thought about adding a top coat of Mod Podge to seal it in and level the surface, but decided against it. The surface is almost perfectly level (good enough for my purposes) and I don't care if any drips of paint might get on the surface. 

Look at all the sparkle!


I love a functional trash-to-treasure project. Mine lives in the craft room like I said, but it could just as easily solve a problem in a different room. It would make a good plant saucer, for example. You could set condiment bottles on it at a BBQ so that mustard doesn't drip on your table. Lots of possibilities!

4/14/22

Snorkeling Egg

 I made this snorkeling egg guy. And I photographed it. 


But it's not my original idea. This is another of those projects we'd featured at Fun Family Crafts, then the creator deleted their website, leaving us with a link to nothing. It's so frustrating. This craft is all over Pinterest as Dye-ving Dudes, but the materials list and steps to make it are gone. 


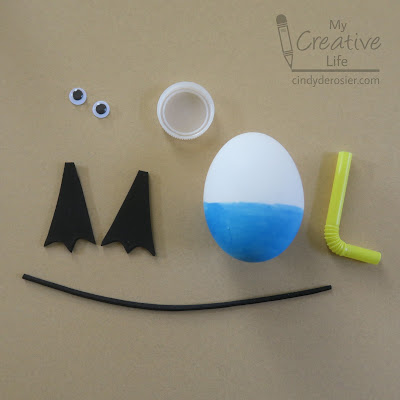
That original photo provides some clues to the materials. It's obvious that the snorkel is a bendy straw. Everything else I'm not 100% sure. It looks like the mask is a clear lid, but the strap looks like a rubber band. If the lid is indeed clear, the rubber band would show through, which it doesn't. It looks like the flippers might be a thick, white-core paper. And did they draw the pupils on with a Sharpie? I'm not sure. 

My version may not be exactly the same as the original, but that's perfectly OK. At least now one version of the instructions exist. Affiliate links below. 


Snorkeling Egg


Steps:


Bend the straw 90°, then trim the excess off both ends to make a snorkel. Set it aside. Cut two black flippers from black craft foam, then cut a thin strip of craft foam for the mask strap. 


Use a dot of craft glue on the FRONT of the googly eyes, then place them in the clear lid. Set it aside to dry. Put away the craft glue; you'll use hot glue for the rest of the project. 

Glue the lid to the egg to make the mask. Wrap the strip of craft foam around the egg. Trim it so that it just touches the edges of the lid. Glue it in place. Because it's such a thin area, I put a glob of hot glue onto my craft mat and then used a toothpick to dab it onto the foam before pressing it in place. 

Glue the straw to the front of the mask. This is a change I made from the original, which has the snorkel down by the swim shorts. I prefer it higher. 

Glue the flippers to the bottom of the egg. 

I experimented with different ways to make the egg stand up without toppling. The easiest was to put a glob of hot glue onto the craft mat and balancing the egg onto it as shown here. 


Let it sit for about a minute, then peel it up. Use scissors to trim away any glue that extends beyond the flippers. 

The lid I used wasn't crystal clear, so the mask has a bit of a foggy appearance. If you can find a perfectly clear lid, great. Use that. I don't mind that my mask is foggy, but if you feel like the eyes aren't visible enough, use a Sharpie to color them onto the outside of the mask, as shown below.  


I had a few more egg project ideas I wanted to share with you before Easter, but I'm going to have to save them for 2023. Trevor's Eagle project has been consuming most of my daylight hours this week. While he still has three merit badges to complete, a pile of paperwork to do, and a Board of Review to pass before he reaches the rank of Eagle Scout, Trevor's project is officially done. I'll tell you all about it tomorrow. 

4/28/21

Recycled Items Hot Air Balloon

I keep a jar of lids in the craft room because you never know when you'll need one. I was putting a metal lid from a cylinder of orange juice concentrate into the container when I realized the red plastic screw-on lid from a tub of mixed nuts would make an awesome hot air balloon. I dug out a few more recycled items and made this:


Every time I look at it, it makes me laugh. The idea of my parents taking their three grandkids on a hot air balloon ride is improbable enough, but the fact that I positioned the photo so that Allison would be visible makes me imagine the impossibly long legs everyone appears to have. The picture was actually taken indoors at my sister's house in December 2018, not in a hot air balloon. Everyone had just come in from the snowy backyard, which explains the jackets but not why Mom is wearing her fanny pack and Dad is clutching a cold drink protectively. 

The main supplies in today's craft all are recycled, if you can count a photo I printed but didn't end up using for the scrapbook as recycled. I'm counting it. Affiliate links below. 
 

Recycled Items Hot Air Balloon


Materials:


Steps:


Decorate the plastic lid with Sharpies and gel pens. Obviously, you can use whatever colors and patterns you want. 


Cut a piece of chipboard about the size of an index card. Use a score board to create the basket texture, first by scoring the chipboard in one direction, then rotating is 90° and scoring again. It's difficult to get precise lines when working against the existing score marks, but that actually makes the basket texture most realistic. 


Rub brown ink on the scored chipboard. The transformation is amazing!
 

Score the sides and bottom of the chipboard so that you can fold them to make a dimensional basket. Use microtip scissors to cut the photo, separating the people from the background. Glue the people to the basket.


Turn everything upside down. Assemble the basket by folding the bottom under and the sides back, then gluing them into place. Cut two lengths of single-strand embroidery floss and glue the middle of the strands to the bottom of the plastic lid. 

When that is dry, stretch the pieces of floss so they are taut. Glue two to the back of the photo and two to the basket. 


When everything is dry, add glue to the edges of the lid and the basket, then carefully turn it over and place it on the cardstock. Let it dry completely before hanging. 


Up, up, and away!

12/22/20

Recycled Lid Snow Globe Ornament

I blog about kids' crafts, which means I'm contractually obligated to save all cardboard tubes, empty containers, and plastic lids. You never know when they'll come in handy. Such was the case for this cute snow globe ornament. The clear plastic lid I used was originally on a container of mixed nuts.


Now that humble lid has a place on our Christmas tree. Affiliate links below. 


---------


Recycled Lid Snow Globe Ornament


Materials:


Steps: 


Put the plastic lid onto a piece of cardstock, then carefully trace around the outside of the lid. Draw a picture on the cardstock circle. (I used pens for the snowman and the trees, and colored pencil for the sky.) Cut out the circle. 

Cut a piece of cord to match the circumference of the plastic lid. Cut Then cut a trapezoid out of felt for the base of the snow globe. 

Pour some Diamond Dust into the lid, then cover the rim with Supertite. Place the drawing upside down onto the rim and press all the way around the edges to make sure it is completely sealed. Let the glue dry before moving your ornament.


Glue the cord around the circumference of the rim, placing it right on the edge where the lid and the drawing meet. This will help ensure that the Diamond Dust cannot escape. Glue the felt base to the back of the drawing. Cut a short piece of cord and glue it behind the top of the ornament to use as a hanger. 

Give your ornament a shake to create a snowy scene, just like a normal snow globe. Enjoy!

12/16/19

The Ultimate Christmas Recycling Craft

Steve thinks I have a problem. Specifically, he thinks that I "hoard trash." Clearly, he doesn't understand how important it is for a kids' craft blogger to have a large stash of cardboard tubes, corks, plastic lids, and empty Tic-Tac containers available for craft emergencies. Obviously, I don't have a problem. I have a perfectly normal collection of valuable crafting materials.

Yet, for someone who accuses me of "hoarding trash," Steve is my biggest enabler. He changed a burned-out light bulb the other day and asked me if I wanted it. Of course I did. Because otherwise, I couldn't have made this:


I'm assuming you spotted the light bulb right away, but can you find any other "trash" in there? Look closely! Did you spot an empty spool? A plastic lid? A Tic-Tac container? I used all of those and more in this project that I'm calling The Ultimate Christmas Recycling Craft. "Hoarding trash." To that I say, "Hogwash!" And anyway, I'm USING the trash important craft stash, not hoarding it.


To make my creation, I painted the light bulb with Classic Green Folk Art acrylic paint (affiliate link here and elsewhere). It took two coats to get good coverage. I added a coat of brown to the empty spool. When those were dry, I added self-adhesive enamel dots to the tree and glued a craft foam star in place. Then I attached the spool to the light bulb using Supertite. I'm a relatively new convert to Supertite. It has the holding power of hot glue, but is repositionable for much longer than hot glue and obviously doesn't have a cord or heating time. I always get it on my fingers though, so I probably should be using my Hot Glue Finger Caps with it, now that I think about it.... 

Anyway, here's a look at my workspace midway through the project. As you can see, my next step is gluing a scrap of felt to a plastic lid. It BARELY fit, but the whole point of my project was to use up stuff, not cut a new piece. 


Once I had my tree skirt, I glued the tree in place. I decorated the presents by wrapping ribbon scraps around them. Finally, I glued them under the tree. 


Clearly, I use recyclable materials cleverly, not "hoard trash." I challenge each of you to make your own version of The Ultimate Christmas Recycling Craft. It's a lot of fun!