Showing posts with label lollipop. Show all posts

2/9/22

Conversation Hearts Bouquet of Flowers

This bouquet of flowers takes yesterday's flower cupcakes one step further. They're so festive and would be just as fun for a springtime party as they are for Valentine's Day. Affiliate links below. 


Conversation Hearts Bouquet of Flowers


Materials:


Steps: 


Prepare your materials. For each flower, you will need four large hearts of the same color, plus one yellow Sweet Tart Heart. You will also need one lollipop stick. 

Prepare 4-5 Candy Melts, following the package instructions. Put a dollop of melted candy onto the parchment paper, then immediately press the four large hearts into it. They should be message-side down, with their points facing in. Place the Sweet Tart Heart on top. 

It took me awhile to figure out the right amount of melted candy. If you look closely at the orange flower, there is some candy showing between the petals. There's less on the yellow flower, but it's still an issue. The pink flower has the right amount - none is showing, but there's still enough at the top for the center candy to stick. The dollop on the right is the correct size. It should be close in size to the Sweet Tart Heart. 
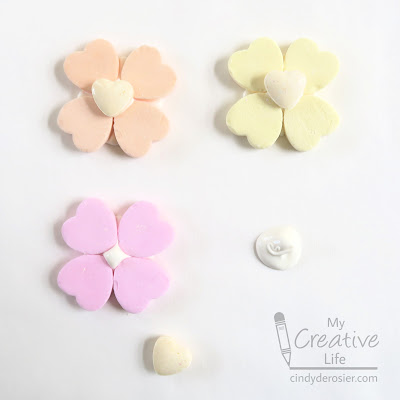

Let the candy harden (approximately 15 minutes), then gently peel it off the parchment paper. Place the flowers upside down on the parchment paper. Re-melt the candy, then add a generous dollop on top of the existing candy. Press the lollipop stick in the candy, then let it set completely. 


Fill a vase (or a drinking glass) with candy hearts, then nestle the flowers into them. You can make your bouquet as full as you'd like. 


In addition to looking great on a buffet table or as a centerpiece, his bouquet makes a wonderful Valentine's Day gift for someone special. 

11/16/21

Turkey Lollipop Cupcake Topper

Pumpkin pie is ok, but frankly I'd rather have a turkey lollipop in a cupcake as my Thanksgiving dessert. Affiliate links below. 


Steps: 


Put a sheet of parchment paper down on your workspace, then prepare the yellow and orange Candy Melts following the directions on the package. Spoon a quarter-sized dollop of orange Candy Melts onto the parchment paper, then add a nickel-sized dollop of yellow directly on top. Drag the toothpick through the candy to blend the colors and make the feathers. Repeat this process for each of the turkeys you'll be making. 


Prepare the rest of your supplies: unwrap the lollipops you'll be using, set out pairs of candy eyeballs, pick out pairs of red mini hearts, and use a sharp knife to cut the mini M&Ms in half (just press straight down, slowly and firmly).  Melt the Dark Cocoa candy melts according to the directions on the package. Dip a lollipop into the melted candy, turning to coat it on all sides. Place it on top of one of the turkey feathers, then place the the eyes, M&M (beak), and hearts (wattle) onto the face. The M&M should be sitting cut-side down and the two teeny hearts should be right up against each other without a gap. 

Repeat this for as many turkeys as you need. Let them set at room temperature for at least 15 minutes, then poke each lollipop turkey into a frosted cupcake. 


What about you? Would you rather have pumpkin pie or a turkey cupcake following the big meal? Or maybe both? Of course, you could pop these turkeys into slices of pumpkin pie or whatever else you're serving. Lots of possibilities!

12/31/20

New Year's Eve Cupcakes

I hadn't intended to return to blogging this soon, but I wanted to share the cupcakes I made for New Year's Eve using some fun items I received as Christmas gifts. Aren't they festive?! 


Among the gifts from my parents, I received this silicone number mold, treat sticks, and an 18-pack of LorAnn flavors (affiliate links here and throughout the post). I couldn't wait to try them out, and New Year's Eve seemed like as good a reason as any. 

I started by sprinkling a thin layer of sanding sugar into the mold. I used red and yellow. Since I'd never done this before, I started with just two numbers to see if it worked. (Spoiler: Yes!)


I prepped a bowl of white Candy Melts, then stirred in about 5 drops of LorAnn cherry. I spooned the melted candy into the mold, then added the sticks and rolled them to make sure they were coated on both sides. I let the candy sit for 10 minutes, then popped the numbers out of the mold. They had a bit of excess that I needed to trim off, but that was super easy to do with a sharp knife.  


I ate the trimmings, delighted that the cherry flavor was perfect. I can't wait to try the rest of my oils! My mom picked out some great flavors, very similar to what I would have chosen for myself. (If you have friends who bake, this makes a GREAT gift!) 

I made the other two numbers, frosted some cupcakes, then poked the lollipop sticks into the center. I added some gold sprinkles on top, letting them spill off onto the tray. So festive!


You can use the same idea for a graduation party, a birthday, or even a housewarming gift (with the address on the cupcakes). So many possibilities!

I hope you all have a safe New Year's Eve celebration tonight, whatever that may entail. It's going to be a quiet night at home for the three of us, with good food, games, and plenty of cupcakes.

11/30/18

Lollipop Snowman Spoon Craft

'Tis the season for snowmen! Not actual ones, as it's 60°F here in northern California. Snowman crafts. In this case, a spoon turned into a snowman.


He's hiding a lollipop. 


These make fun present toppers and they're really easy to do. There are affiliate links in materials list below; I will receive a small commission on any purchases you make, at no extra cost to you. 


---------


Lollipop Snowman Spoon Craft


Materials: 


Steps:


Squeeze two dots of Enamel Accents onto the spoon to make the eyes. Add five dots for the mouth, starting with the center dot to help with spacing. (If you stop at this point, you have a ghost!)


Enamel Accents is self-leveling and creates perfect little dots. It dries pretty quickly and stays on well. I don't use Enamel Accents often, but when I do I always remember right away why I love it. 

Cut a triangle of orange paper for the nose. Add a coat of Stickles for sparkle. This is optional, of course, but it makes it look so much better. Set it aside to dry. 

While the Enamel Accents and Stickles dry, make the snowman's hat. For the hat, you need a black square, a red rectangle, a black rectangle, and a tiny holly leaf. Microtip scissors come in handy. I cut two leaves and wasn't happy with the one on the right, so I just used one on the snowman. (BTW, I took a photo of all the materials, but not one of just the hat supplies. Sorry.) 


Glue the hat pieces together, then trim the brim if needed. Glue the hat and the nose to the spoon. When those are dry, twist the pipe cleaner tightly around the spoon and the lollipop, then arrange the ends to look like a scarf. Trim any excess with wire snippers. (Do not use scissors on pipe cleaners, unless you like replacing scissors frequently.)


Hurray for snowman season!