3/30/22
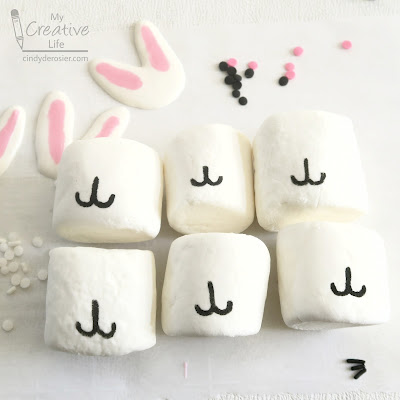
Bunny Week 2022: Marshmallow Bunnies
 Cindy deRosier has a masters in Education and taught 4th and 5th grade for 11 years. She uses that experience to blog about crafts and family-friendly educational travel. She spent many years as the Editor of Fun Family Crafts, a website with over 12,000 kid-friendly craft tutorials. Cindy is the co-author of "What Would Jesus Patent?", does freelance writing and designing, loves jigsaw puzzles, is an avid scrapbooker, and has been to all 50 states.
10/20/21
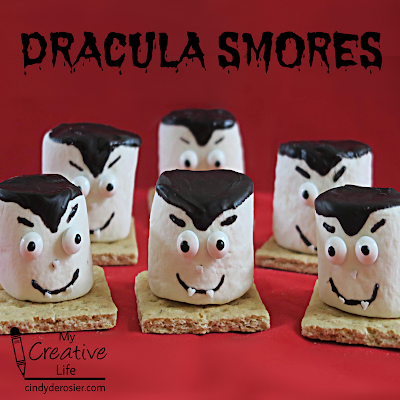
Dracula Smores
Dracula Smores
Materials:
Steps:
Verdict: This took more effort than the other methods, but it yielded the best browning and melting. I was concerned that the hair was burnt, but it wasn't. It tasted like the sugar on top of creme brulee and was nice and crackly. Yum! I think if I'd used white candy melts to attach the eyeballs, it wouldn't be as obvious that they're drooping in the finished Dracula. Next time. 7/10
 Cindy deRosier has a masters in Education and taught 4th and 5th grade for 11 years. She uses that experience to blog about crafts and family-friendly educational travel. She spent many years as the Editor of Fun Family Crafts, a website with over 12,000 kid-friendly craft tutorials. Cindy is the co-author of "What Would Jesus Patent?", does freelance writing and designing, loves jigsaw puzzles, is an avid scrapbooker, and has been to all 50 states.
10/7/20
Popcorn Cake
When I was a kid, my friends knew that when they came to my birthday party, they'd be served a money cake. My friend Rachael had a similarly-distinctive cake at her birthday parties: her mom always served a popcorn cake. Mrs. Sato made her version of a popcorn cake in a bundt pan. It had colorful mini gumdrops throughout. She served it in thick wedges we ate with our hands, like a popcorn ball. It was delicious.
I've been thinking about that popcorn cake recently. I've never been served a popcorn cake by anyone but Mrs. Sato, and Steve and Trevor had never had one. I'm not sure of her recipe, but it was basically rice krispie treats with popcorn instead of cereal, so I started from there and did some experimenting. I didn't have gumdrops on hand, but I had M&M's, so I made a chocolate version and added a drizzle of ganache and sprinkles to my popcorn cake.
While the ganache looks pretty and tastes great, I honestly think the cake doesn't need it. Give it a try and tell me if you think the chocolate adds anything, or if the plain cake is the way to go.
Popcorn Cake

 Cindy deRosier has a masters in Education and taught 4th and 5th grade for 11 years. She uses that experience to blog about crafts and family-friendly educational travel. She spent many years as the Editor of Fun Family Crafts, a website with over 12,000 kid-friendly craft tutorials. Cindy is the co-author of "What Would Jesus Patent?", does freelance writing and designing, loves jigsaw puzzles, is an avid scrapbooker, and has been to all 50 states.
7/21/20
No-Melt Banana Split
No-Melt Banana Split
What was the plot? Was there one? I literally don't remember anything about it except that I used to watch it when I was really young. Wikipedia to the rescue! And then I found this, which doesn't answer my questions, but raised a whole lot more.
 Cindy deRosier has a masters in Education and taught 4th and 5th grade for 11 years. She uses that experience to blog about crafts and family-friendly educational travel. She spent many years as the Editor of Fun Family Crafts, a website with over 12,000 kid-friendly craft tutorials. Cindy is the co-author of "What Would Jesus Patent?", does freelance writing and designing, loves jigsaw puzzles, is an avid scrapbooker, and has been to all 50 states.
11/6/15
Marbled Marshmallows
 Cindy deRosier has a masters in Education and taught 4th and 5th grade for 11 years. She uses that experience to blog about crafts and family-friendly educational travel. She spent many years as the Editor of Fun Family Crafts, a website with over 12,000 kid-friendly craft tutorials. Cindy is the co-author of "What Would Jesus Patent?", does freelance writing and designing, loves jigsaw puzzles, is an avid scrapbooker, and has been to all 50 states.
11/5/15
Pac-Man Marshmallow Treats
---------
Pac-Man Marshmallows
Materials:
- large marshmallows
- Wilton Candy Melts (yellow, red, white, blue, and orange)
- Wilton Candy Eyeballs
- waxed paper
Steps to make the ghosts:
Melt one color of candy in a small bowl. Drop a marshmallow in and swirl it around until it's completely covered. Lift it out with a fork and let it drain slightly. When it's done dripping, transfer it to waxed paper. Let it cool for a minute or two, then put the eyeballs in place. If they slump downhill, remove them and wait another minute and try again. Or leave them that way, like my Clyde (orange). Repeat for the rest of the ghosts.
Steps to make Pac-Man:
Compress one marshmallow vertically until it is more round than cylindrical. Use kitchen shears to snip out a triangle from one side.

 Cindy deRosier has a masters in Education and taught 4th and 5th grade for 11 years. She uses that experience to blog about crafts and family-friendly educational travel. She spent many years as the Editor of Fun Family Crafts, a website with over 12,000 kid-friendly craft tutorials. Cindy is the co-author of "What Would Jesus Patent?", does freelance writing and designing, loves jigsaw puzzles, is an avid scrapbooker, and has been to all 50 states.


